lagerratrobe
Member
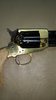
Thought I'd share my experience getting a Dixie Gunworks kit of the Spiller and Burr revolver completed. Having been very impressed with the quality of a Pietta Remington 1858 .44 that I saw at Cabelas a month ago, I decided to get a .36 with a similar design. The Dixie kit being a few dollars cheaper than the completed model, I went with it. I also happen to like kits, but I would only recommend getting one if you're comfortable filing and polishing metal. Since I could find zero information on what work a cap and ball revolver kit would entail prior to purchasing one, I hope others might find this post useful and be encouraged to try one too.
The gun comes fully assembled and packed in heavy oil. The barrel and cylinder are high quality steel and are well machined and blued. The trigger and hammer mechanism is well made and fits properly. I see no sign of stoning on the bolt, as I do on the 1858, but the cylinder locks positively and indexing seems good. The trigger feels amazing and the hammer is case hardened and fits properly in the cylinder safety notches. All the interior machining and fitting of parts is completed.
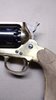
The trigger guard is not well fitted and in my case I believe it is actually machined too thin to fit the frame properly. More on this later, but I may ask Dixie to send me a replacement. Or I might figure out a way to solder some shim stock and refit. We'll see. This is the only part I'm not pleased with.
The grips are nice unfinished black walnut, cut oversize and drilled and fitted with the hardware needed to attach them to the gun. They are partially shaped, which should minimize the amount of material that needs to be removed. I'm not yet certain if this is actually a good thing in terms of getting them to look correct, but they feel nice even in their raw state.
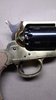
The majority of the work on this revolver lies in getting the frame and trigger guard filed smooth and polished. The exterior of the brass castings are extremely rough and coated in scale. At a minimum, several small flat and half-round files are needed to carefully grind the scale off and smooth everything to the point where it can be polished. The work could probably be done with various grits of wet dry sandpaper, but I don't recommend it. Others more talented than I could probably do the work with a rotary and/or small belt sander.
I believe that this will be a nice looking and shooting pistol when it is done.


The gun comes fully assembled and packed in heavy oil. The barrel and cylinder are high quality steel and are well machined and blued. The trigger and hammer mechanism is well made and fits properly. I see no sign of stoning on the bolt, as I do on the 1858, but the cylinder locks positively and indexing seems good. The trigger feels amazing and the hammer is case hardened and fits properly in the cylinder safety notches. All the interior machining and fitting of parts is completed.
The trigger guard is not well fitted and in my case I believe it is actually machined too thin to fit the frame properly. More on this later, but I may ask Dixie to send me a replacement. Or I might figure out a way to solder some shim stock and refit. We'll see. This is the only part I'm not pleased with.
The grips are nice unfinished black walnut, cut oversize and drilled and fitted with the hardware needed to attach them to the gun. They are partially shaped, which should minimize the amount of material that needs to be removed. I'm not yet certain if this is actually a good thing in terms of getting them to look correct, but they feel nice even in their raw state.
The majority of the work on this revolver lies in getting the frame and trigger guard filed smooth and polished. The exterior of the brass castings are extremely rough and coated in scale. At a minimum, several small flat and half-round files are needed to carefully grind the scale off and smooth everything to the point where it can be polished. The work could probably be done with various grits of wet dry sandpaper, but I don't recommend it. Others more talented than I could probably do the work with a rotary and/or small belt sander.
I believe that this will be a nice looking and shooting pistol when it is done.
Last edited: