OP
OP
troy fairweather
Member
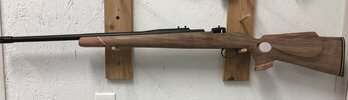
Made a flip flop recoil pad today for the winchester, I made a thread on doing it so more info there if interested.


........and Jimmy Buffet is grinning in gunsmith heaven.Made a flip flop recoil pad today for the winchester,


What a useful tool!Not a gunsmith repair but rather a nice inventory upgrade; a small bench top vise for holding small micrometers in particular. I find mic-ing small parts requires a third hand hat trick sometimes. Now, I can just hold the part in one and dial the micrometer with the other....no drama.
Micro-Mark's new offering all steel / anodized aluminum vise with a heavy non-skid base, almost one pound. Has precision fixture-like pin holes to hold round or odd shaped work pieces. $55.
View attachment 1205655View attachment 1205656View attachment 1205657View attachment 1205658
The way I get around that is to remove the switch/speed control and wire in a Singer Sewing machine control pedal. That gives you a truly full range of speed control. I'm sure you know but my diamond rotary files last a very long time since i can run them extremely slow. I hang the motor up and utilize a flex shaft and of course if I need both hands free, I chuck the handle up in my small vice. I replaced my first Dremel about 6 or so years ago with the then new Model 4000 and it's still "zipping" right along!! It gets used for hours daily as it's my most used tool in the shop (still using the original brushes!!!).The problem with the Dremel power plant, even the cordless, is that several thousand rpm is the slowest speed!
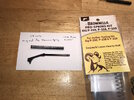
Hows your locking block holding up? IIRC, that was a particular problem area on the Helwans.On Monday I chipped the extractor shooting my Helwan 9mm (Egyptian-made Beretta 1951). A quick visit to Jack First gun parts to order a $28.00 replacement, it was here by Wednesday.
View attachment 1201889
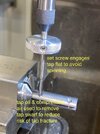
It took a bit of filing and finishing with 1000 grit wet-dry to get the new part to fit in the extractor groove in my slide.
View attachment 1201890
Once fitted, it fed-extracted my dummy rounds just fine. Hopefully I will escape to the range tomorrow to see how it functions with live ammo.
Stay safe.
You set yours up like a Fordham rotary system.remove the switch/speed control and wire in a Singer Sewing machine control pedal.


 .
.