
Frulk
Member
- Joined
- Nov 26, 2018
- Messages
- 1,584
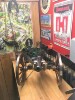
My in-laws bought this back when they were in Spain in the 70's. For 45+ years it's been sitting by their fireplace as a decoration untouched except for the occasional dusting. After I picked up the BP hobby via hunting in the early 80's I took an interest in this cannon and always remarked that I thought it was robust enough to actually shoot it. Many times I dropped a hint with the Mother in Law (MIL) that I wanted to be first in line if the cannon was no longer wanted but the Iron Ogres always passed it off and ignored it.
This past Thanksgiving Day weekend our area got pounded by snow. 16-18 inches. Since my Father in Law passed away many years ago I have the responsibility to remove snow at our place as well as the MIL's. She lives up on a ridge that has a micro climate and receives more snow than the surrounding communities. About killed me moving the white stuff.
Anyway, wife came home from doing something with her mom and I went out to meet her and lo and behold, the cannon's sitting in the backseat. Guess that storm finally put me over the top for the baseline tonnage of snow to remove for the cannon to be awarded for my efforts.
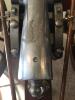
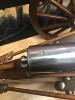
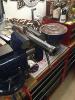
I brought it in and sat it on the kitchen countertop and took a close look at it. Milk jug was placed there for a comparative scale. After 4.5 decades everything was in remarkably good shape. The cannon had a faint patina here and there with small speckles of rust and one area that would need the bench polisher applied to it.


I took the cannon off the carriage and used the reloading calibers to confirm the bore size. EXACTLY .69 Caliber. The wife was going to clean and detail it with Olde English etc. while I worked on the barrel in-between steel wool and the bench polisher.
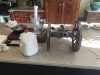
Carriage cleaned up:

Barrel being buffed up:

First 'DRY' patch after 45 years run down the inside:

First 'wet' patch with spray Gun Scrubber:

The barrel cleaned up well both on the inside and outside. While working on that I took the time to hunt down the charge weights on the internet and found this from the Traditions version of their .69 Cannon Owners manual:

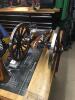
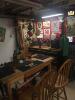
Reassembly is very easy. Replacement of a couple cotter pins and it's back together. I also reversed the wheels (they were in the wrong orientation which was probably done when it was assembled back home after the move). While we have a fireplace, I don't think it's good for the carriage wood to be that close to constant heat. That seems to fly in the face of it's history as it didn't seem to harm it or even dry out the leather that holds the ram rods. I decided to put it on display in the reloading room:


The touch hole was never drilled out. I think that may have been because it was bought as a non-firing display model in Spain. I checked the pilot hole and it's correctly aligned with the back of the bore. Once drilled out it will be where it needs to be to place the fuse in the optimum position.

I plan to use it primarily as a signal cannon (tight wadding for loud retort). Even so I do want to have the option on occasion to shoot a round ball and am going to order the Lee single mold for their .69 cal round ball. $26, a reasonable price for having that option.
Here's a video link to one of these cannons (not mine) being fired:
This past Thanksgiving Day weekend our area got pounded by snow. 16-18 inches. Since my Father in Law passed away many years ago I have the responsibility to remove snow at our place as well as the MIL's. She lives up on a ridge that has a micro climate and receives more snow than the surrounding communities. About killed me moving the white stuff.
Anyway, wife came home from doing something with her mom and I went out to meet her and lo and behold, the cannon's sitting in the backseat. Guess that storm finally put me over the top for the baseline tonnage of snow to remove for the cannon to be awarded for my efforts.
I brought it in and sat it on the kitchen countertop and took a close look at it. Milk jug was placed there for a comparative scale. After 4.5 decades everything was in remarkably good shape. The cannon had a faint patina here and there with small speckles of rust and one area that would need the bench polisher applied to it.
I took the cannon off the carriage and used the reloading calibers to confirm the bore size. EXACTLY .69 Caliber. The wife was going to clean and detail it with Olde English etc. while I worked on the barrel in-between steel wool and the bench polisher.
Carriage cleaned up:
Barrel being buffed up:
First 'DRY' patch after 45 years run down the inside:
First 'wet' patch with spray Gun Scrubber:
The barrel cleaned up well both on the inside and outside. While working on that I took the time to hunt down the charge weights on the internet and found this from the Traditions version of their .69 Cannon Owners manual:
Reassembly is very easy. Replacement of a couple cotter pins and it's back together. I also reversed the wheels (they were in the wrong orientation which was probably done when it was assembled back home after the move). While we have a fireplace, I don't think it's good for the carriage wood to be that close to constant heat. That seems to fly in the face of it's history as it didn't seem to harm it or even dry out the leather that holds the ram rods. I decided to put it on display in the reloading room:
The touch hole was never drilled out. I think that may have been because it was bought as a non-firing display model in Spain. I checked the pilot hole and it's correctly aligned with the back of the bore. Once drilled out it will be where it needs to be to place the fuse in the optimum position.
I plan to use it primarily as a signal cannon (tight wadding for loud retort). Even so I do want to have the option on occasion to shoot a round ball and am going to order the Lee single mold for their .69 cal round ball. $26, a reasonable price for having that option.
Here's a video link to one of these cannons (not mine) being fired:
Attachments
-
 cEZQNbd.jpg60.9 KB · Views: 15
 -
 aoS0FV8.jpg91.7 KB · Views: 16
 -
 3PGZqpr.jpg99.3 KB · Views: 16
 -
 DnV7Tfo.jpg87 KB · Views: 16
 -
 7bwRAqs.jpg93.1 KB · Views: 16
 -
 jXOAHSU.png248.4 KB · Views: 16
 -
 XsPfzRM.jpg185.1 KB · Views: 16
 -
 2iDGcE9.jpg73.8 KB · Views: 15
 -
 qPWXGNJ.jpg111.1 KB · Views: 16
 -
 RKgBX9c.jpg184.1 KB · Views: 16
 -
 3PGZqpr.jpg99.3 KB · Views: 6
 -
 2iDGcE9.jpg73.8 KB · Views: 6
Last edited:


")