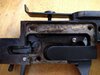
Thanks. I have that view, it gives the orientation of the spring but does not show exactly where or how it connect the the sear and trigger.
ojh cannot be contacted, I tried.
He visited recently but the only way to contact him is to post in one his recent threads or reply to one of his posts and see if he notices a plea for help to visit this thread.
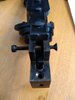
There may need to be some trial & error putting it back together and hooking up the main spring to provide some tension.
Since it's the sear spring, I would guess that it attaches to the sear, perhaps the post [trigger pin] on the sear?
One part of the sear spring is probably anchored with a point of it pressing against something such as the upper inside or side of the receiver maybe?
There is a small bit of black on the tip of the spring. Will that rest against the top or side of the receiver?
Where else can it reach? The trigger?
You need to see which position that the spring can be oriented to where it will be anchored, a place to give the spring some tension to act like a spring and provide some spring action.
But it may not actually provide spring action until the cover is put back together and the mainspring is hooked back up.
Try to think how it could have popped off when the mainspring and cover plate was released.
In an underhammer rifle, the coil sear spring rests against the top inside of the receiver I think, and the loop fits around a post.
I have no idea where your sear spring goes, but trial & error is your main option at this point.
Dixie Gun Works sells the Carleton pistol and they should have a service tech. to speak with.
Perhaps he can describe the assembly process to you on the phone or in an email.
Other than that, I can only suggest to Google search for posts made by people who own the Carleton, and then register with the site and try to contact them for help
through personal messages and see if they reply.
Additional info about the Carleton:--->>>
https://mp510sd.weebly.com/uploads/4/4/9/2/4492446/the_pedersoli_carleton.pdf
daboyleroy, I originally posted the PDF on the Weebly site after it was sent to me by a Carleton owner/seller.