
I am having the same problem with the ram pulling out of the carrier after resizing and depriming. What holds the ram in from the factory. Is there a set screw or something else. I am using carbide dies, I clean my brass, and Im loading 45 acp, Press has only loaded 200 rounds before ram pulled free. Any info please
You are using an out of date browser. It may not display this or other websites correctly.
You should upgrade or use an alternative browser.
You should upgrade or use an alternative browser.
Lee Pro 1000 Solutions < No Bashing >
- Thread starter LiveLife
- Start date
- Status
-
Not open for further replies.
OP
OP
LiveLife
Member
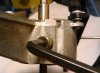
There is a hex head bolt on the right lower part of the shell plate carrier (blue arrow). Loosen the bolt and push the shell plate carrier down on the ram then tighten the bolt with an Allen wrench. (Be sure the shell plate carrier is pushed all the way down on the ram or you will crack the carrier body around the bolt when you tighten the bolt).oldfarts said:problem with the ram pulling out of the carrier after resizing and depriming. What holds the ram in from the factory. Is there a set screw or something else.
Attachments


Nice Thread!
Back in the 80's I bought my first 1000 and the colum where the primer slide pin hits the groove had only one groove. Being a Machinist getting to a lathe was no problem and I added 4 more, for a total of five and never had any more problems with primer drop.
Looks like the new 1000 has three but if you have any problems 5 would not hurt anything.
tightgroup tiger
Member
I don't fight with the chain anymore. I put a spot of locktight on the screw that holds the linkage arm on the powder measure and loosened the screw to make it run free and put a jumbo paper clip and lead weight on in place of the return chain.
I threw the return chain in the trash. This simple weight just works to well.
With the screw loosened to the proper amount the measure will return down by gravity alone but the lead weight guarentees it.
This allows me to simply pull out the entire turret with out disturbing the powder measure and dump my powder back into the bottle, then replace the entire turret in the press and cleanup is done.
This powder measure works better for me like this than it has ever worked.
Last edited:
OP
OP
LiveLife
Member
tightgroup tiger, that is neat! 
I gotta try that now.
I gotta try that now.
tightgroup tiger
Member
The only thing you have to watch when dumping out your powder is that the disc doesn't come out of the measure when you start dumping.
Just wrap you hand around the disc to hold it in when you dump and you won't spill any.
Just wrap you hand around the disc to hold it in when you dump and you won't spill any.
sellersm
Member
+1 to tightgroup tiger! That's a great idea.
bbuddtec
Member
What a great thread, thanks bds and all of you for sharing, I'm running .45auto and look forward to going through all these responses!
OP
OP
LiveLife
Member
Problem:
Very difficult to pull a case out of the sequence.
Solution:
If you raise the shell plate about half way up, it will unlock the shell plate and you will be able to rotate the shell plate freely.
Very difficult to pull a case out of the sequence.
Solution:
If you raise the shell plate about half way up, it will unlock the shell plate and you will be able to rotate the shell plate freely.
OP
OP
LiveLife
Member
Problem:
Auto indexing is too abrupt and not smooth.
Solution:
Put a drop of oil on finger tip and lightly oil the center hex rod surface then cycle the shell plate carrier several times until the auto index becomes smooth. After several hundred cycles, I apply more oil as needed.
Also, adjust the shell plate timing so the shell plate doesn't "over click". Adjust the timing so the shell plate clicks into station just before the shell plate carrier reaches the press base.
OP
OP
LiveLife
Member
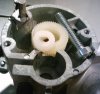
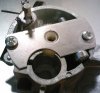
Welcome to THR. Here's how you replace the nylon ratchet gears:WSSM said:Problem: How do I replace the ratchet gear? The index adjustment screw has no effect and when I took things apart the gear is stripped where the screw contacts it.
Pull the center hex index rod out
Unscrew the two phillips head screws (blue arrows) and remove cover
Remove the nylon ratchet gears but not the phillips head bolt
Drop in new ratchet gears making sure the gear teeth mesh with the threads on the phillips head bolt
Replace cover and tighten the two screws
Be sure to clean the hex index rod and place a drop of oil on your finger tip and spread it around the rod (I use any gun oil on the bench or any weight motor oil). Insert the rod from the bottom of shell plate carrier (with the spiral portion at the bottom).
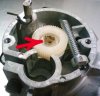
Reinstall the shell plate carrier on top of the ram making sure the shell plate carrier is pushed all the way down or you'll crack the shell plate carrier when you tighten the hex bolt. Before you tighten the hex bolt, ensure that the pin attached to the primer attachment is making contact with the frame rod to shake the primer tray as the pin clicks on the notches - this clicking/shaking action helps feed the primers into station #2 under the case.
More than likely, the shell plate timing will need to be adjusted. Cycle the ram lever and bring the shell plate carrier to the bottom. If the shell plate does not click into station, use a phillips screwdriver and turn the phillips head bolt clock-wise until it does. Cycle the ram lever several times to ensure the shell plate clicks into station as the shell plate carrier approaches the bottom.
Before you begin your reloading session, cycle the ram lever to see if the shell plate carrier slides up and down smoothly and shell plate indexes properly. If not, apply a drop of oil on the center index rod with your finger tip and cycle the ram lever until it does and check the shell plate timing. Whenever the indexing operation becomes less smooth, apply some more oil on the hex rod until it does (wipe off excess oil). Properly lubing the hex index rod will also extend the life of the center nylon ratchet gear - for me, they easily last 20,000-40,000+ cycles.
Attachments

Last edited:
OP
OP
LiveLife
Member
When you install the new gears, remove the phillips head bolt, check the metal surfaces for any burrs, apply a little oil on contact surfaces then spin the large gear to ensure smooth operation. Wipe off excess oil.
drop the phillips head bolt into place ensuring mating of gear teeth with bolt threads.
Install the cover and use a phillips screwdriver to turn the bolt clockwise - you should be able to see the nylon gear turning. If not, remove cover and inspect.
drop the phillips head bolt into place ensuring mating of gear teeth with bolt threads.
Install the cover and use a phillips screwdriver to turn the bolt clockwise - you should be able to see the nylon gear turning. If not, remove cover and inspect.
Last edited:
OP
OP
LiveLife
Member
Problem: Finished rounds slide off the shellplate by the ejection wire but lay down in the chute instead off falling off requiring a sweep with a finger to clear the rounds.
Solution: Bend the ejection wire into the shape shown below - the key is bending the wire to push out the case earlier so the finished rounds tip over/down the chute instead of sliding off the shellplate near the top to be hung up on the chute. The wire shape works well with 9mm, 40S&W and 45ACP cases - they all tip over and fall down the chute each and everytime now.

Solution: Bend the ejection wire into the shape shown below - the key is bending the wire to push out the case earlier so the finished rounds tip over/down the chute instead of sliding off the shellplate near the top to be hung up on the chute. The wire shape works well with 9mm, 40S&W and 45ACP cases - they all tip over and fall down the chute each and everytime now.
Last edited:
evan price
Member
Problem: The primers bridge in the primer tray and fail to replenish the primer chute.
Solution: My kids have these little things called "Nano Hex-bugs" which are basically little toothbrush-looking things with silicone legs and a watch battery and a tiny vibrating motor. I stuck one of them to the bottom of the primer tray with some tape and it never has fed better!

Also works great on the lid of my Auto-Disk powder measure with big flake powders.
Solution: My kids have these little things called "Nano Hex-bugs" which are basically little toothbrush-looking things with silicone legs and a watch battery and a tiny vibrating motor. I stuck one of them to the bottom of the primer tray with some tape and it never has fed better!
Also works great on the lid of my Auto-Disk powder measure with big flake powders.
Great ideas and Mod's Guys...
From Day one the Only Issue I had was just the Powder Spring... so I did something else. i used a small Bungee Cord, get em at any home supply store or wally world....
Attached it to bar, Then Bolt at my bench... works perfect every time...
And BDS... Gunna do that Wire bend for my .223 cases and see if that help... great idea and Pic's bud
I would suggest against the bungee. It takes away the safety feature of the chain. What problem was you having with the chain. I never used the spring that goes on the chain that it came with because I thought it looked to beefy so I used one from a ink pen.
Edit:
I don't want to drag this thread out on the same subject so this is to the never post. If your flare is sticking in the case enough to pull the measure all the way down your flaring to much. Just open the mouth enough to start the bullet.
Edit:
I don't want to drag this thread out on the same subject so this is to the never post. If your flare is sticking in the case enough to pull the measure all the way down your flaring to much. Just open the mouth enough to start the bullet.
Last edited:
tightgroup tiger
Member
I don't understand the point of the chain anyways, the friction on the flaring die inside the powder measure pulls the lever down on the powder measure the whole way before it pulls out of the case anyways. If it doesn't the screw on the powder measure is to tight anyways.
But!, I recently put an adjustable powder bar in mine and it didn't work so well. To tight. I cut a Hoppes cleaning patch up which mic'd at .0010" and put it between the powder measure and it's base. That loosened it up enough to work freely again. I can't see any daylight between the flexible wiper and the adjustable powder bar and it doesn't leak. Problem solved. I never take my powder measure off anyways, I pull the whole turret to dump the powder out, so shimming up the powder measure doesn't cause any problems for me.
Now I don't use stick powder in mine so I don't know how that would work and can't comment on it. My pro1000 is 38/357.
My supervisor at work had a pro1000 given to him, he wasn't very thrilled, but he set his up like I told him to and after I taught him how to time it correctly, he really likes it. He said it just runs every time he needs it to and give him no problems. He was going to buy a LNL-AP like mine but I think he changed his mind now.
OP
OP
LiveLife
Member
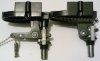
I think it was meant to "break away" as a safety feature if the hopper nuts were tightened too much and the sliding disk edge got caught on the wiper at the bottom of the hopper. If you damage the replaceable $1 wiper (Part # AD3396), your powder drops may not be consistent. BTW, when was the last time you inspected/cleaned the wiper? Can't remember? Unscrew the two hopper nuts and pop out the wiper to inspect and clean - if you don't see any damage/wear, pop it back in (you can flip it to extend the life before replacement).tightgroup tiger said:I don't understand the point of the chain anyways
That's why it comes with a spring (Part # AD2749) you are supposed to use with the chain (see below picture on the left). If you use the Pro Auto Disk without the spring, you are likely to break the chain. You could use the spring from a retractable pen as a quick fix, but the spring tension is not as strong as the Auto Disk spring.
If you don't want to fuss with the chain, you could use the return lever/spring setup used in the Classic Turret Press. Picture below on the left shows the typical chain/spring/lever used in the Pro 1000 and on the right shows the lever/spring used in the turret press. If you want to switch over, you'll need the $2 lever (Part # AD2309) and the $0.50 spring (Part # AD2296).
Attachments
Last edited:
- Status
-
Not open for further replies.
Similar threads
- Locked
- Replies
- 46
- Views
- 11K
- Locked
- Replies
- 200
- Views
- 35K
- Replies
- 18
- Views
- 4K
- Replies
- 13
- Views
- 1K