Pietta Frame Defect?

Status
Not open for further replies.

Springfeld

Member
Joined
Apr 30, 2018
Messages
70
Location
South Georgia
Has anyone else noticed this defect on the Pietta 1851/60 revolvers? I'm just curious if any others have guns with this same defect?

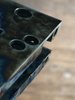
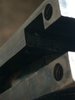
This is a 1851 navy 36 cal, that I just ordered and am going to exchange in hopes of a better frame.
Sorry if their hard to see, I tried my best to get a clear pic!
 

Attachments

  • A78799E8-E2CA-436A-9AE3-A5AA9B1EA1FE.jpeg
    A78799E8-E2CA-436A-9AE3-A5AA9B1EA1FE.jpeg
    60.3 KB · Views: 139
  • AE719EC2-0186-479B-998C-87F33E31CD18.jpeg
    AE719EC2-0186-479B-998C-87F33E31CD18.jpeg
    51.9 KB · Views: 140
Not a problem at all - it's a known issue with Pietta. The hole for the trigger screw is very close to the channel and sometimes when manufacturing tolerances stack this happens. You still have plenty of threads left - just smooth the hand channel with a needle file, assemble and proceed to have fun with your new revolver.
 
A needle file will fix that. Besides, it is under the trigger guard, hidden from view, and has no bearing on how the gun functions. You are in possession of a Pietta repro, and I have 8 different Pietta 1851 Navy .36 "type" guns made by them. Once you shoot it a few times, post some pics on how much you dinged it up.

If you want perfection for at least 3 times the price, get a Colt 2nd gen or better. Piettas serve my needs well.

Jim
 
I bought a Pietta 1863 .31 cal. It had pits and casting flaws throughout. I called Dixie where I bought it and they sent me out a new one immediately. I'm sure the flawed one didn't make it back to Dixie by the time I received the replacement.

Pietta doesn't seem to have much quality control. I do have another Pietta that was fine.
 
I had a 1860 Army with the exact same defect and it preform well except the screw never would stay tight as the bolt hole was actually a shape of a C instead of a O
 
I've seen a few posts describing this same issue on other Pietta's. I have a Colt 2nd Gen where the wedge screw hole is almost like that, just paper thin metal between the wedge screw hole and the wedge slot. In fact I have even seen an original 1851 Navy like mine.
 
If anyone could look or knows if the Uberti Replicas have this same defect? I would appreciate it. This Pietta overall is good, just curious if the Uberti's are the same and if not I may upgrade to an Uberti.
 
If anyone could look or knows if the Uberti Replicas have this same defect? I would appreciate it. This Pietta overall is good, just curious if the Uberti's are the same and if not I may upgrade to an Uberti.

If you "upgrade" to an Uberti, and you use it as a shooter, be aware that the Uberti arbor/arbor recess in the barrel lug is short. The wedge will move the barrel/cylinder clearance depending upon how far the wedge is driven in.

Not a good thing. Piettas do not have that problem. Old story told again and again. Your call.

Jim
 
If driven in too far, can either of your Pietta wedges cause the cylinder to lock up from the gap being too tight?
 
Last edited:
Well, a lot of folks don't realize that the wedge is to be driven in and "just so far" isn't the protocol. The Pietta's are fixed somewhat (a little too much for me but, not bad) and as Jim says, the Uberti's still have the "short arbor" problem (as well as ALL older Italian copies including older Pietta's). That said, the fix is easy enough and close to a moot point (as long as it gets addressed). With Uberti's superior action parts, it is a premier revolver!! They can all be made to be awesome and excellent examples so I'm not picking one over the other necessarily.

Mike
 
If you "upgrade" to an Uberti, and you use it as a shooter, be aware that the Uberti arbor/arbor recess in the barrel lug is short. The wedge will move the barrel/cylinder clearance depending upon how far the wedge is driven in.

Not a good thing. Piettas do not have that problem. Old story told again and again. Your call.

Jim

Indeed it is common knowledge that the Ubertis have short arbors. Here's my fix to the short-arbor problem.
 

Attachments

  • Colt arbor fix_r.JPG
    Colt arbor fix_r.JPG
    69.6 KB · Views: 46
NC,

That is a good fix for the problem. If you have one revolver with two or more barrels dedicated for that gun [such as an octagon barrel (Navy) and a part round/part octagon barrel (L&R)], a better solution (IMO) is to use .001"-.002" shim washer(s) as needed secured in the bottom of the arbor recess for each barrel. That way, the arbor retains the original look for anyone who is picky about those things (such as a prospective buyer, who won't have a clue that the problem is fixed).

I have a 25-year-old ASM 1860 Army that does not have the Uberti arbor problem/issue, even though a new Uberti full-fluted cylinder fits the revolver very well. I know that cylinder fit has nothing to do with arbor fit.

Jim
Also have one I interchange barrels,had to shim the arbor hole in the barrel as they were different depths.
 
Here is my take on this.

https://www.superiorwasher.com/wash...s=&cid=6&facetNameValue=Thickness_value_+.001

https://www.superiorwasher.com/wash...s=&cid=6&facetNameValue=Thickness_value_+.002

Once you have the washers in hand, figure out the total thickness you need and do a dry trial in the arbor bore. Once you are satisfied, remove them, remove any oil from the recess, and use a well-oil-soaked (release agent) round wooden toothpick to align them for concentricity, and superglue them together. Once the superglue is set, remove from them from the toothpick and let them set for about 30 minutes. Remove any excess glue from the shim, use the arbor (or a same diameter wood dowel) and apply a fair amount of grease (release agent) to the end of either so that the shim temporarily adheres/sticks. Apply superglue to the bottoming end of the shim and immediately push it home. Let it set for about a minute and then pull the arbor/dowel out. Let the glue dry for quite a bit, clean the end of the arbor, clean the arbor recess, and check.

You should be good to go.

Jim
 
Status
Not open for further replies.
Back
Top