Putting a little more power in a $15.00 Daisy

Finally got it sorted, then lost the handle just as quick. Before I lost it, I took these as an example. The screen could have been made larger but I didn't realize it until too late.

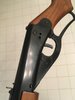
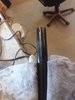
Top is a model 75 abutment, or where the abutment used to be. You can make out the legs on the compression chamber sleeve that captures the abutment- they've been broken off by the hack who beat the abutment out of this gun. Under it is a beater model 96 intact abutment from both sides.

zRVBVNs.jpg

Maaw3nm.jpg
 
I should add that the 1 meter length is from the usb connector to the tip of the lens, so the usable length depends on how close you can get the device the 'scope is connected to, to the work. If I were to do it over again I would go for a longer cable to be on the safe side. But it's plenty long enough for seeing inside an airgun. The cable was stored in a loop so it has taken on that shape when unfurled so I've used an 18" length of small bore aluminum tubing to slide it into so it can be more easily directed to what and where I want to see. I suspect that will be an issue with any of them. No biggie but something to keep in mind.
 
  • Neat information Thanks.
  • Those last two photos are impressive for the cost. Went to your link and about 50 items showed up. I don't know which one you have.
  • PS: you need to clean your gun. :rofl:
 
Yeah, I let that one get just a little dusty!

The one I have is: https://www.banggood.com/Bakeey-6-L...Xiaomi-Samsung-PC-p-1140496.html?rmmds=search At least it looks similar. These things could be made by a different manufacturer by now- I got mine 3 years ago almost to the day. Prices have come down, now the 3 meter costs the same as my 1m unit cost. The 1m units are sold out, were probably a dollar less.
 
Last edited:
Just ordered one. Looking forward to trying it out. Thanks for the idea.
 
I hope you like yours. The one I have is supposed to work on an Android device and smartphone (I know nothing about them) but mine only has a standard USB connector. I hear the newer phones don't even have a way to plug things into them, have to u$e their workaround.
 
I looked at my tonsils...
index.php
That's really funny :rofl:
 
Today I decided to tackle the loose abutment. Disassembled the gun and watched the abutment while turning the barrel. The abutment wasn't turning. Had to be the funnel turning on the barrel so I pulled hard and off it came. Buggers, I forgot to tighten the nut. Took the abutment out so I could install the the second magnet.
Next was the front sight. Something had to be done with it. Drilled out the spot welds without going through the barrel. Go Slow with a low RPM drill if you do this or you will go through. Then Sanded the end of the barrel and using soft silver solder filled the dimples and soldered the seem in the bottom of the barrel. Filed the solder down in the dimples then emery cloth and then sanded it. After a light coat of semi gloss black Took these photos. Will eventually repaint the whole thing.
thumbnail (1).jpg thumbnail (2).jpg thumbnail (5).jpg thumbnail (3).jpg
thumbnail (7).jpg
Now that the end of the can't split the funnel doesn't wobble around when tightened down and the barrel extension is nice and solid. Velocity is now consistently in the middle 470's and just to prove to myself this was worth the effort I picked off my first English Sparrow at 13 yards with it. Those blasted things drive the Purple Martins nuts. I think this is going to be Keeper for sure. Now for the stock work.
 

Attachments

  • thumbnail (4).jpg
    thumbnail (4).jpg
    103.3 KB · Views: 14
Last edited:
That's really funny :rofl:
Today I decided to tackle the loose abutment. Disassembled the gun and watched the abutment while turning the barrel. The abutment wasn't turning. Had to be the funnel turning on the barrel so I pulled hard and off it came. Buggers, I forgot to tighten the nut. Took the abutment out so I could install the the second magnet.
Next was the front sight. Something had to be done with it. Drilled out the spot welds without going through the barrel. Go Slow with a low RPM drill if you do this or you will go through. Then Sanded the end of the barrel and using soft silver solder filled the dimples and soldered the seem in the bottom of the barrel. Filed the solder down in the dimples then emery cloth and then sanded it. After a light coat of semi gloss black Took these photos. Will eventually repaint the whole thing.
View attachment 839467 View attachment 839468 View attachment 839471 View attachment 839469
View attachment 839478
Now that the end of the can't split the funnel doesn't wobble around when tightened down and the barrel extension is nice and solid. Velocity is now consistently in the middle 470's and just to prove to myself this was worth the effort I picked off my first English Sparrow at 13 yards with it. Those blasted things drive the Purple Martins nuts. I think this is going to be Keeper for sure. Now for the stock work.[/QUOTE

Are you planning any sort of front sight on the extension? You are doing some really fine work! Thanks for your input!
 
Today I decided to tackle the loose abutment. Disassembled the gun and watched the abutment while turning the barrel. The abutment wasn't turning. Had to be the funnel turning on the barrel so I pulled hard and off it came. Buggers, I forgot to tighten the nut. Took the abutment out so I could install the the second magnet.
Next was the front sight. Something had to be done with it. Drilled out the spot welds without going through the barrel. Go Slow with a low RPM drill if you do this or you will go through. Then Sanded the end of the barrel and using soft silver solder filled the dimples and soldered the seem in the bottom of the barrel. Filed the solder down in the dimples then emery cloth and then sanded it. After a light coat of semi gloss black Took these photos. Will eventually repaint the whole thing.
View attachment 839467 View attachment 839468 View attachment 839471 View attachment 839469
View attachment 839478
Now that the end of the can't split the funnel doesn't wobble around when tightened down and the barrel extension is nice and solid. Velocity is now consistently in the middle 470's and just to prove to myself this was worth the effort I picked off my first English Sparrow at 13 yards with it. Those blasted things drive the Purple Martins nuts. I think this is going to be Keeper for sure. Now for the stock work.

Are you planning any front sight on the extension? Really fine work! Thanks for sharing your work!
 
Are you planning any front sight on the extension? Really fine work! Thanks for sharing your work!

Not at this time. I'm using a reflex sight and like it a lot. I need a higher comb and more drop at the butt end of the stock. Longer length of pull would be nice also. I'm about 6' 2" so a little more would should be nice.
index.php
 
Spent some more time with the gun this afternoon and like it more and more. Thank you guys for your suggestions. This was a fun project.
The more I look at the gun the more I like the forehand stock the way it is. The palm of my left hand fits perfectly around the end of it. The butt stock is going to need some changes. The barrel extension is staying tight and accuracy is holding good. Mark you were right, the barrel was oily to the point that the BB's didn't want to go down to the magnets.
As of today this is the way it looks.
thumbnail (8).jpg
 
Last edited:
Spent some more time with the gun this afternoon and like it more and more. Thank you guys for your suggestions. This was a fun project.
The more I look at the gun the more I like the forehand stock the way it is. The palm of my left hand fits perfectly around the end of it. The butt stock is going to need some changes. The barrel extension is stay tight and accuracy is holding good. Mark you were right, the barrel was oily to the point that the BB's didn't want to go down to the magnets.
As of today this is the way it looks.
View attachment 839519
That looks great! I remember when I got up around those mv’s. Punching holes through both sides of tin cans. But nothin like yours did to that steel barrel!
 
Cobalt, Hinz, and others- excellent work keeping these wonderful little rifles updated and relevant. I need some advice- I got my mid 70s RR back from my parents attic. It’s in fairly good shape and was used well by me and my nephews but not abused. What would you recommend I do to it? I’d like to keep it working for a new generation. I’m not on a quest for 500, would just like a reliable rifle with a little higher MV(400 FPS) for flatter shooting. Should I just replace the spring with the new version? Modify the shot tube or leave it alone? Replace the seals? I’m not a gunsmith but I can use tools. Thanks, there may be others like me out there that just want to keep them going.
 

Attachments

  • 5D119F48-49F8-4916-99A6-6C2D707F6235.jpeg
    5D119F48-49F8-4916-99A6-6C2D707F6235.jpeg
    44.8 KB · Views: 59
  • 41000726-1952-4AB6-BAC8-26B423C5DBDC.jpeg
    41000726-1952-4AB6-BAC8-26B423C5DBDC.jpeg
    58.9 KB · Views: 56
Cobalt, Hinz, and others- excellent work keeping these wonderful little rifles updated and relevant. I need some advice- I got my mid 70s RR back from my parents attic. It’s in fairly good shape and was used well by me and my nephews but not abused. What would you recommend I do to it? I’d like to keep it working for a new generation. I’m not on a quest for 500, would just like a reliable rifle with a little higher MV(400 FPS) for flatter shooting. Should I just replace the spring with the new version? Modify the shot tube or leave it alone? Replace the seals? I’m not a gunsmith but I can use tools. Thanks, there may be others like me out there that just want to keep them going.
Wow! That must be the cleanest1938 I’ve ever seen. I would love to have one. I’ve not had the chance to do a project with one of those but I know what I would do.

1- Cobalt HP spring and washer
2- new plunger seal
3- drill a new style air tube to 1/8”
4- new abutment seal
5- use a new model 25 shot tube assy, this requires a bit of barrel shroud extension.

6- this is a bit tougher. Use a Hinz custom air tube.

Since I’ve never actually done this project, I don’t know about 400mv. Maybe....

Definitely save all your original pieces!
Thanks Hinz. Do I need a preload if I use the Cobalt HP spring? If I drill the tube I’ll stick to 3/32” as I’ve heard that is easier to do. If I don’t get 400, that’s fine. 300+ consistently will be good. Would a new shot tube be better to drill than the original? I know I get the HP spring from Cobalt and the other parts from Daisy or is there a better source?Not looking for a real big project. Appreciate the info.
 
Thanks Hinz. Do I need a preload if I use the Cobalt HP spring? If I drill the tube I’ll stick to 3/32” as I’ve heard that is easier to do. If I don’t get 400, that’s fine. 300+ consistently will be good. Would a new shot tube be better to drill than the original? I know I get the HP spring from Cobalt and the other parts from Daisy or is there a better source?Not looking for a real big project. Appreciate the info.
No preload.

The new mod 25 shot tube is significantly better than the original. It’s a little longer, but a clever muzzle extension can be made using a short piece of 3/4” copper tubing an a 3/4” copper repair coupling.

If you drill the original seamed air tube, 3/32” is the limit. If you get the new seemless style, you can get to 1/8”.

I order my parts from daisy if it’s new production parts.

I’m pretty sure that you would be looking at 350+ with these mods.

Maybe cobalt will put in his opinion. He has done a very similar project which is documented early in this thread.

That is a project I really want to do. Someday I will find a deal a on a 1938 RR!

Good luck! I really want to hear how this turns out for you!
Many thanks. 350+ sounds perfect. Will be ordering this weekend. Hope to hear from Cobalt.

Have you upgraded an 880 yet? I bought one with Christmas money at WM. Always wanted one. Wow, with the mods that thing is powerful!
 
Many thanks. 350+ sounds perfect. Will be ordering this weekend. Hope to hear from Cobalt.

Have you upgraded an 880 yet? I bought one with Christmas money at WM. Always wanted one. Wow, with the mods that thing is powerful!
No on the 880. I have one of the 20th Anniversary models, courtesy of Cobalt. The plan is to make a replacement smooth full length shot tube for bbs, using 2 499 shot tubes. It’s been on the back burner due to other projects. I do look forward to working on it. That a really different world than the old daisy lever action shooters! Glad you like yours!
 
I was at Walmart yesterday and saw that they had a Red Rider in a white box (didn't open it) with, I believe, blue lettering, has to be new production priced at $24.95 .

I couldn't find any model numbers anywhere so I have no idea what model it might be.
Any guesses?
 
Wow! That must be the cleanest1938 I’ve ever seen. I would love to have one. I’ve not had the chance to do a project with one of those but I know what I would do.

1- Cobalt HP spring and washer
2- new plunger seal
3- drill a new style air tube to 1/8”
4- new abutment seal
5- use a new model 25 shot tube assy, this requires a bit of barrel shroud extension.

6- this is a bit tougher. Use a Hinz custom air tube.

Since I’ve never actually done this project, I don’t know about 400mv. Maybe....

Definitely save all your original pieces!
Thanks again Hinz. Which part do I order for the abutment seal, the shot tube assembly or the plunger assembly? I would like a larger shot tube but don’t want to do a barrel tube extension. Does the model 25 fit a 1938 RR? Also, I don’t have a drill press so I’m worried about drilling the existing to 3/32” by hand. Maybe Cobalt or you might have one for sale.
 
You have a very nice RR there. I think your on the right track when asking for advice. The guys here will help assure your project will be a success.
Good luck and enjoy your gun.
 
Back
Top