Ruger Red Label buttstock repair.

Status
Not open for further replies.

GunnyUSMC

Member
Joined
Jan 3, 2012
Messages
9,142
Location
Denham Springs LA
I was asked back in November if I could repair the buttstock for a Ruger Red Label.
As the story goes, a trap shooter was having a bad day and lost his temper and took it out on the gun by hitting a tree.
He then sold the gun to the guy that asked if I could fix it. He just wanted it useable and said that looks were not important.
I had a look at it and said that it could be repaired, but I was busy with some things and that it may be late December or early January before I could have it finished.
I didn’t start on it until a few days before Christmas.
FE4A8D3B-ED56-410B-AB5E-A8C29E2A0BEC.jpeg

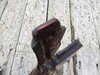
From the break you can see that the right side of the buttstock was used to strike the tree. The left side of the wrist was almost broken off and the tab of wood that fits under the right rear of the action is broken off.
D6DFA87A-BE42-4867-97DC-B40861CE453D.jpeg C1B79D0D-41EC-4906-92F5-BAFFDF565286.jpeg

The hardest part of the repair is where the break ends in the checkering. I’ve never been good with checkering and I don’t have a checkering tool. But I made do with what I had.
F44764A7-FF51-49C9-A673-482E35B55633.jpeg CB1FE0C8-5E51-48DA-9EAA-09FFCFACA9C1.jpeg

The repair is pretty much straightforward. Drill into the cracks and secure with resin and dowels. Replace the missing wood on the inside right of the stock and make it look nice.
5E2A419C-7DFC-4AFF-BC81-830BBF4847A0.jpeg 711D0B56-C92B-49AE-A342-6D7DC29D8EF8.jpeg 883F4FF8-96A0-42F0-94A6-164F9CD85A4D.jpeg
 
First was to clean the crack of dirt and oil. I just flushed it out with denatured alcohol.
Next was to clamp the crack shut and drill the holes.
99E128B1-FFA6-4813-8FF8-D9D9BAA2B2AE.jpeg

I drilled three holes into the wrist from the inside to just beyond the break. This will allow for a fiberglass wrapped dowels to be inserted.
7EB37F54-902E-4C23-9FA2-3EEF035D134D.jpeg D6CEFE4A-CA4C-4104-A575-81885750696A.jpeg


Here are the dowels, test fitted.
2E3FEF1B-7F9C-4954-B9E2-237558FA9CE0.jpeg

And here they are in place with resin. Before the dowels were put in, the resin was worked in by flexing the stock.
The outside of the stock is coated with paste wax.
9F34CA54-DC35-4F68-A2C4-C6C73E403E13.jpeg
97EDAB33-9E3C-411B-A91A-8B89FE24C45A.jpeg
80A58517-846E-4D95-B4C4-CDC9DE335B53.jpeg

Remember I told you the checkering was going to be the hard part.
49FF4FF7-4209-44BF-8061-B89FB0B34797.jpeg
9B133ADA-E2F0-4DA3-8927-449D7E8F2839.jpeg

I have to charge my iPad before I can finish the post. Will be back shortly.
 
Would have been an easier repair if the guy had shot the innocent tree instead! Call a tree surgeon!? Nice work Gunny, I'm on pins and needles to see the finished repair. Great pictures too.
 
Here are the next two steps in the repairs.
With the resin cured it was time to dress up the dowels and remove any extra resin.
A0E89138-C311-4A71-9CFF-AC322D6C986D.jpeg 2997BE4D-F4DC-45CA-9912-91E985923839.jpeg

I used a high speed mill bit on my Dremel Tool to clean up the area.
DF959873-D969-4E09-83FD-697033050AA8.jpeg C72C4959-A5EC-4962-9AA4-62A3685C0E71.jpeg 8A2CFA3B-D809-48D7-989A-E3603D42C603.jpeg

Then I went to work on the checkering. I’m not good at checkering, never have been. I guess that’s one reason I don’t have any checkering tools. But I have a lot of hand files. This part of the repair took the longest.
8A0720BB-0A55-4B62-83B4-D8F5838705F1.jpeg 6E5EB5C5-3C7B-4F22-BA9B-50A8944EF5FB.jpeg ACED3C97-713F-428C-ACEB-CAB62614316E.jpeg
 
Then it was time to address the pice of missing wood. There was no need to try and match the wood because it would not be seen when the stock is on the gun.
First was to cut the area flat and then splice on a piece of wood.

73FA27BD-4CA6-4227-89F5-EAB6562021BB.jpeg


665D2975-703C-47ED-93D0-931083D65460.jpeg 589F3D1D-82F8-4296-9B9F-94450A511E63.jpeg 1294AD61-6BBB-4DFB-A097-A021920464EC.jpeg

But as you can see in this pic, there was some damage to the left side of the wrist area also
6283D672-5FEE-4735-BD06-7AADE4AB2D99.jpeg

To secure the crack so that it would not continue to travel down the stock, I drilled a hole into the crack
81E62E85-54A4-4A4E-817A-EFA3B3B4E3A5.jpeg 7778889C-33C5-4CC4-80E3-8AD1632881E9.jpeg 9F90A44D-3A09-464D-AD8E-CE3BC6D08430.jpeg

This pic shows how far the dowel will go into the stock. The hole is drilled just pasted the end of the crack..
14694DAA-CB1B-4325-B659-29A0E2ED9384.jpeg

I applied resin into the hole and flexed the crack to work the resin in. I also cut a piece of wood for the piece that was missing. To make sure the new piece of wood would adhere strongly, I cut small notches in the two surfaces that would meet. Everything was clamped up and wax paper was used to keep any resin from sticking to the clamps.

740483E8-5CB0-4EAE-A5A0-4A3CB0F10880.jpeg
 
Last edited:
Here it is with the clamps removed.
FB811D1A-1BAA-472E-AF13-18EFA37D7907.jpeg

As you can see, the piece of wood needs to be trimmed so that the action will fit.
05BBC984-33A7-40CF-BB2A-F16B0BC2EBAD.jpeg 581CF95B-8338-457D-91C7-619FE9F5518B.jpeg E2065656-39D2-4BA9-866E-849176E76694.jpeg 0E9DF6EB-D8A9-442A-BA30-F4216B251999.jpeg

I used an alcohol base stain to stain the piece of wood I added and used Tru-Oil to blend the finish.
12C59E1F-B98B-4962-BBFE-7A96DC16E187.jpeg D9D4E074-0A50-4D53-9A74-F8886965B25D.jpeg F1330214-930E-4203-B054-D0739E8F344D.jpeg 281F8426-8F97-48C8-BAA4-4AA1A534AAEC.jpeg
 

Attachments

  • 14E47CF0-FA6F-40E9-896C-D806FFB39F19.jpeg
    14E47CF0-FA6F-40E9-896C-D806FFB39F19.jpeg
    150.6 KB · Views: 3
Looks good. Your skill with stocks makes me a bit envious. Clearly you have more patience than I do, and a lot less inclination to rush through stuff. I have a similar break on my crescent WPW that I bought this past year and it has some “period” corrections that aren’t so great. I might just have to search a few of your posts to use as a how-to guide. Thanks for posting such detailed photos.
 
Looks good. Your skill with stocks makes me a bit envious. Clearly you have more patience than I do, and a lot less inclination to rush through stuff. I have a similar break on my crescent WPW that I bought this past year and it has some “period” corrections that aren’t so great. I might just have to search a few of your posts to use as a how-to guide. Thanks for posting such detailed photos.
I have found that by breaking a repair down into steps, it becomes easy. And by doing one step at a time, you don’t tend to rush.
 
How does one keep the drill parallel to the surface of such thin stock material without poking thru the surface and creating more problems?
You must have the right tools and a good eye. I have neither. That's why I pay my gunsmith when I need to. You do good work Gunny!
 
How does one keep the drill parallel to the surface of such thin stock material without poking thru the surface and creating more problems?
You must have the right tools and a good eye. I have neither. That's why I pay my gunsmith when I need to. You do good work Gunny!
I bought a drill press a few years ago, but haven’t taken it out of the box yet. I pretty much do everything by eye.
When I drill into a thin area, or have to be close to the surface, I just rest my finger on the stock and stop it it starts to get to warm.
But for anyone that is trying to do it, just go slow.
 
That's some very good wood work on that stock, you can be proud.

Having owned a Red Label I know why the original owner did what he did. It was good for a few years after which it spent more time with a gunsmith than with me.
 
That was some of the best work and one of the best posts that I have had the pleasure of reading Thanks for posting
 
You 'da man!

What a great job. And your humility, while refreshing, is misplaced in this arena. I don't know of anyone else who could have done a better job, even including the problem in the checkered area.
 
You 'da man!

What a great job. And your humility, while refreshing, is misplaced in this arena. I don't know of anyone else who could have done a better job, even including the problem in the checkered area.
The problem I have is that I see all the imperfections in my work. I always fill that I could have done better.
But over the years I have learned not to judge the imperfections of my work, but to let others.
 
Excellent work, Gunny! I had a checkering set many years ago, they got lost in a move or sold at a garage sale, don't know which. I was ok with it, but doing it with files, that's pretty tedious work!
 
Status
Not open for further replies.
Back
Top