hotshot357
Member
- Joined
- Dec 2, 2018
- Messages
- 176
That looks really good. Be sure and post some pics when it's got everything mounted on it !!!!We like to see the finished product !!
Absolutely will do!That looks really good. Be sure and post some pics when it's got everything mounted on it !!!!We like to see the finished product !!


 This weekend officially started my basement conversion into a work station for reloading and will include a desk to do my bill-paying job. While organizing the basement I found (rediscovered) a 10' long solid maple 1 1/4" thick sitting on the carpet buried under boxes and whatnot. Score!! I knew it was there but had forgotten about it because it was buried and up until now I had no specific use for it. Justification for keeping "things" around, I guess...
Considering installing a T track system into the benchtop. Does anyone have a recommendation for a quality track system? Will also need to find the hardware to connect an Inline Fab Ultramount to the track system.
An "un-named" image host held my previous photos for ransom...I refused to pay.
Like being organized, so everything has a storage place and purpose. Loaders are mounted using a quick attach rail system that is recessed into the bench top. Can swap out loaders in seconds and clear the bench for other purposes if necessary.
View attachment 893441
View attachment 893442
View attachment 893444
View attachment 893445
View attachment 893446
View attachment 893447

It would benefit THR members is you could do an instructional piece on how you integrated the integrated quick attach rail system. My bench is cluttered and that system might provide the solution to getting better bench top space.


Started with two lengths of 8020 extrusion (1"x 2"), used a router to recess rails flush with bench top. "T" nuts are used on both the top and bottom of the rail....bottom to secure rail to the bench and "T" nuts in the top to attach reloading mounting plates. Mounting plates are made from 1/2" and 3/4" PVC sheet.....strong and won't mar bench top when sliding. Could use aluminum or wood as a substitute. Advantage of long rails is that loaders can be slid along to different positions or out of the way by loosening attachment screws.
Can have endless mounting plates for any number of items....cleaning station, vise, loaders, etc. Very important to keep rails parallel to each other or mounting plates could bind and plates might not line up. Have been using this for about 15 years. Hope this helps.
View attachment 938073
View attachment 938074
View attachment 938076
View attachment 938077
View attachment 938078
View attachment 938079
View attachment 938080
View attachment 938081


Them fancy-dancy Inline Fab aluminum plates that go in the red containers ? Pull them out of the slot, turn them 180* so the printing is in. Stick 'em back in the slot.All mounted up. I will clean the area and start 357 loads tomorrow afternoon. The Inline Fabrication Micro was just the ticket for sitting or standing. (Mashed my first case during bullet seating: 1-3/4 more turns out for Magnum cases.). View attachment 938825
Started with two lengths of 8020 extrusion (1"x 2"), used a router to recess rails flush with bench top. "T" nuts are used on both the top and bottom of the rail....bottom to secure rail to the bench and "T" nuts in the top to attach reloading mounting plates. Mounting plates are made from 1/2" and 3/4" PVC sheet.....strong and won't mar bench top when sliding. Could use aluminum or wood as a substitute. Advantage of long rails is that loaders can be slid along to different positions or out of the way by loosening attachment screws.
Hooda Thunkit, yes and good idea. I will give that a shot. I'm impressed with the Inline Fabrication set-up and service so far.Them fancy-dancy Inline Fab aluminum plates that go in the red containers ? Pull them out of the slot, turn them 180* so the printing is in. Stick 'em back in the slot.
The boxes will hold more before you need to dump them.


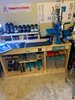
Looks like a solid setup to me. I would feel the need to load.i try to build a reloading room like you see online but i always get distracted and start reloading ammo instead.

looked at your room ,thought i was in mineView attachment 831150 View attachment 831151 I have really enjoyed seeing all the benches. Here is mine in all its glory. The Lee presses (not shown) are on quick change plates to swap with the SDB. This is actually after about an hour of cleaning.