What clever little things have you "invented or discovered" that you can share?

Just for the record, Remington brass should not be marketed due to wall thickness that will cause not enough neck tension.
Just to add to that, I have been reloading 22 rim fire. The ONLY cases that are too thin to reuse (unless you load them very very light) are Remington. Even the first firing often times shows severe malformation. I have noticed that in 2 different guns.
 
To eliminate the small walk related to the Trim-it II case trimmer.

Add a small ~0.006" shim to the back side when you tighten the apposing set screw. Depending on what clearance you have you may need more or less. I used a piece of business card. The fix is to add additional set screws so you can adjust it easily. Even on on the back side will work. But adding 2 120° apart will make it solid. Use the brass head set screws so you don't damage the finish.
 
straighter seating

I had trouble with bullets being off center when starting to insert them into the case mouth. I just seat them 1/2 way or so, turn the cartridge case 1/2 way around, and finish seating to the finished depth. This works with rifle, and pistol ( lead bullets) bullets.
 
Have been trying to load 22tcm on my Dillon 650xl. One of the issues has been using the case feeder and not having the cases drop into the first station. Dillon doesn't make an adapter for the 22tcm case, I've tried using the 223 adapter, jams due to the slot too high, 9mm doesn't work. So I took a 6.5 Grendel case and cut it off and inserted in the 223adapter. The 22tcm cases fall through and I positioned the insert so that the cases just clear the insert. So far not one jam or hung case. Works great. Can be easily removed if I load 223.
 
Reviving an older thread. Now while I didn't invent it or think of it. I didn't want to wait another week to finish swaging 9mm brass. So I took a 4" grade 8 3/8" fine thread bolt & made a carriage for it. Just used a drill & a file. It works really well, I would have gone to our Makerspace to turn it down but didn't have the time to do so.
0DE4CB16-E55C-4BB3-9C63-01BD13A4470D_zpsc6vwtpbj.jpg
 
The police range where I shoot is notorious for looooong grass most of the time and brass tarps, nets, etc. are a must. Recently I picked up some cheap butterfly nets ($2) at the local flea market (you know, the oriental guys with all the boxes on the ground of dollar items). They have an adjustable length and the net ring is rather large and catches brass rather easily. I just stick it in the ground next to me, adjust to to right height and viola.
 
Vibrating tumbler wing nut: Replace the darned thing with a round knob from Lowes nut and bolt collection.

Vibrating tumbler: Concerned about lead? Switch to a wet stainless rotating tumbler. So clean?

Powder dregs in the bottom of the powder measure: Use a cheap long-handled flat feathered paint brush from your hobby supply store.

Bunches of brass to lube: spray Hornady One-Shot spray lube into a ziplock bag, pour in the brass, seal and rub flat on the table. Puts just enough lube on the outside of the case.
 
While your on the Vibrating tumbler. The Frankford arsenal one I bought was a nightmare getting the screws right to attach the base so I just epoxied the thing together where the screws go.
It's still going strong and better than with the screws.
 
I don't know if it's clever but I needed a coaster and this primer tray worked great :D
Cheers to the High Road.
IMAG0823.jpg
 
Got tired of getting cutd on my hands and arms from those threaded RCBS decapping/expander rods. The Red wire nuts screw on top of these rods and can be easily removed when making adjustments.
 
I came up with a couple items shown in the below picture. First I made a new side linkage for my Co-Ax press. Made it out of a square piece of steel the appropriate thickness. Used a hand saw to cut out the middle and a drill press for the holes. Makes more room for your hand.

The other thing is that I drilled small holes on the side of my reloading bench and store all the needed allen wrenches in there. You can see one in one of the pictures. I can adjust dies and the press with the right tools already there.
 
Last edited:
"Super lube"

Now there may be some lubes as good or better then this, but STP did solve a problem once upon a time.

I was reforming a goodly amount of .308 brass to .243 and was stove piping the necks on 50% or so of the attempts.

I was using an RCBS lube which had worked fine for all other sizing work I had done, up to that time.

I decided to try a bit of STP, and what do you know, NO MORE stove piped necks!!

STP is so sticky it is just a matter of getting a bit on the "dirty hand" and smearing a bit on the neck and shoulder before the sizing operation. As I said, no more problem.

However, the down side is the cleaning as STP resists normal attempts at wiping.

I just used a good solvent of some type (gas works, but be careful!), followed by a good strong hot water/soap solution.

I would be interested in something which was as good as the STP but not as hard to clean up.

Any thoughts?
I did the STP thing about 40 years ago.
Getting the stuff off the brass was too much of a hassle.

Several lube formulas later, I started using Anhydrous Lanolin melted in pure alcohol from a hardware store.
I simply spritz it lightly on a bunch of brass in a plastic sheet lined box and wait for it to flow around the brass.
By the time I put the brass through the resizing die, the alcohol has long since evaporated.

I'm pretty sure this is how Dillon's spray lube is made.

Beats the heck out of STP cleaning.

Steve
__________________
 
To remove stubborn labels from containers I first heat them with an old blow drier. After about a minute, start to peel one corner of the label where you heated last slowly away from the bottle. Use more heat if the glue is not giving up easily. When the label is off, use Goo Gone or any cleaner with orange oil in it to remove the sticky mess that is left. Hope this helps you, Too Taxed.:neener:
Use 0rdinary lighter fluid to melt the glue from the label.
Lighter fluid leaves a film so I also wipe down with alcohol prep pad and paper towel.

Steve
 
Just a couple of things:

I made a wire basket out of 1/4 inch wire cloth that loosely fits into a 5 gallon bucket.
After tumbling my brass, the entire tumbler contents are poured into the bucket.
Pull the wire basket half way out and spin it a couple times.
separated brass is them poured into a box for inspection.
Always find a few plugged flash holes.
A cut off crochet hook makes quick work of the stuck corn cob.

After reloading, I tumble my reloaded ammunition a few minutes in fresh corncob.
(with shredded dryer sheets, as suggested by several others here).
This removes the Lanolin resizing lube residue.

Cartridges are put back into the wire basket in the bucket and separated from the media.
After final cleaning, I wear soft white cotton gloves that I bought from Micro-Mark modeling tools catalog.
(When dirty, these go into the wash with my T shirts.)

Cartridges are put into 1 qt. Ziplock bags with a desiccate pack from a pill bottle and a 3x5 card with all the load data.
Bags are then put into military ammo cans for storage.

With no acid from bare finger contact, the reloads stay clean and bright for years if need be.

Steve
 
Last edited:
Here is something I have never seen anyone else try before:
attachment.php

I am working on an action based on the necked-up cartridge.
Skeeter Skelton reported on a similar wildcat designed by the famous Jug Johnson back in the 1980s.

He never followed up with the range test though.

Great minds think alike.

Steve
 
Last edited:
Duct tape can make a great patch for the crotch of your pants in a pinch......at the range:D

Oh and my uncle color coordinates his brass and lead etc. by using different colored lids from peanut butter jars, there are many colors out there, example for 9x19 he uses yellow lids and .38 super he uses green :)
Shamelessly stole your signature block.

Steve
 
Oh, man, you guys are :what:

Here I thought I had a gimmick or two, scanned through here, you guys have me beat (and have saved me some money next time I get case cleaning supplies).

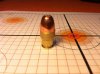
Ever wonder what to do with those extra .38 hollow base wadcutters when you reload? Or ever want some really cheap hollow points?

I loaded up a bunch of 148 grain hollow base wadcutters backwards (I suppose that makes them hollow point wadcutters) and they fly backwards just as well as they do forwards, at least in my limited testing. I haven't done any gelatin testing, but my guess is that for informal pest control, they should have really good expansion on anything the size of a groundhog or bigger.

Thanks to all of you for taking the time to share!
I experimented with reverse loaded HBWC several years ago.
I read a magazine article about it where a gas check was put on the nose.

I found that for short range they worked fairly well but were unstable and very inaccurate at longer range.

A couple of years ago, I saw an article where HBWCs were also loaded backwards, but had a single buckshot placed in the cavity to balance the bullet.
This produced a "hollow" bullet.

This I have not tried yet but thought I would mention it.

Steve
 
I have 3 Hornady Ammo plants and I have a few tricks to make it work perfectly.
1. Light it up. If you can't see the problem you can't fix the problem.
KXkCHvYl.jpg
Bi8GDlBl.jpg
BDBXUjfl.jpg
2. bullet feeder is loud. Cover it. Cuts the sound down by half.
sSMuxlxl.jpg
3. Case feeder drops case on v-block. Build a bracket that holds the pivot body solid. It only has 1 blot holding it in place and has a problem canting to the left.
XLkPaYYl.jpg
xSwypAwl.jpg
uRA4AEKl.jpg
csuxF1Ml.jpg
All so note shot gun shell on drop tube, to help hold shell on better.
 
A few years ago I was in the local dollar store and must of had reloading on my mind. I spotted a wire mesh trash can. mebbe 14" in diameter at the top and tapered down to10" at the bottom, 12" high. Makes a very good media/brass separator. Set trash can in a cat litter pan (every shop has one, right?) and dump tumbler into the can. Shake a bit and media/brass separated. Cost exactly $1.00 and no work involved...
 
I'm not sure my idea is worth anything to you guys. I'm learning from you.
I saw someone mention primer pocket cleaning, so I thought I would share this. I have an old Erector set motor that I have used for probably 30 years to clean primer pockets. I made an adapter back in the day to fit over one end of the shaft, and drilled and tapped one end for 8-32 threads. I just mount a RCBS brush in the adapter and turn it on. Takes about 3 seconds to clean a pocket.

Have a blessed day,

Leon

20150622_080016-1_zpsp61mbywl.jpg
 
Back
Top