TBJK
Member
I made my LED setup for my loadmaster with a 3/4" aluminum rod sliced to make a heat sink for it. If the heatsink wasn't there it would rapidly get to 180* plus. I then tied that into my home made case feeder power supply.


Very Clever.There's actually 2 things here. One is pretty obvious - I used to use my small bench top model drill press to uniform primer pockets and also chamfer the inside and outside of rifle brass. I found a better way to do it was to just pull the power head off the press and flip it upside down on my bench. It makes it easier to see what you're doing, it's a more comfortable motion for doing a lot of brass, and it's really easy to do (just two little set screws hold the tool on the press). I also put 4 little rubber feet on the top of the press's lid so it stays in place. It's really quiet, powerful, etc.
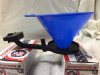
The second thing that works really well, is a brass trap I made for this setup. Using the drill press for any of the brass processing usually made a mess with little brass shavings all over the place. I made this little "trap" out of an empty 1# powder bottle. I cut both the very top and the very bottom off the bottle and taped them together with the top inverted. Then I drilled a hole in the center of the bottom for the cutting tool to go through. When I chuck the tool up in the drill, the plastic is trapped between the cutting tool and the chuck, and so it spins. When I do any kind of operation, the brass falls down into the trap, and the spinning action throws it to the outside walls of the container. It does a great job of catching all little brass shavings and any carbon residue that gets removed.
+1Use a ear foamy
I also use an old freezer to store some of my reloading components.Also, not sure if this has been posted.
Old used/non-working chest/stand-up deep freezer works well as a "good safe" in the garage (you can often find these for "free" in the classified/craigslist). They are well insulated and fairly sturdy for the intended purpose of "safe keeping" of reloading stuff (I install two heavy clasps and pad locks on the door).
If anyone breaks into my garage, they'll find the deep freezer next to the washer/dryer and probably suspect frozen food to be inside, not reloading stuff. If they try to move the deep freezer, it is anchored to the wall studs.
Of course, if the freezer is working, DON"T turn it on (mine is not plugged in, but you can't see that where it is at).


I tried to edit my last post, but was blocked somehow.I finally finished reading all 54 pages…. WOW, some great ideas.
I now have several new projects in mind.
<<< SNIP >>>
Steve


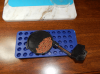
I use a Lee safety primer, and always had some difficulty when I try to fill it. When filling I use two hands to open the primer tray slowly and then drop the primers on the safety prime tray. I always had to be careful not to spill or drop any primers since I normally tried to keep the safety primer level on my lap.
After a few spilled primers I started looking around what could make life easier for me, actually looking for a third hand to hold the safety primer while I fill it.
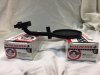
What i found, and what work well for me is a 45acp loading tray. The safety primer has plastic tabs sticking out, and the tab fits nicely in on of the tray holes. This now allow me to lay the safety primer flat, with an additional benefit that the remaining holes actually catches any spilled primers. No more trying to find spilled primers on the floor.
This picture shows the safety primer laying flat on the tray with the plastic tab inside one of the holes. It doesn't move and it is lays flat.

Try placing the empty safety prime unit (open) upside down on top of an open primer tray. Hold together securely and invert. All the primers should now be in the safety prime tray. Jiggle it a bit to turn the odd ones up, put on the cover, and you're done.
I use a Lee safety primer, and always had some difficulty when I try to fill it. When filling I use two hands to open the primer tray slowly and then drop the primers on the safety prime tray. I always had to be careful not to spill or drop any primers since I normally tried to keep the safety primer level on my lap.
After a few spilled primers I started looking around what could make life easier for me, actually looking for a third hand to hold the safety primer while I fill it.
What i found, and what work well for me is a 45acp loading tray. The safety primer has plastic tabs sticking out, and the tab fits nicely in on of the tray holes. This now allow me to lay the safety primer flat, with an additional benefit that the remaining holes actually catches any spilled primers. No more trying to find spilled primers on the floor.
This picture shows the safety primer laying flat on the tray with the plastic tab inside one of the holes. It doesn't move and it is lays flat.