What clever little things have you "invented or discovered" that you can share?

Have been reading about "Glock Bulge" in 40S&W and since I load range brass I decided I could make something similar to the Lee tool. I already had a Factory Crimp Die in 40S&W so all I needed was a case pusher and something to catch the sized cases.

I started by using a fired 9mm case and then a fired 38spl case for a pusher but both would collapse when a larger than normal (over size chamber?)40 case went through the FDC. I had some JB Weld on hand so I tried filling a 38spl case with the weld ( deprime the case so air can escape from the case when you pack in the JB Weld). After hardening I filed the filled case mouth smooth & square. It now pushes the 40 cases w/o collapsing.

For the catcher I drilled (cut) a 1" hole in the bottom of a "Cool Whip" container to insert the FCD and tighten the container between the die lock ring and the press. Added a 3/4" copper pipe connector to raise the case discharge above the top of the FCD but I don't think it is needed.

(Hint) Put the lid on the container as some of the shells require extra effort(case lube helps even with the carbide die)to go through the die and when they do go through will eject out above the top of the container and onto the floor without it. Also found it best to start the 40 shell into the die by hand & then bring the ram/pusher up under it.
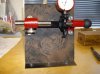
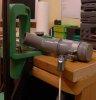
I reversed the operation, no wait - I reversed the orientation of the case.

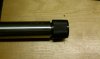
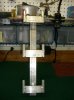
I used the depriming rod on a mandrel fitted to the ram of my press.
I slip a case over the deprime pin, verifying it is in the flash hole,
then I push it up through a carbide sizing die.

The initial contact with die will push the primer out of the case, and then the mandrel will better support case from within to push entire casing thru sizing carbide die.

This way the entire casing is resized - works only on cases where rim diameter is less than case diameter.

Enjoy.

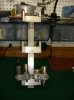
I'm working on automating this concept.
 
Last night I de-primed a bunch of 9mm cases and wouldn’t you know it. I go to take the tray out of my press and dump half the dead primers on the floor. This has happened to me to many times. So I took the tray out and started thinking how can I solve this problem once and for all. I decided to do some cutting with my dremel tool and stick some rubber tubing in there. The problem I had was the wall thickness of the tubing was to think. Primers kept getting caught there and creating a log jam. I’m sitting there think I need something the same size with really thin walls. There really isn’t anything a guy could buy from a hardware store that has really thin walls for tubing. After trying a few different things I put a .223 Remington case in the channel and it fit perfect. I cut both ends off the case, slid the tubing over the case (tubing went over the thicker end), a few zip ties in choice spots and bang it works great. I have run about 300 rounds through it without one problem. I’m sure there are better ways to do this but I used what I had laying a round and it works great. Best of all I will never dump a tray of dead primers on the floor again.

A little cutting.
L1040132.jpg

.223 case fits just right.
L1040133-1.jpg

After cutting the case and attaching the tubing
L1040135.jpg

L1040136.jpg

L1040137.jpg

L1040138.jpg
 
Nice, TH3180... I only wish I could rig something up to catch my spent primers on my Lee Deluxe Turret. The Lee CLASSIC Turret has the tube but mine just dumps them (rather indiscriminately, I might add) into the base of the press.
 
attachment.php
attachment.php

I made improvements to the co-ax press jaw shell holder housing.
1) If a case got stuck in the sizer die, pulling it out bent the housing. I fixed that with a beefier housing.
2) If the long jaw adjusting screw was adjusted too high, the housing would run into it, and the housing got bent. Fixed that by making the hole bigger for clearance so the screw passes through.
3) Changing jaws would sometimes be a pain, as the jaw springs flew across the room. Fixed that with springs in a hole, not a trough.
4) The button head screws took a long time to screw in or out with an Allen wrench. Fixes that with a knurled head screw that screws in with finger and thumb.
5) The button head screw was hard to line up with the holes in the wear plate, jaws, housing, and guide block casting. Fixed that with a pointy end on the cap head screw.

CO-AX Post #790
In "What clever little things have you "invented or discovered" # 790, you posted pictures and improvements for you CO-AX.

Forgive me but could you PLEASE give some more detailed information as to what and how you did these improvements? Looking at the photos with the exception of #4 and #5 got me lost. I'm very interested in the #3 spring fix.

Thank you for posting this information. Please do NOT think this request is a criticism of your post. I'm just an old guy looking for further information.

#1 says "beefier", by that I mean there is a larger cross section of metal in narrow center to keep from bending.
The top housing in the pic is a Bonanza, the center a Forster, and the bottom is mine. Look how mine is wider. There is big die clearance hole in the middle that leaves thin metal on the edge.
That metal is not as thin in mine.

#2 the screw clears. Watch this video:
http://www.youtube.com/watch?v=Fnns9ke4iy0
Can you see the pointed screw come all the way through the housing?
With the Bonanza and Forster housings, the screw smashes into the housing if the screw is adjusted high.

#3 Look at how the spring is in a hole. This makes it hard for the spring to spring out [across the room and get lost] when the jaws are being flipped over to go from 308 to 223.
 

Attachments

  • co-ax shell holder housing before blue2-21-2011 cropped.jpg
    co-ax shell holder housing before blue2-21-2011 cropped.jpg
    78.6 KB · Views: 101
Reloading supplies get heavy fast, use small containers. I have my stuff in those folding top containers and they have become very heavy with 9mm, 45acp and 10mm supplies like bullets for everything, brass, powder, press, dies and so on.

No real "inventions" yet but I haven't started working with my progressive setup just yet. Home projects, lousy excuse, but you know the drill.

I will be putting my primer pocket cleaner in my cordless drill soon though, saves time. I would really like a foot actuator for the press, but that long stroke would be annoying to my leg just as it is my arm after a few hundred rounds.

Setup cartridges NEVER have a primer in them. Beating a bullet out of a barrel is a serious bummer of a thing to do while kicking yourself in the rear. I mark them with a black sharpie also for easier visual identification.

jeepmor
Reply to primer pocket cleaner using foot controls. How about taking an old sewing machine apart and using the system to attack a brush. I am sure there are some old junk ones at goodwill or salvation army... Possibly making multiple areas off that machine to do other tasks.
 
Reply to primer pocket cleaner using foot controls. How about taking an old sewing machine apart and using the system to attack a brush. I am sure there are some old junk ones at goodwill or salvation army... Possibly making multiple areas off that machine to do other tasks.
I did just that. I removed all the vertical sewing mechanism leaving the horizontal turning shaft exposed. I had a machinist make me a stainless collar that fit that shaft and whose inside diameter fit a debur/chamfer tool perfectly (held in place by a setscrew); he also made me another collar that fit inside of the first collar. That second collar had an inside diameter that held a primer pocket scraper. I could whip through case processing like nothing. I have since ditchced the sewing machine because I bought the RCBS case prep unit. If anyone wants that collar set up I will send it to you for my cost + shipping.
 
here in australia you can only get spp and not srp in leadfree (pmc)

now these spp will occasionally pierce in a rifle around the firing pin dent so what i do is put a funnel in the external side base of the flash hole with a 9/64th drill bit twirled by hand and the case held upright in a bit of wood with a hole drilled in it !

dipping the case end in a bit of meths washes the filings off !

the funnel rim i take out to about 45% of the primer hole diameter, you can get this pretty consistent and regular

why it works i think is that the explosive pressure coming back into the primer pocket from the case expands a bit at the beginning of the funnel so its not directed in a tight blast onto the firing pin dent which is where the primer is splitting !

this 45% still leaves plenty of webbing in the primer hole and i haven't had any problems with a 223 or 7mm-08 !

update: doesn't work, still getting splitting so must be primer case thickness variability

interestingly the funneling didn't seem to shift the POI hardly at all !

too much work tho, might still put in say a 5% funnel.

7mm-08 is a lrp of course and i only put the funnel in to give a bit more primer flash onto the powder which it seems to do !
 
Last edited:
Drying rack

I bought the hornady LNL sonic cleaner. I love the cleaning that it does, but it takes a while for the brass to dry, so I took a small plank of wood, covered it with a dish towel, and nailed ten rows of ten nails in each row, to put the cleaned brass on since I do 100 at a time when I clean them. You just put the brass mouth facing down to the towel, and it sits on the nail and dries a lot faster than just letting them sit there in the basket.
 
Wonder if you could put the cases into feeding tubes with a case collator, then feed them onto your drying board by moving the tube across a row of nails.
 
Really cool TH3180. I "borrowed" your design and it seems to work great. Can't wait to decap my next batch.
 
Newb mistake

I bent my decapping rod in an old Herters die set and replaced with a piece of 8-32 all thread, used the old sizer ball / pin vise reamed out to accept the current replacement Hornady pins with the wide round/ flat base so theres no need to machine a pin vice into the all thread. Worked great so far, and if I ever need to replace it again I've got another 2' 9 3/4" of replacement stock :)

EPIC thread by the way!
 
Some gadgets and tips I've made

In the short year that I have been reloading I've noticed some areas that needed improvements. So here they are!

IMG_0973.jpg
I started with and still use the Lee single stage breech lock press. I noticed that the powder pass through die could work with the dispenser that came with it. It just needed some help so that is the above picture. I have recently upgraded to the Powder Disk Pro, but I keep this around for custom loads the Powder pro can't do. This works like a charm!

Pre-story to the next pic. If you are interested in using an Ultrasonic Cleaner for your brass. Go to Harbor Freight. Their bigger USC is regularly like $89.99 and can be picked up on sale with a 20% off coupon for like $49.99 sometimes. If you have seen in the last 12 months Lyman has come out with their own USC. It is the same one from Harbor Freight they just put Lyman on the side of it and are selling it for $120. If you want to pay for a name go for it. I'll save the $80.

IMG_0975.jpg
The main issue people have with USC is drying the brass. Some people choose to dry it over night. I used items I had laying around. The rack is made out of scrap wood, I built it around the fan, I got the wire basket from Goodwill for $.50 and I had the space heater. about 1 hour of measuring, cutting, and assembly resulted in this nice little drying rack. The basket will hold about 500 9mm and dry them in about 45 minutes.
IMG_0977.jpg

IMG_0978.jpg
I got tired of trying to prop up my Lee Auto Disk pro and my primer arms. A piece of scrap wood, and spare Submarine warfare pins resulted in this little rack that I mounted to an existing shelf. No more worrying about my powder tipping over and spilling. Also if you look closely I put hooks on the bottom to hold the disks for the Lee Auto Disk Pro.

The biggest thing that I have learned about reloading. Is it is just like everything else. If you need it and can't buy it, make it!
 
I had a bushing machined to mount the RCBS low primer alarm on my Hornady LNL-AP press. Then I used a brass rod with a SP and LP cap on each end. I put tape around the rod to trip the alarm. Without the bushing and clamping on the plastic part it would work loose due to the Powder dispenser w/PTX die (position #2) slightly bumping it. Then you had loose primer in the outer tube.

Now if your using Wolf primers and notice the primer feed sled sticking. Put a sheet of paper under the feed column mount. I've see Wolf primers run slightly thicker at times, the paper shims make the feed good. Normally the weighted rod cures this.

If you use the Powder dump funnel. Cut a block of wood to hold the cylinder rotated up (dump Powder). This allows you to remove the piston without worrying about dumping powder.
 
I forgot to add on my previous post, I use Lucas oil stabilizer on the ram of my Lee Breech lock presses, it is nice and thick yet lubricates extremely well and you only need to re-lube about every 4 months.
 
Cheap barrel tenon thread protector. Cap came from carb cleaner can.
 

Attachments

  • 1307848418-picsay.jpg
    1307848418-picsay.jpg
    87.7 KB · Views: 183
Hornady Concentricity Guage mount

After I bought my concentricity gauge I was disappointed to find that I needed to stand up to read the gauge. So...I went to Lowe's got a small piece of diamond plate and bent a 1" lip at 50 degrees (+/-). Then I drilled 4 holes to hold the gauge and 3 holes on the lip. All the holes were 5/16". I used 1/4" bolts and washers too fit, to hold the gauge. Yes, the holes were bigger than needed but, the extra slop let me level the gauge perfectly on the plate. On the bench I countersunk the 5/16" holes about 1/8" and hammered in some, threaded 5/16" "pronged tee-nuts". The plate bolted up solid. Seeing as how I mounted it on my 2nd reloading bench I don't have to remove it unless I want too. But, removing it only takes about 1 minute or so. Now I can read my gauge sitting down. Ohh...The camo paint was just sitting there so.....
 

Attachments

  • IMGP0810 (640x480).jpg
    IMGP0810 (640x480).jpg
    46.1 KB · Views: 250
Last edited:
Dillon Toolhead Racks

Single stack and wide body styles, mounted to wall, they free up shelf and drawer space. Made from aluminum.
 

Attachments

  • SINGLE02.jpg
    SINGLE02.jpg
    195.9 KB · Views: 170
  • DUAL02.jpg
    DUAL02.jpg
    195 KB · Views: 250
  • DUAL01.jpg
    DUAL01.jpg
    189.3 KB · Views: 105
  • SINGLE01.jpg
    SINGLE01.jpg
    206.1 KB · Views: 116
Last edited:
Redding BigBoss primer catch

I was tired to sweep up primers after reloading.

The provided small magnetic primer box from Redding never really worked for me.

Back from malling in the hardware store i built this little helper.
 

Attachments

  • a.jpg
    a.jpg
    251.1 KB · Views: 300
  • b.jpg
    b.jpg
    240.5 KB · Views: 203
  • c.jpg
    c.jpg
    283.9 KB · Views: 225
case lube

Hi, try castor oil. Just a trace on the case or the fingers that handle it works easily. I have used this (available from pharmacys) for many decades and it seems easy to clean off. Wipe with a dry cloth or a little solvent or WD40 on the rag works to clean it easy.
 
I forget who it was who posted about using an empty case as a powder trickler in this thread and I'm too lazy to look it up.

Thanks! Works like a charm.
 
Automatic Case Ejector Lee Classic Turret Press MOD

This looks cool, was gonna make one myself, but this guy said he sells them, but didn't say how much or how to contact him. He said he wanted to see if people were interested first. I think it's way productive. I saw that other video he talks about, that chineese talking guy. this looks similar but I think its stainless steel. I'm gonna post to see how much he's asking. I can probably figure it out myself, but my time is worth more that a few bucks.

http://www.youtube.com/watch?v=bqVeZhKrrQY
 
I don't reload much. I haven't even gotten 100 rounds done yet, so I suspect this will be obvious to everybody but me. I have the lee hand trimmer. The chuck/shell holder goes in my drill - thats easy. The cutter though I went cheap on and didn't get the one with the ball. After 50 rounds getting trimmed, the knurling (which is very deep) starts to make my fingers sore so I will be jb welding a rod across the back to act as a T handle.

For plugged flash holes, the pilot from the trimmer mentioned above, pops all of that crap out if done before you put the shell into the holder (no trimming done, just use the pin like a media ejector).
 
Last edited:
I do not know if I saw this. A Dillon XL 650 Spent Primer Upgrade
It is a funnel that screws where the little primer cup goes and you hook a hose onto it so the spent primers go down the hole through the bench into a 2 liter soda bottle. You will never clean up a spent primer again using a Dillon XL 650.

Home made funnels for putting powder back into powder containers. I cut off the top of either a 24 ounce or a 2 liter bottle of soda. This works great and they do not move or spill when pouring the powder back into the container.

I use tape for cleaning up powder on the bench when I do a cleaning. It also works great on the Dillon Shell plate or under the plate.

For PISTOL I found that the best head space gauge is the barrel for the pistol you are going to be shooting from.
I had a Springfeild 1911 that had a very tight breach and I had to use the barrel. Bullet that would work in my Les Baer would not seat in my Springfield.

I document all of my load data in my Dillon Manual, My Lyman book under the notes in the back and on a spreadsheet. I also have it documented on the 30mm and 50 mm military Ammunition cans that I store my bullets that I make when making a run of 1,000 or 2,000.

I have two 10 pound ABC Dry Chemical Fire Extinguishers in the room that has my primers and powder I also have a fire rating sign on the door for the fire department God forbid. ABC dry powder is corrosive and will ruin a lot of things but it will work the best.

If you do not switch your powder feed assemblies often there are powders that stain the clear plastic after time. I know Power Pistol will do this.

If you load 9mm or 380 using a Dillon XL 650 you can sometime get a little powder jumping out of the shells when they turn on the progressive press. I put a .5 inch thrust bearing under the shell plate bolt and it helped with the powder jumping out of the cases when the shell plate rotates. MC Masters part number TWA815 6093930.

The last thing that I can think of. is never use a roll crimp on a 38 or 357, or any cast bullet. It will not give you consistent bullet flight. If you have to pull cast bullets. Thrown them away. They well not be accurate because they were not held in their original shape. This iis iof you are looking for 2 inch groups at 50 yards oor even 25 yards. I was having a very hard time loading 357 Mag cast bullets with the roll crimp. I went to a taper crimp and the bullets worked fine.

Sorry for the long post.
One more thing. I found that a balance beam scale is a lot more accurate than an electronic one. I have put the same weight empty bullet on an electronic scale and it would jump back and forth .03 grains. That was on a $100.00 scale. That is a lot in my book. The electronic ones are usually 0 to 1000 grams scale. My OHAUS is 0-560 GRAINS.


I am sorry for any duplicates. I read about 3/4's of the post and decided to add mine. I hope they are of some help
 
Back
Top