questions about 1851 colt's barrel wedge and wedge screw and arbor fit

Status
Not open for further replies.

midland man

Member
Joined
Jun 8, 2014
Messages
2,377
Location
coalgate oklahoma
so can someone explain how this wedge works and what is that screw that's above the arbor for? plus I have to use a plastic tip hammer to install the barrel assembly back on the frame as its very tight so is that normal or is there a way to make it to where I can change cylinders if needed without having to hammer the barrel assembly back on everytime?? :confused: thanks guys for your help and knowledge! :D
 
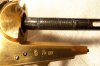
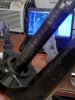
The wedge doesn't need to come out all the way. Just far enough to let the arbor come out. That little screw is the capture screw that prevents the wedge falling on the ground.

In a proper fitted gun the nose of the arbor is supposed to seat firmly and lock against the front of the hole in the barrel assembly. And at that point when seated solidly the barrel to cylinder gap should be set to an optimum distance.

The wedge is supposed to bear on the front edge of the slot in the arbor and the rear edges of the slot in the barrel to force the nose of the arbor against the end of the hole.

That's how it's supposed to work. But all to often the arbor is too short, or the hole too deep. Pick one :D When this is the case the wedge has nothing to lock against in a proper manner and it ends up being used to adjust the cylinder gap. And that's just plain wrong.

Mike at Goon's has written a lot on this and when he gets an open top this is almost certainly one of the first things he checks for.

I'm not doing this for a living but I'm a keen hobby gunsmith and I ran my own thread on this and how I fixed the four open tops I've got here. It involved making up a small spacer button and after fine tuning the fit soft soldering it to the end of the arbor. I also did a couple of 1871 open top Uberti cartridge guns for a cowboy action buddy using this same method.

Here's a link to the thread I ran a bit over a year ago on how I did this and a few bits I made up to make the job easier;

http://www.thehighroad.org/showthread.php?t=785288&highlight=open+top+arbor+button

Others have packed the end of the arbor with a ball bearing or a small washer or some other spacer to fill that spot. I did that for a while too but I kept forgetting that the fill was in there and I'd end up dumping it out and losing it.

When the arbor is fitted or packed correctly the wedge won't feel "springy". Instead it slides in and gets very tight all at once with very little movement apparent after the initial contact.

The arbors are often tight and I'm not always sure why. If you want clean up the arbor so it's bare metal and coat it with a felt marker. Slide the barrel on and seat it. Remove again and where the felt marker is rubbed away file off a thou or two of metal. Re-mark it and try again.

I would not go too far in this and produce a "drop on" fit. Instead just get to where it's a firm but not tough job to seat the barrel and call it a day.

If you have the tools for it and if the felt marker rub points suggest it check the arbor around the wedge slot for signs of being "kinked". If it is you can try to carefully bring it into a straight line if it seems like this will cure the tight fit. I check mine but so far have not found a kinked arbor so I can't offer more than the suggestion to "read" the felt marker rubbings with an eye which is open to all possibilities. Assume nothing and expect everything.
 
Last edited:
On the original Colt, the end of the arbor bottomed out in the well in the barrel assembly, and the wedge simply held the two parts (barrel assembly and arbor/frame assembly together. Barrel cylinder gap was determined by the arbor fitting the well precisely. The little screw above the wedge slot is there to prevent the wedge from falling out completely and possibly getting lost. These were military weapons remember, and losing a wedge completely disabled the revolver.

Our modern Italian reproductions frequently have arbors that do not contact the bottom of the well. That "slop" means that barrel/cylinder gap is determined by how the wedge fits into both parts. In other words, if the arbor does not bottom out in its well, the wedge is being forced to do a job that it was not intended to do.

Fixing a sloppy arbor fit is one of the first and most important things to be done on these Italian kits. Historically, Pietta arbors fit pretty well, Ubertis tend to be short. Many times on these repros, the wedge can be removed completely without loosening the wedge screw.

As far as difficulty putting the two assemblies back together, they should reassemble without having to pound them together. One of my Uberti 1851s had a poorly finished arbor tip; reassembly improved when I marked the end of the arbor with a Sharpie pen, and polished down those areas where it rubbed on the well.

Looks like BCRider outdrew me on this one. He would probably do the same in competition!!

If you have not already read Larsen E. Pettifogger's guides to tuning these things, it will help you a lot, even if you decide not to tackle the job yourself. We can get you a link if you need one.
 
Looks like BCRider outdrew me on this one. He would probably do the same in competition!!

I thank you for the vot of confidence. But truth be told there's days where I can type better than I can shoot.... :D

Who'da known that when I took typing in Grade 9 because it was the class with the most girls that it would have turned out to be one of the more useful courses I ever took in school?
 
Who'da known that when I took typing in Grade 9 because it was the class with the most girls that it would have turned out to be one of the more useful courses I ever took in school?

Amen, Brother! Mine was 7th Grade. Touch typing saved so much time writing stuff in college the real world. It's painful to watch others hunt and peck, ain't it!
 
thanks guys yeah i would like to be able to change cylinders on the fly just in case the british are coming lol! but appreciate the help! :)
 
No Grease Grooves?

I must be the only one to notice that it appears that the arbor in the kit revolver is unfinished. It has no grease grooves or relief cut into it.
 
yep i had to make a channel in the relief so that I could put caps on so i made a bit of a wide gap in that area so i could cap it other wise i couldn't get caps on.
 
so where are these grooves ya'll are talkin about to capture fouling? now my arbor does have the spirling grooves if that's what ya'll are talking about.
 
I don't know what you did to the picture but it's pretty clear that it is a VERY low rez photo. Don't compress or otherwise cut the file size down so much and we'd be able to see the spiral grease grooves. Hell, maybe the fouling capture groove is there too!
 
this is all i have is my phone to take pics with sorry but what is the fouling capture groove? theres a groove in the recoil shield just past the hammer so that the spent caps come thru!
 
cap channel

i made it a little wide so i could cap it much easier... sorry its not period correct i'm sure but otherwise i couldn't get caps on them nipples!
 

Attachments

  • IMG_20160305_161237.jpg
    IMG_20160305_161237.jpg
    82 KB · Views: 34
Last edited:
I think everyone is talking about these grooves.
This is my old Euroarms 51.
 

Attachments

  • 100_9741.jpg
    100_9741.jpg
    82.8 KB · Views: 27
Pause my YouTube movie at 5:10 for a good close-up of the factory Uberti arbor. Note the depth and pitch of the grooves. The "button" on the tip end of the arbor is a shim to make this arbor bottom out in the well...I used Pettifogger's technique to fit it, then epoxied it into the arbor.

You can see the loading channel in the section on "Loading" at 7:07 and in the section on "Capping" at 8:51. The whole recoil shield is noticeably dished, with a smaller trench the size of a cap leading to the nipple.
 
Sorry missed this part MidlandMan,, "so where are these grooves ya'll are talkin about to capture fouling? now my arbor does have the spirling grooves if that's what ya'll are talking about".
 
I would think so. That's what the grooves on the arbor/cylinder pin are for. And you'll find them on the original Colts. :)
 
Status
Not open for further replies.
Back
Top