Resizing/Peening Uberti Wedge

Status
Not open for further replies.

gtrgy888

Member
Joined
Feb 3, 2021
Messages
355
Location
Western US
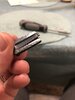
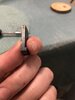
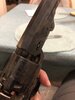
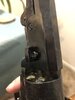
You guys might recall I had previously put in some work on the Uberti 1851. I first took the gun in to a smith to get the arbor reconstructed and tightened with some epoxy to eliminate some wiggling that had started to develop. Then I corrected the arbor length by fitting two #6 steel washers using sand paper on one washer until the barrel and frame barely fit together with just a sliver of light visible between them that gets closed when the wedge is installed. Finally, I’ve just widened the wedge using a ball peen hammer and a jeweler’s block so that it can no longer be seated or removed with just finger pressure. It now requires a good whack with the butt of my screwdriver to install or remove. The finished wedge looks a bit like a bunch of moon craters, but the fit is 10 times better and the gun is much more solid overall. The only wiggle left in the gun is a 1/1000 inch forward and backward movement of the cylinder, which gives it good clearance to prevent cylinder drag. The gun is officially optimized for the next range trip at month’s end! Thanks for all the good advice, folks.
 

Attachments

  • 2286BAFB-B1FF-4833-B5AC-833054B80F38.jpeg
    2286BAFB-B1FF-4833-B5AC-833054B80F38.jpeg
    55.7 KB · Views: 45
  • 0004AAE4-C5ED-4162-A7CF-02B4463E36E7.jpeg
    0004AAE4-C5ED-4162-A7CF-02B4463E36E7.jpeg
    52.4 KB · Views: 44
  • D69C5B4A-B318-447E-B26F-E4CE2B4E9416.jpeg
    D69C5B4A-B318-447E-B26F-E4CE2B4E9416.jpeg
    64.9 KB · Views: 44
  • 0B3CA442-9275-4E22-9A4A-AEB1F772D45A.jpeg
    0B3CA442-9275-4E22-9A4A-AEB1F772D45A.jpeg
    63.2 KB · Views: 43
That barrel to cylinder gap might be a little tight, cylinder may bind after it gets warmed up from shooting, you won't know till you go shooting. My ASM 1860 liked to bind after 4 shots with a tight gap, it's now at .004 and working great. Hope it works out for you. Let us know how it works.
 
That barrel to cylinder gap might be a little tight, cylinder may bind after it gets warmed up from shooting, you won't know till you go shooting. My ASM 1860 liked to bind after 4 shots with a tight gap, it's now at .004 and working great. Hope it works out for you. Let us know how it works.

Thanks, I’ll keep an eye on it. The gap passed the printer paper test on every chamber, so fingers crossed.
 
I hope your barrel wedge treatment works out for you. I did the same thing to a Pietta 51 Navy wedge a few years ago and it didn't last very long.
 
Wedges should be hardened. They weren't intended to be installed "finger tight". If you'll cut the shaft dia. down just below the screw head, you can fully install the screw ( I Chuck the screw up in a drill motor and use a cutoff wheel on the dremel for this).

Mike
 
What is wrong with the wedge screw? That should screw should be flush with the barrel, or the spring clip will not catch and the wedge could get lost. I have been down on my hands and knees in the dirt looking for an escaped wedge at the range.

For holster carry, it keeps the wedge from seating too deep. I’ll screw it down prior to firing. I anticipate the wedge loosening across cylinders. As the peened edge gets flattened again, I’ll seat a bit deeper until I run out of wedge, then reshape the width again as needed. If the wedge breaks, I have 2 more of the same size. Both will need to be hammered the same way for a tight fit.
 
Gtrgy888, the screw isn't there for the reason you say. The wedge should be driven in so as to impart a connection under tension so vibration/ harmonics between the 2 assemblies won't have detrimental effects to the revolver. If you're allowing the screw to hold the wedge from full insertion, no wonder you're having problems . . . the wedge is loose!! The screw, as has already been stated, is there to retain the wedge during disassembly . . . nothing more.

Mike
 
Last edited:
Gtrgy888, the screw isn't there for the reason you say. The wedge should be driven in so as to impart a connection under tension so vibration/ harmonics between the 2 assemblies won't have detrimental effects to the revolver. If you're allowing the screw to hold the wedge from full insertion, no wonder you're having problems . . . the wedge is loose!! The screw, as has already been stated, is there to retain the wedge during disassembly . . . nothing more.

Mike

The wedge is tight and cannot be removed under finger pressure from its current position. It does however seat deeper after holster carry since it sticks out far from the barrel. Seating any deeper doesn’t allow me to take full advantage of the length of the peened edge, which will get flattened again by absorbing the force of firing. As that happens and returns the wedge to its default loose fit, I’ll just turn the screw and seat the wedge 1 mm deeper so I won’t spend more of my weekends refitting the wedge than shooting. The screw is also a tight fit, since it holds the hammered wedge at that length. If it starts spitting into the bushes I’ll need to rethink that approach, but for now it seems to work fine. I’m treating the wedge as an expendable part at this point since it was fitted so loose from the factory.
 
Gtrgy888, It's not supposed to be removed with finger pressure!!! You obviously don't have a clue about the engineering of the open top revolver!! IT'S THE LENGTH OF THE ARBOR THAT DETERMINES THE BARREL /CYLINDER CLEARANCE !!! HELLO! No matter what YOU decide to do, it doesn't change the fact that the wedge isn't the referee between two competing assemblies!! Engineers actually smarter than you (180 yrs ago) designed this platform and I doubt you'll out smart them.

Good luck in your future endeavours.

Mike

I get that. That’s why I thickened the wedge, so it can’t be removed with finger pressure.
 
I get that. That’s why I thickened the wedge, so it can’t be removed with finger pressure.

Mike is trying to drive home the fact that it is the arbor-to-arbor-recess fit that needs to be addressed first before anything else can be addressed. Otherwise you are just wasting your time.

Regards,

Jim
 
Mike is trying to drive home the fact that it is the arbor-to-arbor-recess fit that needs to be addressed first before anything else can be addressed. Otherwise you are just wasting your time.

Regards,

Jim

It’s good advice. I’m much more worried about taking too much off than leaving that .0000000001 inch sliver of gap though, especially since the washers do flex a tad. If I swipe that washer even 1 or 2 more times, I worry about defeating the purpose of all that sanding by leaving a sliver between arbor and recess. I wonder which extreme to err on: a sliver of light between frame and barrel, or an arbor that’s a sliver short?
 
I think both parts need to fit with no gaps, especially when the wedge is seated, just my nickles worth.
 
It’s good advice. I’m much more worried about taking too much off than leaving that .0000000001 inch sliver of gap though, especially since the washers do flex a tad. If I swipe that washer even 1 or 2 more times, I worry about defeating the purpose of all that sanding by leaving a sliver between arbor and recess. I wonder which extreme to err on: a sliver of light between frame and barrel, or an arbor that’s a sliver short?

I guess I need a feeler gauge set like you have. Your steel washers flex? Get better ones.

Do the arbor fit first. Then check the barrel/cylinder gap: it should be .002"-.004". If it is less, remove some metal from the forcing cone. If it is more, remove some metal from the barrel lug where it meets the frame. Recheck the arbor fit if the barrel lug stands off from the frame, adjust accordingly. The last thing is the wedge fit: the rear surface of the wedge should contact the arbor slot and both sides of the barrel lug slot evenly/parallel. Drive in the wedge until the front of the wedge contacts the barrel wedge slot firmly.

That will be one solid assembly and won't move.

Regards,

Jim
 
Status
Not open for further replies.
Back
Top