AR 15 Build and Range Report

Status
Not open for further replies.

StationOps

Member
Joined
Sep 13, 2018
Messages
75
I had a chance to build out my AR lower on the 4th of July. The process went ok, although I certainly wasn’t as smooth at the steps as the people on youtube. If a step didn’t make sense, youtube has, ahem, several videos so another version could be seen.

The lower was an Andersen and the kit was this PSA-always-on-sale-for-$399.

Tools used (in rough order of importance)
  1. Harbor freight Table swivel vise. Used with a wood plank and some weights to keep the plank from moving.

  2. Lower receiver vise block

  3. Harbor freight Punches.

  4. Detent tool. Only used for one step, the front pivot pin, but not sure how it would have gone without it.

  5. Task light. My living room is somewhat dark, so having a hands free light I could focus on the receiver helped a lot.

  6. Allan wrenches

  7. Hammer

  8. Rubber mallet

  9. Hex head wrench doohickey for the pistol grip.

  10. Hemostats. Very useful for putting the screw into the pistol grip. Needle nose pliers would also work.

  11. AR 15 armorer’s tool for the castle nut.

  12. Ballistol for lube.

  13. Box cutters. For the rear pivot pin, and used to trim up the front MBUS sight. That thing was very stiff.

  14. Towels. Laid on the kitchen table so parts couldn’t roll away.

  15. Roku TV that showed the youtube videos in glorious HD.

One video said to tighten the castle nut to 40 ft-lbs with a torque wrench, but I just didn’t. That same video also said to peen the whatchamacallit ring (“buttstock collar tube lock”) into the castle nut (“receiver extension nut”), but I couldn’t figure out how to get the buffer tube off at some later time if I did that. Another video didn’t mention that step, so I figured it’s fine. I had one detent and detent spring left over. Pretty sure Palmetto sent extra in case one flew across the room and was lost.


Shows most of the tools:
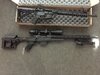
toolsNoMeta.JPG
The AR and my Howa:
 

Attachments

  • riflesNoMeta.JPG
    riflesNoMeta.JPG
    135.5 KB · Views: 28
The first time I loaded it, I let the bolt go manually and it had a failure to feed. Using the bolt release produced no failures. The first few shots were fired from the hip, so if the thing exploded, my face would be farther away. It didn’t explode. It ran flawlessly and I shot about 150 rounds through it. All cartridges were Wolf Gold 223.

Accuracy, I’m not so sure. Here are some shots off hand at 25 yards. My shots are on the white part of the upper target.
AR15offhand25yards.JPG

Shots from bench rest at 50 yards.
AR15Benchrest50yds.JPG

Not sure where I was hitting at 100 yards. I had a target on the corner of the framework, and I think my shots were hitting left. I adjusted the sight twice, but still couldn’t get onto the paper.
AR15offhand100yds.JPG

For comparison, here are some shots from my Howa HCR bolt action at 50 and 100 yards with Vortex Diamondback 4-16x 40mm scope. Heavier rifle, with scope and resting on bags.
25 yds in the center, 50 yds on the lower right:
HowaVariousgroups.JPG
100 yards from the Howa.
Howa100yds.JPG
At the time I was happy they were on the paper, but the Howa should make 1" groups at 100 yards. It was hot, I was tired. Definitely need more practice.
 
Your point of impact should be no higher than dead on at 50 yards. If it's high, you'll likely be shooting over the target at 100.

Unless you understand how to install a castle nut without staking it, stake it. It doesn't take much to do properly. If a castle nut comes loose and the shooter doesn't catch it in time, it could lead to a lockup of parts that will cause serious damage to your AR. The part you will stake into the castle nut is called a "backing plate".
 
Last edited:
Palmetto does send extra parts in their kits. I think it is for 2 reasons, the first that they can probably justify is in case you lose a part, which I did the last time I built one. The second, and I think this is their primary reason, is so you have a reason to build another one. "Oooh look, an extra spring, time to build a new lower."

As far as the castle nut, once the tube is on you really won't need to take it apart, unless you plan on changing out the rear takedown pin. That is the only thing that would really need the tube off in order to change, so you can stake it or torque it and loctite it.

As far as your 100 yard target, it looks like you have one shot on paper and it is in the cheek portion, if that target of the face is what you were shooting at. Where was your point of aim for the 25 and 50 yard groups? If I am not mistaken, if you are zeroed for 25yds then you will be about 5 inches high at 100yds, and if you are zeroed for 50 I think you would be about 2 inches high at 100.
 
The first time I loaded it, I let the bolt go manually and it had a failure to feed. Using the bolt release produced no failures. The first few shots were fired from the hip, so if the thing exploded, my face would be farther away. It didn’t explode. It ran flawlessly and I shot about 150 rounds through it. All cartridges were Wolf Gold 223.

Accuracy, I’m not so sure. Here are some shots off hand at 25 yards. My shots are on the white part of the upper target.
View attachment 849205

Shots from bench rest at 50 yards.
View attachment 849206

Not sure where I was hitting at 100 yards. I had a target on the corner of the framework, and I think my shots were hitting left. I adjusted the sight twice, but still couldn’t get onto the paper.
View attachment 849207

For comparison, here are some shots from my Howa HCR bolt action at 50 and 100 yards with Vortex Diamondback 4-16x 40mm scope. Heavier rifle, with scope and resting on bags.
25 yds in the center, 50 yds on the lower right:
View attachment 849208
100 yards from the Howa.
View attachment 849209
At the time I was happy they were on the paper, but the Howa should make 1" groups at 100 yards. It was hot, I was tired. Definitely need more practice.
Firing first shot from the hip is farther from your face but closer to other parts.
 
Thanks for the replies. I think I need to be more careful and shoot it from benchrest, see how accurate I can get it, before trying offhand. Probably need to write out a procedure.

@mshootnit Shooting from hip may be closer to other parts, but at least those parts have clothes on.
 
That same video also said to peen the whatchamacallit ring (“buttstock collar tube lock”) into the castle nut (“receiver extension nut”), but I couldn’t figure out how to get the buffer tube off at some later time if I did that
I've removed staked on buffer tube castle nuts. It just takes the correct fitting wrench and brute force. But having done it, I decided to never stake my builds, I don't use Loc-Tite unless it comes loose a second time, YMMV.

Its the same as removing the staked on gas tube bolts -- just need the correct size hex key and a lot of torque.
 
Status
Not open for further replies.
Back
Top