1862 pocket arrived today

Status
Not open for further replies.
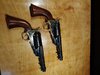
Here is my gun all done. Many may think that it looks wierd without the loading lever but with the screw going bent and OOC I needed to do something so I could keep on shooting as I love this gun. View attachment 1063997View attachment 1063998View attachment 1063999View attachment 1064000

Looks like some of the Remington factory conversion guns with no loading levers I have seen in pictures. Remington made a lot more different conversions than Colt. I for one like the way it looks.
 
Then it comes to the nipples, I think of them like turning my car on.

Turn the key to accessory, then a gentle twist to ignition.

We really do need torque settings for these guns. I have a list of torque settings for every bolt and screw on my rigs, but play "guess and by golly" on my guns. It ain't right.
 
We really do need torque settings for these guns. I have a list of torque settings for every bolt and screw on my rigs, but play "guess and by golly" on my guns. It ain't right.
Somewhere around 10 inch pounds would suffice… be gentle with them.
 
Pick up an aviation mechanics handbook, it has torque values for small fasteners. Also one can get a torque type screwdriver through Amazon pretty reasonably.
 
I finally got the piece that holds my cylinder pin in place since the loading lever is no longer part of my revolver. I ordered it directly from Howell Arms and no bueno! All that came in was an empty box filled with shredded paper. So I called to complain and got hung up on. I then ordered it from Buffalo Arms and presto, I got it 2 days later. Now I am good to go. Shot the other day here in Mesa and everyone, adults only, took a turn and loved it. They all told me, "no wonder you love this gun". Too fun shooting! Had a blast! No pun intended. No cap jams, shot so many rounds with no problems whatsoever.
 
Blackpowderwarrior, those are nice looking pistols, what did you do to them in addition to the Kirst cylinders?
Thanks man
Not much other then cut and reblued loading port,added ejector rod, installed a 2 step hand and smoothed out the actions. Im not a fan of the wire trigger/bolt spring but i do fancy the wolff reduced power flat trigger/bolt spring so i put those in.
Also not a fan of the reduced power mainspring and prefer the stock ones.
 
Last edited:
I pulled the trigger on a 1862 pocket police and WOW its truly a little guy! After foing around with it my 1851 navy seems humongous.

I installed some slixshot nips and will repost after i fire her a few times
I didn't realize you had bought one of those BPW. That is cool!!. Uberti right? Where, if I may ask, did you find that one? They seem to be few and far between. Nice find. :thumbup::thumbup:
 
Did you correct the arbors as well if they are Uberti? I don't like the flat springs either, I make mine from .030 music wire and set them up as torsion springs along with a bolt guide. One of these days I'm gonna figure out how to coil spring the hammer.
 
I set up my 2 Ruger Old Armys with the torsion spring setup, what a huge difference, so much smoother plus a big difference in trigger pull.
 
[QUOTE="Jackrabbit1957, post: 12245160, member: 25023. One of these days I'm gonna figure out how to coil spring the hammer.[/QUOTE]

I thought about that for a while. There was a short run from Uberti (can't remember the model) that came with a coil main. It could be be installed in place of the flat main. I'm probably still on a list as to availability (if ever) but if ever, I'll decline.
What I've learned about coils being main springs is they are s-l-o-w at moving heavy payloads fast compared to a large "angry" flat. Freedom Arms knows that as well . . . They use coil torsion setups along with a frame mounted coil and plunger hand setup but for hammer speed and power delivered . . . they rely on a flat main. Triggers don't move much or fast, neither do bolts and hands but hammers travel a large arc, are heavy, and speed can play a roll.
I came to that conclusion myself after tuning many Rugers and finding that reducing the hammer draw to the same as for flat spring examples, the Rugers suffer from light strikes. Even though a coil main was a "gee whiz" in the 1950's, it isn't the best tool for the job. That said, I found a "compromise" tuning for the coil main. I reduce the coil material thickness for about a third of the length (normally you do the complete spring . . . never cut coils!!!) which causes that section to give first as the rest of the spring retains its tension. Doing that basically turns it into a "progressive" spring and gives the perception that the main is lighter because the beginning of the cycle is easier and follow through has momentum. That allows most of the original tension to give reliable ignition and good speed for the hammer . . . and still give the customer what they are looking for in a competition revolver.

Mike
 
Last edited:
We really do need torque settings for these guns. I have a list of torque settings for every bolt and screw on my rigs, but play "guess and by golly" on my guns. It ain't right.
I made a wrench to fit and the nipples came out easily. I lubed them and shot it with no problems. The problem came when I went to clean it. The nipples came out easily but every other screw on the pistol was torqued so tight that I was bending the screwdriver tips. I had ground them for an exact fit. To get the screw that held the hammer spirng I had to lock the grip frame in a vice and use a wrench to turn the screwdriver. The pistol was unfired so this was done at the factory. There was no rust on the screws or threads. I reassembled it with never seize.
 
Good information on springs Mike! I would have not thought about it in that light. Still would be cool though to come up with a way to do it that's cost effective.
 
[QUOTE="Jackrabbit1957, post: 12245160, member: 25023. One of these days I'm gonna figure out how to coil spring the hammer.

I thought about that for a while. There was a short run from Uberti (can't remember the model) that came with a coil main. It could be be installed in place of the flat main. I'm probably still on a list as to availability (if ever) but if ever, I'll decline.
What I've learned about coils being main springs is they are s-l-o-w at moving heavy payloads fast compared to a large "angry" flat. Freedom Arms knows that as well . . . They use coil torsion setups along with a frame mounted coil and plunger hand setup but for hammer speed and power delivered . . . they rely on a flat main. Triggers don't move much or fast, neither do bolts and hands but hammers travel a large arc, are heavy, and speed can play a roll.
I came to that conclusion myself after tuning many Rugers and finding that reducing the hammer draw to the same as for flat spring examples, the Rugers suffer from light strikes. Even though a coil main was a "gee whiz" in the 1950's, it isn't the best tool for the job. That said, I found a "compromise" tuning for the coil main. I reduce the coil material thickness for about a third of the length (normally you do the complete spring . . . never cut coils!!!) which causes that section to give first as the rest of the spring retains its tension. Doing that basically turns it into a "progressive" spring and gives the perception that the main is lighter because the beginning of the cycle is easier and follow through has momentum. That allows most of the original tension to give reliable ignition and good speed for the hammer . . . and still give the customer what they are looking for in a competition revolver.

Mike[/QUOTE]

Dang it. The brain surgeons and rocket scientists got nothing on you and the Rabbit.
 
If you remove the loading lever, aren't you required to cut the barrel to at least 3-1/2"? I'm sure I read that somewhere.
No, I left the barrel at the 51/2 " and it shoots great. I will leave it that way. A longer barrel is more accurate than a shorter one so...........
 
Many say that it "rakes" the cap off the hammer when the hammer is cocked, keeping it from falling into the action, jamming the gun. This assumes the caps are sticking to the hammer.

What I think it actually does is to keep the cap from flying back, and dropping into the action, (or between the hammer and frame) when the hammer blows back. Which ever you believe, it keeps the spent caps out of the action.
 
To make a cylinder holding block, I chose some ash from a wood pallet.
The 2" roughcut thickness was about right.
To start select the materials you will be needing, block of oak, ash, cottonwood or maple.
Some hardwood dowel that will slipfit in cylinder chambers.
Rub trace cylinder using pencil and paper, that will be template to layout the dowels that will hold the cylinder from turning while clamped in bench vise to aid in removing stubbern cap nipples.

Just a board with 3 wood dowels that will slip into the chambers to allow you better leverage when removing stubbern nipples.
Great part is it can be clamped to a drill press table and your nipple removal modified socket in the drill chuck, with down pressure by drill press feed handle and a fair grip rotating the chuck to loosen those stubbern nipples will work free with penetrating fluid.
 
Last edited:
Many say that it "rakes" the cap off the hammer when the hammer is cocked, keeping it from falling into the action, jamming the gun. This assumes the caps are sticking to the hammer.

What I think it actually does is to keep the cap from flying back, and dropping into the action, (or between the hammer and frame) when the hammer blows back. Which ever you believe, it keeps the spent caps out of the action.

Thanks for the explanation. Are the commercially made or are they are they fabricated? I have no idea what they look like.
 
I think there are more than a few here that could post a pic, they have in the past. Needs to be fabricated and installed by a smith. The Goon and the Rabbit both do it.
 
Status
Not open for further replies.
Back
Top