I stained the two I built, and then finished the top with Helsman's varnish. My main bench top is 3/4" plywood on top of 2x6s. My small bench is just 3/4" plywood on on top of the 2x4 frame. Presses are mounted to the big bench.


Put laminate on it. Will glue up nicely on MDF. It's easy to clean and will stand up to any cleaner or solvent we use.I moved to a new house earlier in the year, and I'm finally ready to put my bench together again (brass is starting to pile up).
I'll be using 2x4s for the frame, bolted to the concrete wall behind it. The reloading surface will be two 3/4" MDF sheets stacked on top of each other.
Any reason not to do this?


my next one... and i have a friend/friend of a friend that powder coats...I made my last one out of steel, made the top a truss, to eliminate flex and added the shelf at the bottom to add weight, so it didn’t have to be bolted to anything (hardwood floors in my reloading room) used non slip adjustable feet on the bottom for level. It’s two pieces so I could get it from the shop and into the reloading room, then bolt it together.
View attachment 1183581
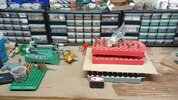
The presses bolt to plates that, themselves are bolt to the bench top, so if I want to add another pattern, I just remove the plate, go drill and tap it, then return it to the bench to mount the next press.
View attachment 1183580
There are two switches on the face, the one on the left is for the dental air compressor that sits on the bottom shelf and the other switch shuts off power to the 14 outlets underneath.
View attachment 1183582


Never understood the 2x top layer…what are you guys loading that you need that additional strength?


") The single 3/4 plywood top is plenty as long as you don't bolt presses only to it. I like your steel, but that's not a inexpensive option for some of us.
The single 3/4 plywood top is plenty as long as you don't bolt presses only to it. I like your steel, but that's not a inexpensive option for some of us.I don't know, my wife is a pretty good shooter.....I don't think mounting a press to her countertop would be good for my health. Now the trailer hitch, I could get away with.There are a number of ways to mount a press to something to make it usable, in just about any kitchen.
View attachment 1184516View attachment 1184517
or even away from home.
View attachment 1184518
That is a very rare item you have on your bench, you'll never see the Cubs as world champions again. Even Haley's comet comes around more often than the Cubs winning the series.View attachment 1182858
The ends are two kitchen base cabinets that were picked off a scrap pile. This is not a work bench this is a dedicated reloading bench. so the top area is 48"X24" and works well with everything within reach.