Birth of a blade

Status
Not open for further replies.

messerist

Member
Joined
Jan 17, 2009
Messages
875
Location
Faribault Minnesota
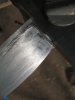
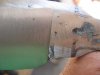
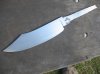
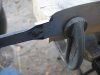
There have been a few members here expressing an interest in making their own knives. I have been making knives for a little over twenty years and do almost all of my work by hand. I was thinking of posting a thread here on how I make my knives so I forged out a blade from a very old and rusty leaf spring. It looked like it came off the first car ever invented according to my eight-year old son. I apologize for not having any photos of me forging the blade but I was the only one home at the time and simply can't forge and take pictures simultaneously. What I plan on doing is recording and posting the steps I take to make a blade from a rough, annealed blank through to the final fit in its sheath. I hope this is OK with the moderators. If not please let me know. This will be a project covering several months so sit back, relax and enjoy. Here is the first installment, the rough blade blank. Constructive criticism and suggestions are welcome during the process as well as any questions one might have. And awaaay we go!
firststep001.jpg
 
This is gonna be a good one. I can feel it.

I can't imagine the mods having a problem with it. this is the sort of thing that knife guys on this board salivate over.

I can tell you right now, I'm already fascinated.
 
Yes HSO, the tang is drawn out from the bar of steel. The piece I started with was approximately 1 1/2" wide by 9" long. I spoke with the Wife last night and she recommended that I forge out another blade and she will photograph the steps involved in the actual forging. She is a teacher and says I am cutting you guys short by not showing the entire process. Besides, the fire part is the "funnest part" according to my 8-year old. Whaddaya think?
 
You should save a piece of the original spring and put it in the presentation case. Looking forward to this thread...Russ
 
Making sharp things...

Yep, I'm in too. As if I didn't already have enough of a variety of ways to use up my time!

What, if anything, do you have to do special to the spring steel when you start out? I have a nice 1/2 of a broken truck spring leaf that says to me "Knife, knife!" occasionally. I'm not into forging (forgery?? :D ) yet.

BTW, I rather like the rough shape of your blank.
 
Last edited:
messerist,

Great idea for a thread. I am looking forward to seeing the progress. I have been itching to try forging and will be watching your post intently. Tell your wife thanks. I'm sure myself and the others will enjoy seeing the forging part take place.
 
Sorry for the wait everyone. I was finally able to do some work on the blade this past weekend. First I removed as much scale as I could by soaking it in a bath of plain white vinegar overnight and then scrubbing with some 0 steel wool. Then I marked on the blade what parts to file away.
Dapper Knute 003.jpg
This is one of the reasons I try to forge my knives as close to shape as possible. A few hammer blows on a hot blade can save minutes or hours time filing. I suppose if I had power tools I could use them to save time as well.
Dapper Knute 008.jpg Dapper Knute 007.jpg
Here I am draw filing the spine of the blade and the finished shot. I will hit it again with a finer file and sandpaper later on.
Next I will do the sides of the blade. As you can see there is not much to my set up just an old Workmate, some 2X4s and a few C-clamps
Dapper Knute 023.jpg
I try to keep it simple for several reasons. Of course the first is economy and second, I like the accomplishment of being able to do something almost entirely by hand. I will try and post some more photos tomorrow. Please feel free to ask me any questions you may have. Thanks for looking
 
Are you sure you aren't Norm Abrams evil twin? Ya know the one that works with hand tools and metal? I'm just joking around. I think we need MORE tutorials like this. Cause not everybody has a dremel or an entire workshop full of power tools to do stuff with.
 
Cause not everybody has a dremel

Boy, they should. Dremels are well under $50.00 at Walmart right now and represent an inexpensive, solid tool investment for anyone remotely interested in handcrafting or doing different kinds of home repair. I know not everyone has all the money in the world to blow on tools, and some, like Messerist, simply like using hand tools but it's just not that big of an investment.

On the other hand, I personally enjoy using hand tools. There is a certain zen about them, and as our society experiences something of a very small renaissance towards living more simply, owning a few basic hand tools and knowing how to use them just makes good sense. Plus, if your the teotwawki type, you can't shoot a log cabin together, nor can you tactically stab a new well. If things really do get medieval, tools and skill are going to be valuable, valuable assets.
 
Sorry for being a day late but Momma had school last night and I had the four "Children of the Apocolypse" all to my self. I left off where I was draw filing the flats of the blade. You can see just how much metal is taken off using a sharp, new file.
Dapper Knute 030.jpg
One of these days I am gonna save all the shaving just so see how much I take off a blade. This photo shows the blade after about two hours of filing. I try to make sure that the blade maintains an even thickness while I'm filing so I am constantly checking to make sure I don't take too much steel off.
Dapper Knute 029.jpg
After I work on the flat of the blade I tilt the file and start to clean up the rest of the blade down to the edge. A bevel is forged into the blade so I just let the file follow the bevel and do the work. This removes the remaining scale and evens out the edge. You will notice that occasionally I leave in a pit or divot caused during the forging. Depending upon the thickness of the blade and whether or not the person I'm making it for wants it, I usually leave some in. I think it sorta adds to the hand forged look. Sometimes taking out a particular pit or deformity will make the blade too thin in one spot or just take to darn long
blade project II 010.jpg
Here is the blade with most of the draw filing finished. I will still do a bit more with a finer tooth file and sand paper but you can see the knife starting to shape up. Now I determine where I am going to start the line for the ricasso. That is the flat, un-sharpened portion of the blade between the bevel and guard.
blade project II 019.jpg
I change the filing direction and use a file with a safe edge to cut the bevel in. I will show in greater detail this process the next time I post. I have to run for now. The eight-year old has his Karate class. Please ask any questions if you have them and I will try and answer them.
 
I had a few hours to work on the knife yesterday so I concentrated on the choil area of the blade. I have a jig made from two chunks of hardened steel that I clamp where I want to locate the bevel on the choil. The jig helps keep the two bevels even. You can do it without the jig only keep checking as you file to keep both sides even. I had a machinist friend make mine but I have seen them for sale on the Texas Knifemaker Supply websitehttp://http://www.texasknife.com/vcom/index.php?cPath=884_915&osCsid=6d5268707da03db5b5e31fd4631b26eb
You can see the before and after shot using the jig.
The third photo is the blade after I have gone over it with a fine, single-cut file. It is beginning to look more and more like a knife everyday. Since I used a very old leaf spring for this knife I take some time now to carefully examine the blade with my magnifiers to see if I can see any obvious cracks. Now would be the time to make any drastic changes that a crack might require to salvage the knife. However, most cracks only come out of hiding after hardening. It is one of the risks when you use old, unknown steel. Heaven knows what the steel has been through. The last photo is of finishing up the choil and ricasso area, getting ready to prepare the area for the guard. I intend to do some more work this weekend so I should have some more photos to post soon. Thanks for looking and please ask any questions you may have.
 

Attachments

  • Oct 18th 002.jpg
    Oct 18th 002.jpg
    266.4 KB · Views: 65
  • Oct 18th 004.jpg
    Oct 18th 004.jpg
    256.7 KB · Views: 63
  • Oct 18th 005.jpg
    Oct 18th 005.jpg
    268.8 KB · Views: 112
  • Oct 18th 007.jpg
    Oct 18th 007.jpg
    260.1 KB · Views: 66
Not sure if you have even measured, but what is the thickness of the steel along the spine and tang?
 
Nice work.

I remove any forge marks from the bevel, but think they're fine to leave on the flats. Just me.

Do you find your blade wanting to flip on it's side as you file the spine (post 17, image 3) clamping it with a C-clamp like that? It looks like you have your technique down pat, but it might be a little more convenient if you consider taking a piece of square channel or round pipe and fitting some wedges of wood in it to clamp the tang or blade and then clamping that fixture so it doesn't shift. A buddy made a square steel pipe with rubber faced plates that could be screwed down clamping the blade/tang tight so I could put it in my pipe clamp jaws of my vise. It allows me to just leave the blade clamped and rotate the piece as needed.
 
Status
Not open for further replies.
Back
Top