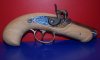
BP Derringer

Status
Not open for further replies.
When I was in college, I bought a kit for a Dixie "screw-barrel" derringer, a .44 caliber copy of the old percussion "muff pistols" that were made in Belgium before the Civil War. Neat gun, especially with the folding trigger. Packs quite a whallop, too , even with the small powder charge, due to the tight seal of the oversized ball in the barrel (I use a .451 ball from my .1860 Army replica). It could possibly do as a last-ditch self defense gun in places that don't allow modern firearms, just like thay did in their heyday.
 
Here/s one of those:
attachment.php


attachment.php


attachment.php
 
Mec,

I have that same pistol too. I use the .454 balls in mine. I get penetration on a full 1 inch spruce board with the slightly heavier ball. Black powder derringers are a real facination with me I have 8 and want more. All have required a fair amount of tinkering with to get them shooting reliably but they are a hoot to carry and shoot. What do you know about the Abeline or McNab derringers? Palmetto makes them which makes me a little hesitant about buying one but then again two of my derringers are Classic Arms guns and you can't get much rougher than them. Like to see more data on a variety of BP Derringers. Please post if you get any new toys.

Don
 
we kind of had to dish out the front of the hammer on that pedersoli to make it work. Delicate things but kind of interesting. there is a fairly droll review of the Abilene derringer on the dixiegun.com site. guy suggests getting one for your grand kid when he's too young just to irritate his parents. this guys actually works but I would never bet on Palmetto. A couple of years ago, I ordered a kit palmetto "Lincoln Derringer." Did it because they were out of the finished ones. The wood was full of voids and all the metal was rusted. most of the furniture couldn't be fitted.The sear tip crumbled away while I was struggleing to build it. When I finished it, it would only set off caps after multiple strikes or after filing the cap thin. They got in some finished ones and one guy laid in a review about how bad his was. His sear crumbled away on the first shot and he sent the thing back promising to write another review when it was replaced. Never happened and the original review disappeared. the "lincoln derringer" was a lot smaller than the original Booth derringer which you can find written up by the FBI. A burglar had bragged that he had stolen the real one and replaced it with a fake so the fBI lab did extensive tests on it and determined the one in Ford's theater was real. It shot a 41 caliber ball while the fako palmetto has a .41 bore and shoots 380 balls. I gooled up the fbi report and you can probably find it too. Those Palmetto "Lincoln Derringers cost about $500 and are not worth 50 cents.
 
Yes, yes, I know, pictures. Maybe later today when I get done with Graduation stuff. (I have to give a speech and give away a fire department memorial scholarship :) )

I also found out that the nipple is not exactly built for firing. The opening on the one I have is too big. In other words, when the hammer strikes the cap, it does not hit the explosive. Instead it acts like a paper hole punch and cuts the foil holding in the explosive compound, which then fell into the nipple.

However, I have filed the nipple, which is overly tall, and now have a better bearing surface that should work to fire the cap. Could not try it last night as the wife was home and she frowns on snapping caps in the house :( .

I have the stock shaped about as far as I am going to take it right now and now just have to sand it totally smooth for BLO. The trigger guard's front screw hole is actually off from the trigger plate. I will have to inlet a tad more on the rear of the trigger guard to get it to fit better, so for now it is a press fit to hold the trigger guard on.

More later.

The Doc is out now and getting ready for church. :cool:
 
"I have one too. If you ever want to actually use the thing for protection, don't use BP. It'll just piss off a potential assailant. Use Bullseye smokeless powder. Lots of guys do."


Did a job on old Abe .
 
:uhoh: Nipple problems. The hammer does not strike the nipple square and as a result, does not fire the cap on the first strike. I will have to take a grinder to the inside of the hammer to compensate. The nipple also was too large in diameter, too. The cap would not go down all the way onto the top of the nipple. I turned the nipple a smidge and that fixed that problem, but now I have to deal with another. (Sigh). :(

Yes, yes, I know, no photos yet. What can I say, busy day and an hour-long Simpsons! :rolleyes:

I'll take the camera upstairs tonight to get a photo and try, yes try, to get it on here tomorrow afternoon. (Hey, lawyers can procrastinate, it is in the Constitution. I'll look that up for you but it'll cost you.)

The Doc is out now. :cool:
 
Post

Back in the 70's when I was hot and heavy in the Mountain Man scene and black powder in general I made a couple of these from kits. The process is not too difficult and only gets in your blood. You will graduate to a rifle and or shotgun kit and then will want to build something from parts from the blank stock and the other various and assundry parts which will need to be fitted and assembled. It just keeps going from there.

The nipple problem: There are different size percussion caps. Generally the number 10 caps are designed for a snug fit on the nipples of the revolvers. Then a larger cap, the #11, is designed for most of the single shot rifles, pistols and shotguns. This might be your problem.

Once you smell the black powder burn, you are hopelessly hooked. (that is, real black powder :D not the new fangled replacement stuff :eek:)
 
GopherO,

Sounds like you have tried the smokeless in your pistol. Don't want to preach but I'm sure a lot of guys on this forum would agree with me that you're taking a big risk putting smokeless powder in a BP gun. Maybe bullseye doesn't produce the pressures of other smokeless powders but its still a risk I wouldn't take.

Don
 
Last edited:
"Did a job on old Abe ."

Guys, I was talking about using Bullseye (which is a high pressure powder) in the NAA Companion. It was originally designed for .22 Mag. cartridges. It is more than adequately built to handle a cylinder full of Bullseye. As I said, it's pretty common for people to use smokeless in these.
 
ED21. I used both the #11 and #10 caps. When I put either on the nipple, I could not push it down more than 1/3 of it's way onto the nipple. The hammer had to do the rest of the pushing. That should not be the way it works. Anyway. I got the cap to rest on the primer finally, but the hammer was not striking flat and was actually pushing the copper cap to one side. So I have to fiddle with it to get it to work. No big deal, and yes, I did not get the camera upstairs to download a photo and it is about time to go back to the office from lunch. Maybe later?!?!?!

The Doc is out now. :cool:
 
Drlaw,

I know what your going through. I bought a factory finished Derringer made by Traditions and I had to completely reshape the nipple(shorten with a file and turn to narrow with sand paper). I also had to alter the hammer and then take the lock off and remove wood from the inletting that was slowing down the action. Its been my experience with these guns that manufacturers put little quality and control effort into these guns. But it is gratifying to get them shooting and they are fun to shoot.

Don
 
Derringer and an oldie

Here is my Derringer and another shot of it with my oldest kit done in the 1970's. A Dixie Overcoat pistol in .380. Now that I look at it, I think I can still take some more wood off the top and rear for esthetics. Still cannot figure out how to add photos that are not thumbnails, unless I have to attach it from somthing like photobucket with a url.
 

Attachments

  • Derringer2.jpg
    Derringer2.jpg
    54.1 KB · Views: 27
  • Overcoat and Derringer 2.jpg
    Overcoat and Derringer 2.jpg
    103.3 KB · Views: 297
attachment.php


This should work. find the picture tab on top of the message page (fifth from right) Push it open. You may run into your pop up blocker here and have to disable it. Mine throws a yellow line on top the page with options to allow popups. Then click on the picture tab again.
Then click open your thumbnail and copy the address from the address line or from the "properties" window. If there is alread an "http" in that window, do away with it by higlighting it and pasting your picture address instead.

attachment.php


clicking on the picture tab should bring up a rectangle with
"http:" in it. eliminate the "http" or highlight and paste your picture address on it eg: "http://www.thehighroad.org/attachment.php?attachmentid=58342&stc=1&d=1179850079" you don't want to leave both "https" in the line or it won't work.
 
Last edited:
Thanks

That shows me the way, better.

Proof that you are never too old to learn! ;)

By the way, what do you think of the Philly Derringer?

The Doc is out now. :cool:
 
My opinion of the Phil Derringer is much higher than the price of the thing would merit. That picture series with the group cluster- the derringer with the rear sight added and checkering is one I/ve shot. Jukar locks in general tend to be reliable and long-lasting though you do sometimes have to deal with such things as the hammer being slightly out of register.
 
DrLaw,

I like that overcoat pistol. I wish somebody still made something like that. Little bigger than a derringer with more thump but still concealable. What size ball and powder charge do you shoot out of it?

Don
 
Overcoat pistol

The other gun there about the same size as the Traditions (Jukar) Derringer is the Dixie Gun Works Overcoat Pistol. It was out in both assembled and kit form for years in the Dixie book, but no longer. The original came with a metal ramrod with a metal button pressed to fit on the end. I turned a wood ramrod, but lost it over the years.
The pistol takes is a .390 caliber and takes a .380 ball with patch. It is a smoothbore, so it can also double as a small snake gun with shot. Accuracy is something I have never had with this as it is a short barrel and smooth bore. It is just a fun little gun. However, if you look close, you can see the modification I had to make to the hammer to get it to work with the way that the stock came inletted for the lock. A mismatch. One of these days I plan to get a new stock and make it into more of a derringer-style of gun. However, I got infected with the derringer fever from the photos that MEC posted here. I got the Tradition's derringer from the Possible Shop (best price I found). :)
As for the Philly Derringer, I got the hammer to fall properly on the nipple now with a little help from a Dremel Moto Tool, as well as putting the trigger guard on. The screw hole for the trigger guard did not line up with the trigger plate as the gun was inletted. I had to add more inletting on the rear of the trigger guard to keep from having too much forward pressure on the forward screw.
Some more finishing of the stock, and some work on the barrel to remove some marks and I will be ready to stain and brown it.
Yes, it takes some work, but the work is what will make it worthwhile. The lock itself seems to be strong enough and has a coil spring for the mainspring.
I will have to do some work on the trigger and sear bar to take up slack, but hey, this is not a precision gun.

The Doc is out and working on it again. :cool:
 
Construction Update

Went to the Dremel Moto Tool box since I thought I had polishing wheels. Nope.

So I have them on order for the trigger guard. I shimmed the trigger and it is nice and tight without wiggle.

I also decided to use the side plates for the tennon pin. Right now I am cutting the inlay in. I previously put a few coats of BLO on the stock. Makes it a nice tan color. I will also be trading in the silver screws for brass ones. I think that will look better.

I also have some browning solution on order, too. The barrel will be the last thing from the looks of it to get done.

As for checkering. I was thinking about that, but I also know that I know nothing about checkering and the thought of screwing up the gun on a novice effort kept me from making a purchase of a beginner checkering set today. (Any thoughts on that :confused: )

When I finally finish this, in about a week or so as it goes now, I will put up some more photos.

Then I will test it out and put up some photos of that!

The Doc is out now. :cool:
 
I also have some browning solution on order, too. The barrel will be the last thing from the looks of it to get done.

Hot or cold browning?

...the thought of screwing up the gun on a novice effort kept me from making a purchase of a beginner checkering set today. (Any thoughts on that ? )

Good decision. Best to practice on a beater first.

...in about a week or so as it goes now, I will put up some more photos.

Then I will test it out and put up some photos of that!

Looking forward to it.
 
I can attest that checkering requires some skill. Skill that I don't have.
 
Another update

found a piece of brass tubing. Cut off a short amount and then slipped it over the sear/trigger bar. The sear itself is steel, the trigger brass. The trigger already had a wear mark on it. I crimped the brass down on the sear bar with a vice grips. Looks ugly, but works great. The trigger does not have as much rearward movement now to engage the sear bar. With the shims in, it does not wiggle or move back and forth as it would otherwise.

The shims by the way, were HO Train coupler covers that I chopped the sides off of and the hole for the pin that the coupler would otherwise be on, fit the trigger pin nicely.

Sometimes it helps to have a couple hobbies! :D

Also, I have the barrel pin side plates on and inletted.

The Doc is out now. :cool:
 
Status
Not open for further replies.
Back
Top