
JimGnitecki
Member
- Joined
- Mar 28, 2010
- Messages
- 1,258
Calculating True 9mm pistol Base-to-Ogive from measurement taken on Hornady Bullet Comparator
WHY:
I thought I would start this thread for pistol shooters interested in determining true cartridge Base-to-Ogive (“BTO”), and subsequently the correct length of BTO to provide their targeted amount of “Jump” in their pistol, via their handloaded ammunition.
I am doing this because I realized recently that although ai had set my Dillon bullet seating die on my Dillon XL750 very carefully, I was nevertheless getting a variation of as much as .010” in OAL as measured from base of cartridge to tip of bullet. I don’t currently know if that variation is a result solely of typical varying meplat (“tip”) length on the bullet I am using, or if some of it is a true BTO variation.
Determining TRUE BTO is especially important on my current 9mm 115g load because I am using a load from the Vihtavouri load tables, that is moderately vigorous (1324 fps / 451 ft lb), and so I am particularly keen on ensuring that (1) the COAL does not ever slip below the minimum recommended for pressure safety by VV, and (2) that I maintain at least minimal “Jump” in my tightly chambered SIG P210A Target model pistol, again for pressure safety.
But, I also want consistent and optimal BTO to help ensure optimal ACCURACY.
Determining “True” BTO is a challenge on at least this specific 9mm pistol cartridge, because:
- I am using the highly regarded Hornady HAP 115g JHP .355” bullet, whose ogive above the shank is basically a truncated cone with a 15 degree slope, topped by a meplat (“tip”) that is a hollowpoint of fairly broad diameter. Either end of the reversible Dillon seating insert fails to bear on the 15 degree ogive. The insert instead bears on the broad hollowpoint tip, whose length varies (as does the tip length of even the very best bullets, pistol or rifle). Normally, bullet seating inserts are designed to bear on the ogive for this reason, since the BTO on quality bullets does NOT vary to any discernible extent. But the specific combination of Dillon insert and this HAP bullet does not achieve that goal of ogive versus tip contact.
and
- Although Hornady makes a Bullet Comparator Gage specifically designed to help a reloader determine BTO, it is aimed at rifle versus handgun loading, and so does NOT provide any gage insert designed to work with a .355” diameter bullet. The closest I can get is a .338” gage insert. The next size up is larger than the .355” of the HAP bullet.
OBJECTIVES:
I THINK I have determined how to use the Hornady gage to:
- Determine where my variation is actually occurring (i.e. tip only, or tip plus BTO)
- Determine true BTO
- Determine current “jump”
- Determine the acceptable BTO range (minimum to maximum) that keeps my peak pressures safe
- Be able to adjust jump accurately within that range to optimize the load
In the following text, I try to describe my planned process. I would appreciate it if any experienced handoader could critique it and correct me where i am wrong, or simply improve the process. Please do not suggest I go to separate single stage handloading, as I shoot too many pistol rounds per month to make that an attractive option. I want to use the Dillon XL750 progressive machine.
PROPOSED PLAN:
Here’s my first draft of my proposed process, starting with a diagram:
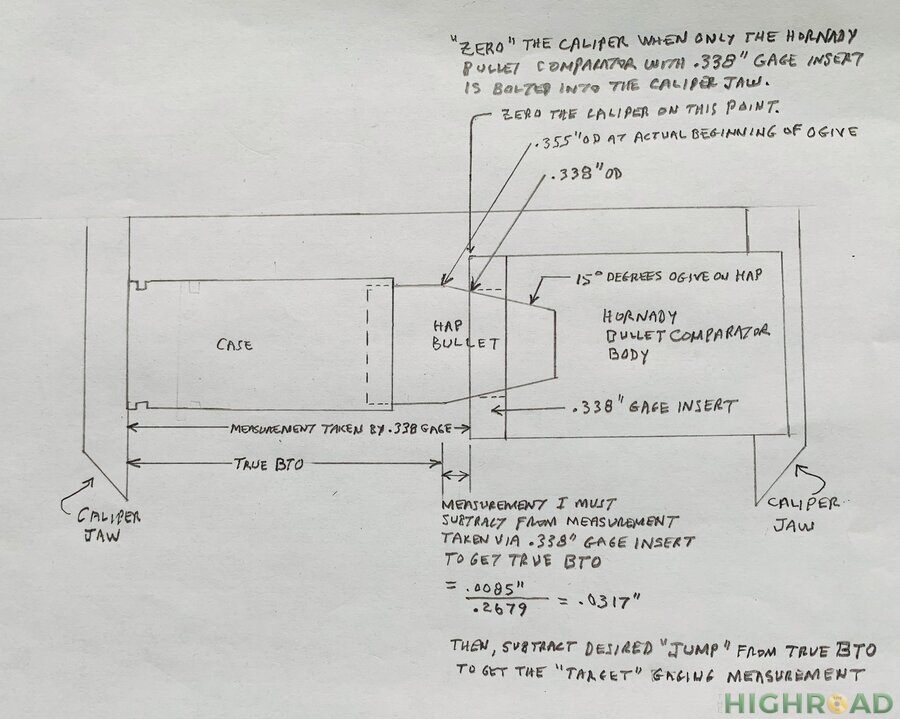
My proposed process is:
Insert the .338” gage insert into the Hornady Bullet Comparator
Secure the Comparator to the moving jaw of my digital caliper via the slot and bolt that Hornady provides
Close the caliper with the gage in it, and “zero” the caliper, so that it is now measuring the distance between the face of the .338” insert to the other jaw of the caliper as it zero default
I know that the slope of the “cone shaped” ogive on the HAP bullet is exactly 15 degrees (per Hornady Tech Support), and that the slope is constant
I know that I want to measure the BTO, from base of the case to the .355” diameter of the bullet right where the bullet’s shank ends and the bullet’s ogive begins. But I am instead measuring to the point where the 15 degree slope of the HAP bullet is already down to .338” diameter
The difference in DIAMETER between the desired true BTO point and the actual point measured is .355” minus .338” = .017”
Therefore the difference in RADIUS is .017” / 2 = .0085”
But the slope of the HAP ogive is a constant 15 degrees, so I can use trigonometry to determine the distance along the bullet AXIS that separates the 2 points
The formula is:
.0085” / (axial distance) = Tan of 15 degrees = .26795
Doing the math, axial distance = .0085” / .26795 = .0317”
So, to get my True BTO:
Place the completed cartridge into the caliper, with the tip of the bullet resting inside the .338” insert, and the bottom of the case resting against the other jaw of the caliper
This gives me the Base-to .338” point on the ogive
To get the current True BTO, subtract .0317” from this measurement
I can then determine current “Jump” by making a cartridge deliberately excessively long (for my SIG P210A Target, this means a COAL (base to TIP) of about 1.153” or more). Then doing an iterative “plunk & rotate test”, gradually reducing the length of the cartridge until it just passes the test. That is then the maximum cartridge length to prevent the ogive of the bullet form contacting the rifling when chambered
Then measure that cartridge’s base-to-.338” length in the caliper/gage setup described above, and determine True BTO for zero jump by subtracting .0317” (as described above)
Decide what increments of Jump I want to test
Adjust the seating die to make those incremental changes in Jump.
This incremental testing with differing Jump will be difficult to do with the Dillon die, because by bearing on the hollowtip tip versus the ogive, this die invites variation in true BTO because the hollowpoint can be relatively easily deformed just a bit by seating pressure, AND since each bullet tip (unlike its ogive) varies, I would have to keep using the exact same individual bullet and work my way downward to shorter BTO lengths, hoping that I never accidentally adjust the die just a bit too much!
Fortunately, a partial remedy is on the way. Another forum member has made a custom die insert for me for the Dillon die for a very reasonable cost, and that new insert correctly grabs the ogive, not the tip, of the HAP bullet (He tested it with an XTP bullet which he has, which is identical to the HAP except that it has cuts in its hollowpoint perimeter to promote terminal expansion. That die has been mailed to me from The U.S. and hopefully won’t be too delayed by the COVID-19 shipping slowdowns. It will be at least 10 to 14 days though I think.
This incremental testing with differing Jump will be MUCH easier yet for me to do once the Redding Competition Bullet Seating Die finally arrives (a long time, since it too is coming from US to Canada during COVID-19 transportation slowdowns). This is because that die has a micrometer adjustment on it, with marking increments of .001”, and requires 7.2 degrees of rotation to move each .001”. And, the settings are reproducible. I am looking forward to getting THAT entirely new die setup.
So, this is my plan.
Please feel free to point out any errors or omissions! I want to do this right!
Jim G
WHY:
I thought I would start this thread for pistol shooters interested in determining true cartridge Base-to-Ogive (“BTO”), and subsequently the correct length of BTO to provide their targeted amount of “Jump” in their pistol, via their handloaded ammunition.
I am doing this because I realized recently that although ai had set my Dillon bullet seating die on my Dillon XL750 very carefully, I was nevertheless getting a variation of as much as .010” in OAL as measured from base of cartridge to tip of bullet. I don’t currently know if that variation is a result solely of typical varying meplat (“tip”) length on the bullet I am using, or if some of it is a true BTO variation.
Determining TRUE BTO is especially important on my current 9mm 115g load because I am using a load from the Vihtavouri load tables, that is moderately vigorous (1324 fps / 451 ft lb), and so I am particularly keen on ensuring that (1) the COAL does not ever slip below the minimum recommended for pressure safety by VV, and (2) that I maintain at least minimal “Jump” in my tightly chambered SIG P210A Target model pistol, again for pressure safety.
But, I also want consistent and optimal BTO to help ensure optimal ACCURACY.
Determining “True” BTO is a challenge on at least this specific 9mm pistol cartridge, because:
- I am using the highly regarded Hornady HAP 115g JHP .355” bullet, whose ogive above the shank is basically a truncated cone with a 15 degree slope, topped by a meplat (“tip”) that is a hollowpoint of fairly broad diameter. Either end of the reversible Dillon seating insert fails to bear on the 15 degree ogive. The insert instead bears on the broad hollowpoint tip, whose length varies (as does the tip length of even the very best bullets, pistol or rifle). Normally, bullet seating inserts are designed to bear on the ogive for this reason, since the BTO on quality bullets does NOT vary to any discernible extent. But the specific combination of Dillon insert and this HAP bullet does not achieve that goal of ogive versus tip contact.
and
- Although Hornady makes a Bullet Comparator Gage specifically designed to help a reloader determine BTO, it is aimed at rifle versus handgun loading, and so does NOT provide any gage insert designed to work with a .355” diameter bullet. The closest I can get is a .338” gage insert. The next size up is larger than the .355” of the HAP bullet.
OBJECTIVES:
I THINK I have determined how to use the Hornady gage to:
- Determine where my variation is actually occurring (i.e. tip only, or tip plus BTO)
- Determine true BTO
- Determine current “jump”
- Determine the acceptable BTO range (minimum to maximum) that keeps my peak pressures safe
- Be able to adjust jump accurately within that range to optimize the load
In the following text, I try to describe my planned process. I would appreciate it if any experienced handoader could critique it and correct me where i am wrong, or simply improve the process. Please do not suggest I go to separate single stage handloading, as I shoot too many pistol rounds per month to make that an attractive option. I want to use the Dillon XL750 progressive machine.
PROPOSED PLAN:
Here’s my first draft of my proposed process, starting with a diagram:
My proposed process is:
Insert the .338” gage insert into the Hornady Bullet Comparator
Secure the Comparator to the moving jaw of my digital caliper via the slot and bolt that Hornady provides
Close the caliper with the gage in it, and “zero” the caliper, so that it is now measuring the distance between the face of the .338” insert to the other jaw of the caliper as it zero default
I know that the slope of the “cone shaped” ogive on the HAP bullet is exactly 15 degrees (per Hornady Tech Support), and that the slope is constant
I know that I want to measure the BTO, from base of the case to the .355” diameter of the bullet right where the bullet’s shank ends and the bullet’s ogive begins. But I am instead measuring to the point where the 15 degree slope of the HAP bullet is already down to .338” diameter
The difference in DIAMETER between the desired true BTO point and the actual point measured is .355” minus .338” = .017”
Therefore the difference in RADIUS is .017” / 2 = .0085”
But the slope of the HAP ogive is a constant 15 degrees, so I can use trigonometry to determine the distance along the bullet AXIS that separates the 2 points
The formula is:
.0085” / (axial distance) = Tan of 15 degrees = .26795
Doing the math, axial distance = .0085” / .26795 = .0317”
So, to get my True BTO:
Place the completed cartridge into the caliper, with the tip of the bullet resting inside the .338” insert, and the bottom of the case resting against the other jaw of the caliper
This gives me the Base-to .338” point on the ogive
To get the current True BTO, subtract .0317” from this measurement
I can then determine current “Jump” by making a cartridge deliberately excessively long (for my SIG P210A Target, this means a COAL (base to TIP) of about 1.153” or more). Then doing an iterative “plunk & rotate test”, gradually reducing the length of the cartridge until it just passes the test. That is then the maximum cartridge length to prevent the ogive of the bullet form contacting the rifling when chambered
Then measure that cartridge’s base-to-.338” length in the caliper/gage setup described above, and determine True BTO for zero jump by subtracting .0317” (as described above)
Decide what increments of Jump I want to test
Adjust the seating die to make those incremental changes in Jump.
This incremental testing with differing Jump will be difficult to do with the Dillon die, because by bearing on the hollowtip tip versus the ogive, this die invites variation in true BTO because the hollowpoint can be relatively easily deformed just a bit by seating pressure, AND since each bullet tip (unlike its ogive) varies, I would have to keep using the exact same individual bullet and work my way downward to shorter BTO lengths, hoping that I never accidentally adjust the die just a bit too much!
Fortunately, a partial remedy is on the way. Another forum member has made a custom die insert for me for the Dillon die for a very reasonable cost, and that new insert correctly grabs the ogive, not the tip, of the HAP bullet (He tested it with an XTP bullet which he has, which is identical to the HAP except that it has cuts in its hollowpoint perimeter to promote terminal expansion. That die has been mailed to me from The U.S. and hopefully won’t be too delayed by the COVID-19 shipping slowdowns. It will be at least 10 to 14 days though I think.
This incremental testing with differing Jump will be MUCH easier yet for me to do once the Redding Competition Bullet Seating Die finally arrives (a long time, since it too is coming from US to Canada during COVID-19 transportation slowdowns). This is because that die has a micrometer adjustment on it, with marking increments of .001”, and requires 7.2 degrees of rotation to move each .001”. And, the settings are reproducible. I am looking forward to getting THAT entirely new die setup.
So, this is my plan.
Please feel free to point out any errors or omissions! I want to do this right!
Jim G

")