Dremel work on cylinder stop

Status
Not open for further replies.

BowerR64

Member
Joined
Aug 1, 2013
Messages
1,243
Bower, when you say sloppy, do you mean cylinder movement when it is locked up? Your use of the word dremel scares me. You need to get a set of small files, a hard stone and a drill press vise for use on a table top. You need to fit the bolt head to the stop notches, 10 degree slope from the leading edge or high side of the head to the trailing edge. Using the vise helps you make sure you keep the sides parallel (do not make a wedge shape out of the head of the bolt). Where the arms meet the bolt, is the opening squared or rounded? It's prob. square. Use the small round file and the vise and make it round ( U not [ ). The left arm of the bolt needs an angle on the upper most part to allow the hammer cam to push it aside as it comes back to rest. Likewise the arm needs to snap back over the cam just before the hammer comes to rest (last click you hear when that happens). The timing of the bolt drop (or rise) should be in the approach (or lead ) if there is one. Remys don't norm. have them. Each bolt is a custom fit so it's hard to think you can do it with a dremel.

45 Dragoon

Well this is an odd copy, its not a common pietta or uberti so i had to get something that looked close to what i had and make it work. Its a brass frame colt navy .36 made by Hawes firearms

When i say sloppy everything feels really loose compared to how it was when i first started shooting it. I cleaned it really well that could be one of the issues, OR im shooting to hot of a load with T7 in it. Im using a level scoop of T7 with a spent 9mm cartridge (13-15 grains)

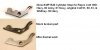
Here is the image of the stock dixie part, the stock broken part and the dremeled part. (In red is what all i had to remove)

attachment.php


What i did was put the screw threw the hole and then aligned the bottom edge they seem to have a similar angle. I then took off everything that stuck up on the new part trying it each time in the gun till it started to work sooth then i stopped. Then i sanded all the rough edges off with 800 sand paper.
 

Attachments

  • BP dremel work.JPG
    BP dremel work.JPG
    23.9 KB · Views: 175
Last edited:
The pivot hole is critical. From it all measurements and cuts are made.

Kudos for your skill with the dreaded dremel. I'm not good enough but I did use it once to cut a 55 gal plastic drum for a rain shield I need to make. Anyway, I would only use the dremel to a certain point at which point the hand files come into play.
 
I have found that the sanding discs are a relativly safe grinding device for the Dremel. Even with them you have to be very careful.

Don't ask how I know.
 
When I saw "Dremel" and "cylinder stop" I thought "OH NO! ! ! !". But used for what you did I can't think of a much better tool for the job. At least not for the roughing out stage. And with care, and the right tool tips, even for the finishing up.

Neatly done!
 
I'm still a little confused by "everything feels loose" but, if the bolt is too small for the notch, the cylinder will not lock up tight.other than that, the looseness will be because of something else. Using hotter loads may have allowed the cylinder ratchet to dig into the brass frame (fore and aft movement of cylinder). Look for a ratchet pattern in the recoil shield. Maybe a combo of both ? You said that everything works now, the bolt may stop the cylinder when it advances (even though it is to big for the notch) but can you turn it backwards? When you cock it , the hand may be what is keeping it from moving backwards (since there is no hammer stop). With the hammer down, can you rotate the cylinder backwards? When you sanded all the rough edges with sand paper, you may have created excessive clearance within the bolt window (hole in the frame the bolt head goes through). Hmmmm I will say, this is a great way to learn, I wish i'd had somebody to learn from . . . . . . . a long time ago !!! It's amazing how much goes on with just one part.

The Hammer is the engine, but the bolt is the "computer" !! The notches in the hammer are where they are. The trigger is the length it is. The hand rotates the cylinder. But all the timing revolves around the adjustments to the bolt. How soon it's picked up, when it will drop in the lead, how far into the stop notch it goes, when the arm snaps over the hammer cam. Whoa !!

45 Dragoon
 
Last edited:
What Dragoon said! What I do to test proper lock is this:

With an unloaded pistol, I bring the hammer to full cock. Then, while slowly lowering the hammer, I grasp the cylinder in my other hand and try to rotate it backwards. If the hand is holding the cylinder against the bolt at full cock, then the cylinder will be able to be rotated back as the hand lowers.

Every Italian revolver I've seen has a poorly fitted bolt. I always make sure the bolt fits the notches first, and do so with both pieces out of the gun. Then I put the revolver back together and keep shortening the bolt leg that rides the hammer cam until it releases into the lead notches as the cylinder rotates.
 
I went slow with the grinding, the part was $7.50 thats why i gave it a shot.

I got it to fit first with the screw in. Then the hammer wouldnt cock because the little forks were to long. I ground those down and then it would cock, but at half cock the cylinder wouldnt rotate because the little nub was to tall.

Finally i ground down the nub a little at a time.

When i say sloppy the cylinder moves to much front to back. The gap between the cylinder and the forcing cone seems to be larger then it use to be.

Ill have to look at the stop plate and see if it has markes in it.
 
Status
Not open for further replies.