Gutless method of field dressing a critter.

H&Hhunter

Moderator
Staff member
Joined
Jan 28, 2003
Messages
13,333
I’ve been asked multiple times over the years about the “gutless” method of field dressing. This works on any four legged animal on the planet, including elephant.

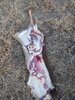
We’ll use Robert, long time staffer at THR as an example with a doe whitetail he shot recently.

Start with a dorsal cut right down the center of the spine from the tail to the neck.

Then make a cut down the front line of the shoulder, across the front the leg all the way down the ribs and belly down the front on the hind quarter to the hock. And skin off the whole side of the deer.

44F05E17-3FB4-492F-9357-45B9121602EE.jpeg E0B4DCBE-7B48-4462-AF0C-9040B212E28C.jpeg 290C63DF-151A-4A16-8993-7A02592C271E.jpeg I’v
 
Last edited:
Carefully find the line of the last rib and cut out the flank muscle revealing the abdominal cavity. Gently pull the gut down revealing the tenderloins attached to the spine between the ribs and the pelvis. Easily excise first one then the other tenderloin.

123F2B65-5D91-48B0-9454-4F9AD80724D3.jpeg 56F21167-445B-4EBE-8461-DE409F4D4A50.jpeg A60A78A4-4BAD-461E-B73B-EE31C9EF4C1F.jpeg 7E08B95C-F1A4-4416-899B-90D4002B95C0.jpeg
 
Last edited:
Skin up off the neck and take any neck meat you’d like. You can also unclip the ribs from the spine on both sides and take the rib cage if you so desire. After doing so you can easily take the front tenderloins out as they’ll be exposed at that point. That is the “gutless” method of field dressing and quartering a critter. If you want to take the cape simple make the same dorsal cut that we started with then cut the hide all the way around the ribs about midway between the last rib and the line of the shoulder. Skin out the the hide tubing out the front legs to about 4 “ below chest line skin up to the base of the skull and cut off the head. Then proceed to do just as shown above for meat care.
B2A0A513-F4A0-4DD0-B9CB-98EE4D39BCCB.jpeg
 
Last edited:
Excellent timely post.
I have read about this technique that was used by native Americans to bring home the spoils of the hunt. They would wrap the meat up in the hide and carry it back to camp. The meat and hide were to most important to them. Later they would send some of their wives and kids back to the kill site to gather the bones and whatever was left.
 
Very nice post.

I’ve taken it a step further for remote hunting locations.

I de-bone at the kill site and I use the hide to protect from flies, which is a concern in an August/September archery hunt. The only things I take are boneless meat, heart, kidneys, liver and head to prove sex. When I make a trip out, I shoo the flies away and lay the hide over for protection. Everything else stays at the kill site to promote biodiversity :)

This year, 4 trips, 1.1 miles each round trip. Here I’ve de-boned one rear hind quarter and 2/3 of one back strap. The pack has an anti-microbial game bag with 60 pounds of deboned elk meat in it. I converted a 5 cubic foot freezer to a refrigerator set at 42F powered by a 2200 watt generator which cools the meat for the 6 hours it takes me to break camp and get home.


View attachment 956701

View attachment 956702
 
Last edited:
Your photos and instructions are clear and well written. But (there is always a but, and I'm it today) you are making this old meat inspector cringe. This method exposes the meat to contamination from the environment. Leaving the hide on the carcass until it is in a packing house (or your kitchen or garage...any more controlled clean environment) protects the meat from dust, dirt, flies, handling fumbles, etc. Stuff that gets on the meat from the environment is not going to rinse off with a hose. Federal meat packing regulations require trimming off the contaminated surface with a sterile knife, one that has been dipped in boiling water before it contacts the carcass, otherwise you are just spreading the contamination from one area to another.
Cooking the meat completely (internal temperature at least 165 degrees F) compensates for a lot of dressing errors. Those who prefer their venison rare might be advised to protect the meat by leaving the hide on for later dressing.

One trick I use when gutting a deer in the field: wash the inside of the carcass with vinegar. The acid helps prevent bacterial growth for a while until the carcass is in a cooler. Many beef packing houses spray carcasses with acetic or lactic acid to help control E. coli growth/contamination.

I understand that packing out the whole animal, especially a large one like an elk, may not be practical. In such instances, the dissection you have outlined is a good way to go as long as consideration is given to avoiding contamination after the meat is exposed. Again, cooking thoroughly covers a multitude of sins!

:thumbup:

Interesting comment. How long, time wise, from kill to butchering before refrigeration is necessary, as recommended by USDA? I know the answer, because it set my goal for having meat out of the field.

You should know that contamination in the woods (grass, pine needles, hair, etc.) is different than contamination in a feed lot (bacteria, cow sh*t, etc.) and elk / deer are a lot cleaner than cattle.

My first choice is not to skin in the field. But first choice isn’t practical in remote locations.
 
Last edited:
I was a Public Health Veterinarian for the USDA/FSIS from 2001 to 2013, supervising the meat inspectors in packing houses and food processing plants. There was no specific regulation in existence at the time I retired for chilling a carcass within a certain period of time, but the accepted guideline was to get the beef or hog carcass down to 40 degrees F within 24 hours of slaughter. If the establishment's HACCP plan called for a longer timeline, it had to be supported with published evidence or bacteriological studies performed by the establishment itself. There may be additional regulations imposed since 2013 of which I am not aware. Bureaucrats do that. Chilling guidelines for poultry are different from beef and swine. But as a general rule of thumb, if one can get the meat down to 40 degrees within 24 hours, it should prevent most bacterial growth.

How does that square with what you were told?
 
I was a Public Health Veterinarian for the USDA/FSIS........But as a general rule of thumb, if one can get the meat down to 40 degrees within 24 hours, it should prevent most bacterial growth.

How does that square with what you were told?

That’s spot on, and then some. Thank you!
 
Last edited:
Nicely done!

We usually remove the legs and leave the skin on, but otherwise thats how I've always "quartered" animals. Anywhere here where you don't have to bring them out whole, that's how we handle them.
 
Excellent write up with pictures.

I did similar to that when I lived in Michigan. Snow helped keep everything clean. Now that I hunt in the South. I suck it up and start dragging. Guts still stay in place.
There is one thing. I don't drag over half a mile.
 
For the longest time I used to pack a saw to split the pelvis to get the rear quarters off the animal, this is wholly unnecessary. Once you get the hide peeled off of the hind quarter, feel for the hip bone. Draw your knife along the butt side of that hip bone in a scooping motion (following the bone) and eventually toward the spine and tail. Follow up that cut to the groin and follow the pelvic bone to the hip socket for an easy quarter for packing.
 
This was my second deer of the hunt. The first one was definitely a learning experience, but H&Hhunter is a great teacher. While he still provided guidance I made many of the cuts without direction and the competency of my cuts was much better. The pelvis gives me fits. It goes way back up in there...

While both the traditional and the gutless methods have their pros and cons, I much prefer the gutless method.
 
Shot my first elk in years. My wife and I were hunting together (very glad she didn't make it two!), and used the gutless method on a cow. It had been some years since I field dressed, and my wife never had, though she took butchering classes as a kid. With two of us, we pretty much kept the meat clean, got it bagged and hung in a tree. I carried out one ham, then returned the next day for everything else. But the gutless method was fast, easier, and cleaner than the other alternative. As one well know advocate of this method states, there are no elk meat flavor enhancers in that big sack in there.
 
Back
Top