Michael Tinker Pearce
Member
- Joined
- Oct 23, 2016
- Messages
- 1,576

The other week someone gave me this Continental Arms Company .410 with a bent barrel. The forearm was also buggered and it was missing a firing pin. About the same time a buddy mentioned that he had a .22 Hornet chamber reaming die and I remembered a random 10/22 barrel tucked away in the shop. Poor Impulse control took over and a project was born. My buddy mailed me the chamber reamer and I was off.
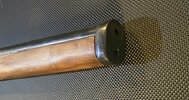
I cut off the .410 barrel at the front of the chamber and bored it out to 5.8". Then I turned down the breech-end of the 10/22 barrel to 5/8" and silver-soldered it into the breech. I reamed the chamber for .22 Hornet and modified the extractor for the smaller cartridge. Since I'd had to cut the barrel a bit to get it onto the lathe it's now 16-3/4". I made a flat on top of the breech and screwed a random piece of Picatinny rail on. I fabricated a firing-pin and made a new full-length fore-arm out of some old Douglas Fir 2x4 I had lying around. I made a plate to fit onto the muzzle and ran a 1/4-20 screw into it to secure the forearm. I mounted a TRS25 I also had laying around for test-firing.
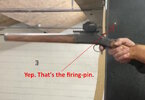
The first time out it ejected blew the primer and ejected the firing pin, which hit me in the forehead. I made a new firing pin to much tighter tolerances and tried again, this time holding the gun at an arm's-length.

This time it didn't hit me at lease. OK, I bored out the hole for the firing-pin retention pin to 3/16", modified the firing pin to work with the larger-diameter pin and secured it with a pin made from the shank of a chromium-cobalt drill bit. That worked. It wasn't ideal though; shotguns have large firing-pin holes and primers were flowing back into the hole, necessitating a sharp rap on the barrel to get the gun open after firing. On the right track but not there yet. I bored out and sleeved the firing-pin hole with a threaded insert and modified the firing pin again and voila! problem solved.


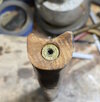
For a finishing touch I cut off one of the pieces of brass with a blown primer and inset it into the tip of the fore-end so the retention screw would be bearing on metal rather than the wood of the fore-end. A buddle of mine came up with an old Weaver fixed-4x scope and I mounted that. Looks like this one is more or less finished! it's light and handy, barely topping 6lbs. with the scope mounted and balances nicely.

OK, to address the issues- I was a bit worried about the 1-16 rifling pitch, but from a casual rets it's stacking bullets at 25 yards so I guess that's alright. When I can get it to a proper rifle range we'll see how it does at 100 yards. the other concern was that .22 Hornet specifies a .224 diameter bullet and .22 rimfires typically have a .221-.222 bore. using factory PPU 45gr. ammo this does not seem to have created an issue, but when I reload this brass I plan to use .221-.222 bullets.
I'm super happy with how this has come out. I need to get some .22 bullets for reloading; I'm running low on ammo and it's gotten kind of hard to find.


