New Holster For 617 Cut Out For C-More Railway

Status
Not open for further replies.

AzShooter1

Member
Joined
Dec 6, 2006
Messages
1,174
Location
Surprise, Az
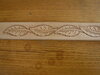
I got frisky today and decided to make another holster. This one is cut out for a C-More Slide Ride red dot sight. I used a stamped belt hook. This is my third attempt at carving so I'm open to suggestions.

There really is a flower in there and my initials.

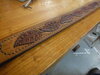
I had the welt completely sewn on and tried to fit the gun. I didn't trim the inside of the web so the gun only went in a few inches. I quickly took it apart, trimmed the girth of the web and sewed it back on. The gun now fits perfectly and goes in just far enough for the C-More to sit on the front of the cutout.

Retention is excellent but I may put a pressure screw on it in the future.

So: Comments are welcome. For C-More with belt strap.jpg Back of holster for C-More.jpg Welt.jpg
 
Going by what I can see in your pics, you probably don't have the moisture in your leather quite right when you are tooling/carving. If it is too dry you can swing the mallet like john henry and still not get a good impression, too wet and the leather is mushy and doesn't tend to hold the impression as well as you continue to work with it.
The key thing to look for is if the color changes when you strike your tool. You want the tool to have a burnishing effect. After you hit the stamp, the impression should be darker than the face of the leather around it. If they are the same color it is usually too wet (seems to be the more common mistake then too dry)

It is also difficult to form tooled leather and not mess up the tooling. For things like the pommel of a saddle they actually form the leather to the tree of the saddle and then carve it in place rather than try to work with it flat. For items like a holster the best thing to do is plan your tooling pattern strategically to avoid areas where you have to stretch or press the leather a lot.

You can also use dye to help your tooling stand out. This is a belt I made back at Christmas. The first pic is the bare tooled leather, you can kind of see the burnishing effect the tools have when your moisture is right. The 2nd pic is after dye. I used a water based dye to do just the leaves, and then I went over the whole belt with fiebings tan antique. The antique is a gel that fills in all the little cracks and cuts and makes then darker. You get much more contrast with antique than you do with just dye.
 

Attachments

  • DSCF3301.JPG
    DSCF3301.JPG
    94.6 KB · Views: 10
  • DSCF3306.JPG
    DSCF3306.JPG
    109.7 KB · Views: 10
redneck:
Thanks for your comments. I really appreciate them and will watch for it when I do my next tooling. I think I've been too dry when I case the leather. I should also use my spritzer to keep it moiste.

Love your belt. Tooling is great and the colors are fantastic. I need to get some water based dye and try it.

Again. Thanks for your advice.
 
I tend to over wet the leather and then come back to it when it has dried the right amount. Once it is ready to work with I keep a sheet of saran wrap over any areas I'm not working on, or if I don't have time to tool it all at once I will cover it and come back.
 
Status
Not open for further replies.
Back
Top