Paper Cartridges, step by step photos..

Status
Not open for further replies.
Quick question: would this work for a muzzle loading pistol?

Like a kentucky traditions??

No, it's not intended to work in single shot muzzle loaders especially those having a drum ignition system. Generally the paper cartridge needs to be opened up and then the powder would need to be poured into the barrel.
The right size balls can then be paper patched or the paper can be rammed and used as an over powder wad.

If the design of the flash channel of a single shot gun allowed for a wire to be inserted to pierce the paper cartridge, and/or if a few grains of powder were to be placed under the nipple to enhance ignition, then it's possible that the percussion cap flame could be strong enough to reliably ignite a powder charge. But even that method would make for a more tedious loading process which is in opposition to the purpose of preparing paper cartridges in advance in the first place.
Even having a delayed ignition after loading a paper cartridge is not optimal so it's not recommended to load them into single shot muzzle loaders because of that distinct possibly. :)
 
Last edited:
I only have 36 cal. ball and cap revolvers but this should work for many other cal's.

I don't use a paper cartridge for its not near as easy as this method. To me the paper cartridge isn't worth the effort.
I would show you the real thing but all my gun stuff is packed away from the 70's. So I drew a 3d drawing of the method I used to use.

This is how I do it.

I don't use a grease wad under the ball ever. Only on top of the ball.

I made some boxes like the drawing with a sliding lid. inside is a block of wood 
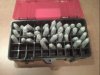
with holes drilled for 38 mag. cases
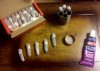
 to fit into. leave plenty of the case above the block to get a hold of to pull them out. Also enough room between the rows to get your thumb and forefinger around each one. 6 to a row.

Make sure they are fired cases.... With the spent primer still in them.

Load your charge into each case.

A 36 cal. ball will sit right on top of the case. The lid slides right over the ball it can't fall off. Make sure your lid fits right almost on the balls. If the lid fits right the powder can't get out of the cases.

If you want to weather proof them then all you have to do is dip each ball into melted paraffin. let harden then set the ball down on each case.


slide the lid on. Now to use just slide the lid back to get at the first row. pull a case out with the ball on it. bring the case and ball up to the muzzle. push the ball off on to the muzzle with your thumb to hold it. Then dump the powder into the cylinder. drop the case and grab the ball of the muzzle and set it on cylinder mouth. ram it home. All done with one hand. Other holding gun barrel up.
With practice you will get fast at it.

View attachment 116168
 
Last edited:
Hi guys,
Been fooling around with these paper cartridges since I got my b & c revolvers this spring.
Probably have shot around three hundred of them so far. Had a few delayed rounds in the beginning, and a few that required a second hit with a fresh cap to set them off, but I found it was because the cap was not fully seated on the nipple or the paper tail of the cartridge had been left too long and it blocked the hole of the nipple. Used regular primers in the the first few firings; have since switched to mag caps since then and have had no ignition problems after the switch to the mag caps which seem to burn right through the paper no problem. I noticed that if I used regular caps, and I pricked the end of the cartridge with a nipple pick that it eliminated any of the aforementioned problems too. Making the cartridges does take a little preparation time, but it saves time for me at the range, as I simply drop them into the chambers, ram them down, cap, and then fire away: really quicker than pouring powder from the flask, dropping a wad and ball (or just a ball), and then ramming it down. I like them and they work for me.

Regards,

jgray
 
I am grateful you mad e the effort and posted this training. I know it was alot of work. I tried this last night, and cannot wait to put fire to the cartridges I made. Thank you!
 
Wow.

I can't believe this thread is still going. I never have problems with the tail clogging the nipples on my 58 remington. I would think that if you are having problems with this you are probably not clipping them short enough. I have found that a nail clipper is actually more of a precise tool for this than scissors. You can clip the tail amazingly short without compromising the structural integrity of the cartridge. If you have rolled it tight enough the paper will split and expose the powder when you ram the ball down. I used to do this with a .36 navy also. Same technique, but it helped to trim the paper a little with scissors so that there wasn't a huge overlap. You can preshape the paper with a mandrel if you want, but I found that I could go just as fast without one. I thought the guy using the sharpie was pretty clever though. I guess there is really no one way to do this, everyone has their own technique that works best for them. Anyway, it's good to see people trying this and having success with it.
 
Hey guys I''m the new kid on the block: SO hello all!! How I call this very good information. I never heard of this before. I really like that way of loading a cap & ball revolver. I just sent the wife out to pick up some rolling papers. When Jackie gets back I'm going to make about 24/30 rds. Thank you for the idea. Mike
 
What???

No little bright red and gold cigar type band to tease it all up???

Shux....

LOL !!!

Beautiful job !!! They look very professionally done !!!

Sincerely,

ElvinWarrior... aka... David, "EW"
 
1851 Colt Navy

Has anyone used the paper cartridges for the Pietta 1851 Colt Navy in .36 caliber?

What load do you use?

Thanks. I am getting the rolling papers this weekend and will try to make some...
 
@ Thewall, I use them all the time in mine. I usually use about 20 grs of BP with no wad. I find that instead of folding them over like some do I just twist the ends and wet them a little bit. just enough to get the paper to stick together. I l8r then snip a little off of the tip. at the range the paper just goes into chamber up to the ball and when you compress it tears the paper car. open (at least I think it does.) and she goes bang every time. keep in mind the 36 is pretty narrow so you will want a some what conical shape to the paper, tapered from the ball down. good luck and have fun.:D
 
Last edited:
Finally got to roll some of my own...

Okay -- I finally got around to doing this for my Pietta Colt Navy. I was able to roll 36 cartridges. I used a .376 round ball, about 17 grains of Goex 3FG and french rolling papers. I found it easier to use a small pencil as a dowel, then gently push the bullet in. As I twisted the end with the powder I tapered it a little. I messed about 7 or 8, but toward the end got the hang of it. They ain't that purty, but I think they will work. I am going to test them out tomorrow at the range with my son. I am sure he will appreciate the quicker re-load time...
 

Attachments

  • 36 caliber cartridges.jpg
    36 caliber cartridges.jpg
    54.8 KB · Views: 76
Range report

Took my 9 yr old son to the range today to have him shoot my Pietta 1851 Colt Navy using my homemade cartridges.

He fired 42 rounds with no misfires! The cartridges worked great. The few early ones I made were a little "chubby" and did not fit well (too big). But most of them fit perfectly and all fired no problem, no delays.

And the kid shot well again! Not bad for only the 4th time he ever shot (see pics below). You may not be able to see in the pic, but he almost got a bullseye. All shots were from 25 yds, seated.

The cartridges held 17 grains of Goex 3fg w/.375 round ball. I used Crisco over the balls to prevent chain fire and for lubrication. Worked great -- never had to clean the gun between loading.

I am hooked on cartridges! Makes loading at the range a lot easier.
 

Attachments

  • 8_31_11_Chris!.jpg
    8_31_11_Chris!.jpg
    243.5 KB · Views: 73
  • IMG00818.jpg
    IMG00818.jpg
    285.5 KB · Views: 60
thanks! timuchin.

I told both my boys I would get him an 1851 navy if they got on the honor roll. I've never loaded BP before and stumbled on your thread, we are all looking forward to the upcoming event.

:)
 
I did a cross between what DoDo and Oam did, without the ball (like DoDo's method). I found it easier for me to work without the ball, and the paper "held" better with Oam's little "tab" folding under the bottom. I tried making it with the ball, they came out OK, but the ones without the ball came out far better.

Making these things was surprisingly easy. Either way you go, you will go through the learning curve very quickly. The hardest part was finding the papers! Tried several places and couldn't find them. Went to a drug store that carries "loose" tobacco supplies, asked the clerk for the papers, and she didn't even know what I was talking about! As I walked out the store, a guy who over-heard the conversation directed me to the only place on our side of town that carries them, a small gas station that I never go to. Sure enough, they had 'em. I used the Zig-Zag 1.25's that were mentioned in earlier post.

Also, found (by accident) that six cartridges fit perfectly in a mini Altoids tin. Place 4 on bottom row, and stack 2 on top. The lid kind of compresses them slightly, but doesn't damage them. Will "field test" next weekend....

This is a very cool thread!! Thanks to all posters for sharing your info!!

Remie Paper Cartridges.jpg
 
The thing I do different is after I cut the ends down on the cartridges, I dip the ends in some rubber cement works great and have had no ignition problems or fouling problems and the cartridges are very durable and never leak powder.
 

Attachments

  • paper cartrige.jpg
    paper cartrige.jpg
    65.9 KB · Views: 76
I've been "Rolling My Own" for a while now. It's got nothing to do with historical accuracy and a lot to do with making life easier when going out to shoot. There are times when I like to take the bike out to shoot and carting around a heavy shooting box on the back of a motorcycle is a pain. Pre-made paper cartridges mean less "stuff" has to go with me when I shoot.

When I first started making paper cartridges, I included the round ball in the cartridge. What I found out was that there are two issues, niether of which is insurmountable but I am a fan of the K.I.S.S. system. The first issue is the paper shearing when you ram the ball into the chamber and leaving a ring of paper which if you forget to grab it, will be pulled into the cylinder gap. Not a big deal but it's just one of those things you need to remember to clear before you rotate the cylinder past the forcing cone.

Making paper cartridges with the ball included for a 2nd Model Dragoon Video.

The second issue is a little more irritating and really has nothing to do with having the ball pre-loaded in the paper cartridge. If you're just using cheap cigarette paper you will eventually wind up with paper fouling the flash hole in the nipples. Normally I run a nipple pick through the flash holes after each firing no matter what. But I've found that the cigarette paper will really blast itself into that hole. So much so that a nipple pick can't punch it out. When this happens I just cap the nipple and fire a cap through it clearing the problem. Unfortunately this wastes caps and I'm thrifty (cheap). To avoid this problem I simply tear the end off of the paper cartridge and pour a few grains of powder into the cylinder "before" I stuff the cartridge in the hole.

Loading a '51 Fake Navy with Powder Only paper cartridges - Video

Any way you decide to do this, you'll find that you save a lot of time on the range. You can make these things as historically accurate as you like or as simply as possible.
 
The appendix of the Army's manual of Cavalry Tactics from 1860 contains "A Manual for Colt's Revolver" that specifies that the paper cartridge be torn open and the powder poured into the chamber before ramming.

The trooper being mounted, holding the reins as presecribed in Cavalry Tactics, the pistol either in the holster or pistol-case, the instructor will command:

Draw-Pistol

2 times.

1. At the first command, unbuckle the holster or pistol-case, seize the pistol by the handle with the right hand, holding it between the palm of the hand and the three last fingers, the forefinger resting on the guard, the thumb on the handle.

2. At the second command, draw out the pistol and elevate it, the guard to the front, the wrist at the height of, and 6 inches from the right shoulder.

Six times

1. Load.

1 time and 1 motion.

1. Place the pistol in the bridle-hand, holding it by the handle in front of the body, the hammer between the thumb and fore-finger, and turned to the left, the muzzle pointing upwards. Carry the right hand to the cartridge-box and open it.

2. Handle-Cartridge.

1 time, 1 motion.

Seize the cartridge with the thumb and the first two fingers, and carry it to the mouth.

3. Tear-Cartridge.

Bite off the end and carry the cartridge opposite the chamber nearest the lever.

4. Charge-Cartridge.

1 time and 2 motions.

1. Empty the powder into the chamber, and insert the ball, pressing it down as far as possible with the thumb and fore-finger.
2. Turn the pistol with the left hand, bringing the hammer towards the body, and cock it with the thumb of the right hand.

5. Ram-Cartridge.

1 time, 2 motions.

1. Seize the lever at the catch wit hthe thumb and fore-finger of the right hand, ram down the ball, and replace the lever.
2. Let down the hammer with the right hand, and carry the hand to the cartridge-box.
Repeat as above until all the chambers are loaded.

6. Prime.

1 time, 2 motions.

1. Lower the muzzle towards the right side by turning the wrist of the bridle-hand, the muzzle pointing downwards, the hammer to the front, the left wrist resting against the stomach; half-cock the pistol with the left thumb, turn the cylinder with the thumb and forefinger of the right hand until it clicks. Take a cap and press it on the exposed cone. Turn again the cylinder until it clicks, and so on until all the cones are capped, the hammer resting on the safety notch.
2. Seize the pistol at the handle with the right hand, and bring it to the position of draw pistol.
The instructor wishing to fire, will command:

Ready.

1 time, 2 motions.

1. Place the pistol in the left hand, the little finger touching the key, the barrel nearly vertical, the muzzle a little inclined to the left and front, the guard to the front, the thumb on the head of the hammer, the fore-finger along the guard.
2. Cock the pistol, and bring it to the position of draw pistol.

Aim.

1 time.

Lower the pistol, the arm half extended, and place the fore-finger lightly on the trigger, the muzzle directed to the height of the man's waist.

Fire.

1 time.

Press the fore-finger steadily on the trigger, fire and retake the position of draw pistol.
The men being at a ready, and the instructor wishing to fire all the barrels in quick succession, will give an intimation to that effect, and then command:

1. Aim-2. Fire.

The men will fire, then take the first position of ready, cock, aim, and fire again, and so continue until the pistol is discharged; then take the position of draw pistol.
The instructor wishing to reload, will command:

Load at will.

Load.

1 time.

Load the six chambers as heretofore prescribed, and take the position of draw pistol.

Return Pistol.

1 time.

Lower the muzzle of the pistol, and return it to the holster or pistol-case.
When the troopers become well instructed in the use of the pistol, the following mode of coming to a ready will be substituted for the above.

Ready.

Incline the muzzle of the pistol to the front, the wrist remaining six inches from the shoulder; place the first joint of the thumb on the head of the hammer, and cock it by an extension of the thumb, and resume the position of draw pistol.

http://books.google.com/books?id=0D...ce=gbs_ge_summary_r&cad=0#v=onepage&q&f=false
 
Last edited:
i twisted up a bunch of em today. i used flax papers, they worked well last time i tried them for cartridges. they are rather thin too, but strong enough to handle being manipulated and filled with powder and balls. i screwed up about three of em, but go the rest made into cartridges. i found the perfect way to store them too, i used a Remington tin i got from a garage sale. that's perfect because they will be set off with Remington percussion caps in an 1858 Remington. hehe!

this did take less time than i would expect. i used a wooden dowel i tapered with a belt sander as my form, rolled a bunch of tubes all at once, filled them with my standard load of powder, put balls in all of them at once, then twisted the end shut, then trimmed off the excess paper at the end. it's a little different than the method described here, but it does yield essentially the same results. i like paper cartridges, they are very fast to load at the range, i don't like having to reload for other people. if Pa gets trigger happy i can use my loading stand for my revolver and those paper cartridges for a real fast reload. i don't really do it for the historical part, i like saving time at the range, it means i get to shoot more.
 

Attachments

  • 001.jpg
    001.jpg
    151.6 KB · Views: 81
  • 002.jpg
    002.jpg
    105.9 KB · Views: 52
Last edited:
Tried rolling with the ball, got through the learning curve, and they came out great!

My opinion - this paper cartridge thing is the way to go. I haven't figured out the "time benefit" of wrapping cartridges on my workbench as opposed to loading loose at the range. But do I feel like it takes longer to make the cartridges - only because I'm at my liesure and comfort. I enjoy that. And certainly reloading at the range would be quicker. I've been to "pay-by-the-hour" ranges and I can see how this is a benefit in that respest..
 
Status
Not open for further replies.
Back
Top