
- Joined
- Dec 19, 2002
- Messages
- 22,482
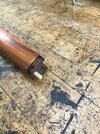
Currently auditing a NRA Summer skool Conservation Course offered Trinidad College Gonne-smything Department in Trinidad, Colorado. A student brought in a 22 Sportsmodell trainer (no papers from GI though). He removed the barrel band and discovered it was a duffel-cut! [Gomer Pyle]Surprise, surprise[/Gomer Pyle]. Rest of it was super nice though and the GI who did it was thoughtful enough to saw it where the cut is hidden by the barrel band. Anyway, I suggested that he could pin the two pieces together by drilling a hole in both pieces, thus creating a hole for a dowel rod.
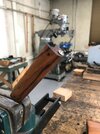
He agreed to do it and I brought in a 1/4" brad point drill bit for dowel rods. He drilled the short forearm at the spot I marked (I wanted to ensure there was enough wood for strength). Now onto drilling the stock itself. Trouble was the drill press table couldn't be lowered enough and the huge gap (no big blocks of wood) meant we could not use it. Anyway, he inserted the metal dowel center (used by woodworkers) and we tapped the stock to make an impresion on the where to drill. After removing the dowel center, we placed metal ruler along the top of the forearm pieces to ensure there were aligned. A cross level was also placed on the stock to ensure that we were parallel to the ground. MK I eyeball to check side to side alignment. Then with one student standing 10 feet away to direct the driller and another to the side by 6 ft away behind the butt to check drill windage, we ensured that the electric drill (held by student #3) drilled the hole straight. With tape on the drill to ensure it wasn't drilled too deep, the hole was exactly where we wanted it and to the depth it needed.
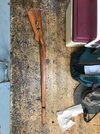
With the holes drilled and the two parts aligned, I told him he could:
1) permanently attach the dowel and join the two pieces with acraglass
2) temporarily attach the dowel and the two pieces of the stock with hyde glue (heat to soften the glue for disassembly)
3) Just wax a dowel that was slightly reduced in diameter for ease of insertion/removal for a non-permanent repair. It'll provide enough tension for the stock to remain on when firing (it's just a 22).
Either #2 or #3 would meet modern museum standard for non-permanent repair. He opted for #3 and used pure beeswax.
He agreed to do it and I brought in a 1/4" brad point drill bit for dowel rods. He drilled the short forearm at the spot I marked (I wanted to ensure there was enough wood for strength). Now onto drilling the stock itself. Trouble was the drill press table couldn't be lowered enough and the huge gap (no big blocks of wood) meant we could not use it. Anyway, he inserted the metal dowel center (used by woodworkers) and we tapped the stock to make an impresion on the where to drill. After removing the dowel center, we placed metal ruler along the top of the forearm pieces to ensure there were aligned. A cross level was also placed on the stock to ensure that we were parallel to the ground. MK I eyeball to check side to side alignment. Then with one student standing 10 feet away to direct the driller and another to the side by 6 ft away behind the butt to check drill windage, we ensured that the electric drill (held by student #3) drilled the hole straight. With tape on the drill to ensure it wasn't drilled too deep, the hole was exactly where we wanted it and to the depth it needed.
With the holes drilled and the two parts aligned, I told him he could:
1) permanently attach the dowel and join the two pieces with acraglass
2) temporarily attach the dowel and the two pieces of the stock with hyde glue (heat to soften the glue for disassembly)
3) Just wax a dowel that was slightly reduced in diameter for ease of insertion/removal for a non-permanent repair. It'll provide enough tension for the stock to remain on when firing (it's just a 22).
Either #2 or #3 would meet modern museum standard for non-permanent repair. He opted for #3 and used pure beeswax.
Last edited:

")