What gunsmithing or repairs have you done today

Assembled the barreled action on my poverty 7mm PRC build.

It’s a pre-Accutrigger flat top Savage long action with a new factory take off 7mm PRC sporter profile barrel with hex barrel nut.

I have as glad to find a sporter weight barrel without going full custom as I like things light even on harder recoiling rifles.

I had the Bell and Carlson stock already. Blind magazine even. Probably the only 7PRC set up this way.

I hope to mount this Vortex Viper scope but since the Savage long actions are really full magnum length, it may be difficult.

Just need the bases.

IMG_3293.jpeg IMG_3295.jpeg
 
Assembled the barreled action on my poverty 7mm PRC build.

It’s a pre-Accutrigger flat top Savage long action with a new factory take off 7mm PRC sporter profile barrel with hex barrel nut.

I have as glad to find a sporter weight barrel without going full custom as I like things light even on harder recoiling rifles.

I had the Bell and Carlson stock already. Blind magazine even. Probably the only 7PRC set up this way.

I hope to mount this Vortex Viper scope but since the Savage long actions are really full magnum length, it may be difficult.

Just need the bases.

View attachment 1170603View attachment 1170604
Looks good I'm a fan of blind magazines, shame there out of style at the moment. I'm really regretting selling the savage 300 rum I had, would made a nice 7 prc build. Plus it was one of the control round feed savages there pretty rare these days.
 
Not today but the past week I did. I'm putting together a Small Ring Mauser build. I have all the parts except the stock. It will be chambered in 6.5 x 55 Swede.

As many of you probably guessed it will on an 1893 Spanish receiver.
View attachment 1171370
Should make for a nice rifle, that stock you thinking. Is that a midway barrel.
 
oh, I cleaned and serviced a sticky Taurus 856 cylinder. just cleaned and went over it, put it back together, much much smoother cylinder rotation and the extractor motion is smoother and not sticky as much, but still a little. apparently it is not supposed to make a clicking or ticking noise like there is a wrachet or gear inside it when the cylinder spins. was hard to find any info or resources on how to clean and lube the cylinder assembly, but I figured it out and I don't have to deal with waiting and shipping and I can just give it a run around the field hopefully this weekend and see how it does out with a work out.
 
I wouldn’t actually say “gunsmithing” per se, but I drilled out the wallowed out grip pin holes on some sq butt J Frame stocks. I JBed some black walnut pins into the hole that I turned on the lathe and then redrilled and put them back on the gun.

They are pretty ratty and oil soaked and worn, but I like the look of them better than the Pearloid grips I had on it for a temporary fix. They are also numbered to the gun.
 
I guess this is not really gunsmithing but I was having some issues with trigger reset on one of my AR15's after a blown case. I had previously cleaned the lower and inspected the trigger in in the receiver. It is a factory Colt (Schmid) trigger so I felt it should be pretty trouble free. However, after a good cleaning, I was still getting some issues with the reset.

Yesterday, I disassembled the lower to take a closer look at the and found this little guy lodged under the disconnector.

IMG_5991.jpg

It's the anvil from the blown primer. I have no idea how it worked it way under the disconnector, but that solved the problem. I took the opportunity to install a SSA-E Geissele that I picked up from a 4th of July sale and was looking for a new home. I will head up to the desert next weekend to give the new trigger a good workout.

Now I have a left over Schmid trigger with no home....

Any ways, I only shoot for fun, but do keep this rifle ready for home defense if needed. It is a good reminder that a blown case should result in more than a deep cleaning to ensure a properly functioning rifle.
 
Last edited:
I have these AR receiver extension reaction blocks. The TechCo has an additional forward jig to insert the lower receiver grip tag to square up and keep-square the buffer tube-receiver relationship so when the buffer castle nut is tightened / torqued they remain square and thus the butt stock will be square with the rifle when shouldering it. The problem was this new M4 receiver was cerakoted so the grip tang width was 0.3880" whereas the jig extension internal width was
0.3775". Maybe I could have tapped the grip tang into the jig but pretty sure the 0.0105" discrepancy would have destroyed the cerakote on the grip tang. Kind of surprised the design did not allow for any small discrepancies in measurements. So, I disassembled the jig extension, used a 3/8" end bit and milled the internal width to 0.50" which allows for 0.012" of clearance on each side of future grip tangs now. Drilled 17/64" holes tapped for 5/16"-24 tpi screws to mate up with the lateral surfaces of the grip tang. Used 0.266" precision pins to perfectly locate drill holes prior to tapping. Used my new Noga internal de-burring tool.
With a receiver extension mounted on the lower the grip tang will be perfectly centered so the screws only need to be hand tight to take up any slack in the
jig support walls. Just need to order some proper sized non-marring polymer screws like the jigs use.

IMG_7809TechCo LLC AR 15 Receiver Extension Jig 07.17.23 copy.jpg IMG_7815TechCo LLC AR 15 Receiver Extension Jig 07.17.23A copy.jpg IMG_8730TechCo Receiver Extension Block Width Modification  09.24.23.jpg IMG_8731TechCo Receiver Extension Block Width Modification  09.24.23.jpg IMG_8733TechCo Receiver Extension Block Width Modification  09.24.23.jpg IMG_8735TechCo Receiver Extension Block Width Modification  09.24.23.jpg IMG_8736TechCo Receiver Extension Block Width Modification  09.24.23.jpg IMG_8737TechCo Receiver Extension Block Width Modification  09.24.23.jpg
 
Last edited:
Wow! That is good work :thumbup: You have ten times the skill with tools than I do, sir!:)

This is about the extent of my abilities with a drill press: I liked the G-10 grips I put on my P-01, so I grabbed three more sets from Cool Hand for $19 bucks a set and installed them on some other CZ’s I have.

IMG_2968.jpeg IMG_2969.jpeg

One set for my compact model had grip screw holes that were drilled just a touch off.

I enlarged the original screw hole to compensate for the mid-drilled holes, I then centered the countersink with a larger bit and used aftermarket grip screws with a slightly larger head to fill the countersunk void to the edges.

IMG_2965.jpeg IMG_2970.jpeg

I like these grips, much more showy than the black plastic or rubbery grips and they feel great.

IMG_2971.jpeg

Stay safe.
 
Took some students blackpowder handgun shooting and we pulled the lock off the flintlock to clean the lock. Big flake of wood came out from where the lock was inletted. Applied Titebond glue (blue label) and clamped it in place for 24 hours.
 

Attachments

  • IMG_4307.jpeg
    IMG_4307.jpeg
    45.6 KB · Views: 8
  • IMG_4308.jpeg
    IMG_4308.jpeg
    57.5 KB · Views: 8
  • IMG_4309.jpeg
    IMG_4309.jpeg
    47.6 KB · Views: 8
Wow! That is good work :thumbup: You have ten times the skill with tools than I do, sir!:)

This is about the extent of my abilities with a drill press: I liked the G-10 grips I put on my P-01, so I grabbed three more sets from Cool Hand for $19 bucks a set and installed them on some other CZ’s I have.

View attachment 1173014View attachment 1173013

One set for my compact model had grip screw holes that were drilled just a touch off.

I enlarged the original screw hole to compensate for the mid-drilled holes, I then centered the countersink with a larger bit and used aftermarket grip screws with a slightly larger head to fill the countersunk void to the edges.

View attachment 1173011View attachment 1173012

I like these grips, much more showy than the black plastic or rubbery grips and they feel great.

View attachment 1173015

Stay safe.
Those are nice CZ's! I would love to add a full-sized 75 to the safe at some point. I like the classic look of the black grips, but man those G10's really go well with the black finish!

Great job with the grips and any time in the garage working on stuff beats time in front of the TV set.
 
Sunday morning tinkering and musing on the lathe.
In the spirit of my recent AR gauging rabbit hole explorations, I got the irresistible notion of making a gauge to
measure AR carbine / rifle length buffer springs and quickly determine if they are in spec or not. I have seen some pin a yardstick, others apply an adhesive tape measure to their bench. I made a quick outline of a Plan for said gauge on the laptop over a good cup of coffee.
I turned between lathe centers 3/8" 6061 aluminum stock (should have used a lathe steady rest), chamfered the ends, rattle can paint color coded precision Go-NoGo zones for spring lengths. That's all I have today.

Screen Shot 2023-10-01 at 3.37.33 PM copy.png Screen Shot 2023-10-01 at 4.02.07 PM copy.png Screen Shot 2023-10-01 at 4.02.34 PM copy.png IMG_8817AR 15 BUFFER CARBINE RIFLE SPRING LENGTH GAUGE MJD FABRICATION 10.01.23 copy.jpg IMG_8819AR 15 BUFFER CARBINE RIFLE SPRING LENGTH GAUGE MJD FABRICATION 10.01.23 copy.jpg IMG_8822AR 15 BUFFER CARBINE RIFLE SPRING LENGTH GAUGE MJD FABRICATION 10.01.23 copy.jpg IMG_8823AR 15 BUFFER CARBINE RIFLE SPRING LENGTH GAUGE MJD FABRICATION 10.01.23 copy.jpg IMG_8826AR 15 BUFFER CARBINE RIFLE SPRING LENGTH GAUGE MJD FABRICATION 10.01.23A copy 2.jpg IMG_8830AAR 15 BUFFER CARBINE RIFLE SPRING LENGTH GAUGE MJD FABRICATION 10.01.23 copy.jpg
 
And finally got the ramrod to fit into the ramrod hole. That was just a bit of time standing outside and sanding the rod. Still have to buy a brass tip for it (so I can put a jag on it). 6 Barrel is 46" long.

Stock still needs work.
 

Attachments

  • trade gun.jpeg
    trade gun.jpeg
    214.9 KB · Views: 10
Last edited:
Tinkering over my pay grade in the shop this week. Get a cup of fresh coffee.

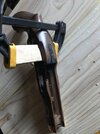
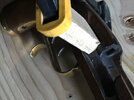
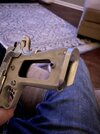
I use a LeBlonde Regal lathe with a 14" swing. The Aloris quick change tool post default uses a 3/4" square shank lathe bit. Some small gunsmith projects have small dimensioned places or metal stock where a smaller lathe bit tool would be handy. I wanted to fabricate a 3/4" to 1/4" tool bit adapter sounds simple enough. The project requires milling a 1/4" mortise to hold 2-1/2" tool bit, which would be secured within the mortise with 8-32 set screws; make a 1/4" slot, drill and tap holes, what could be easier ? The mfg. 3/4" tool bit shanks are really stout so I wanted to replicate that rigidity for my adapter.

I started with a 6" x 1" x 1" 4140 alloy chrome moly stock that was the hardest material I have attempting to rough it on the mill to 5"x 3/4"x 3/4". I was using TIN-coated high speed steel bits, not carbide end mill bits. I couldn't mill it or accurately band saw it; was able to use the big chop saw to cut it. Enough of that program. Learned 4140 was not a good starting point and I should have used some stock closer to my desired final dimensions.

Sourced a 5"x 3/4" x 3/4" lathe bit blank made of M-2 high speed steel; said it was easy to grind, not. Got some 1/4" carbide end mills and was
able to make the 1/4" slot for smaller tool bits. Next to drill 8 holes for set screws. Started with #29 ga. Monster brand cobalt bits, pecked it almost all the way thru the first 1/4" hole, bit broke as it was just breaching the far side of the hole (where they often do). Was able to take punch and knock the residual bit out the bottom of the hole. Next up full carbide bit with lots of AnchorLube took 25 minutes to peck the next hole. Switched to a International Carbide Corp square
die bit and it worked really well (highly recommend it), finishing the next 6 holes in about 20-30 min. I then used my 3-flute (HSS) Supertap in the last hole for my first threading; tip snapped off at ~1/8" in the hole; an opportunity to use broken tap extractor! So I have my project 2/3 done, just need to tap 8-32 holes.

What would be the carbide brand and style to use for the threading? I am leaning towards a 2-flute spiral tip style.
Plan B is to give it to some one to thread it that knows what they are doing!

IMG_8863.jpg IMG_8867.jpg IMG_8848.jpg IMG_8859.jpg IMG_8869.jpg IMG_8870.jpg IMG_8871.jpg IMG_8875.jpg IMG_8876.jpg
 
Last edited:
Back
Top