Winchester 67a FTF (PIC and Detail heavy)

Status
Not open for further replies.

hadmanysons

Member
Joined
Nov 5, 2008
Messages
582
Location
Arkansas
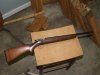
Ok. So I got this OLD Winchester 67a from my father in law. I got it home and cleaned the crap out of it. It had been in storage for a while and hadn't been fire in god knows how long, he got it from his mother-in-law. I took the firing pin assembly out of the bolt and cleaned all that with Hoppes and scrubbed the bore a bunch, then did a good wipe down for surface rust.

So I take it to my friends how to test fire it after having cleaned it thoroughly and take the first shot, Bang. Great! Pop another round in, Bang! Awesome. Another round, click. Huh? So I cock it again, click. click. click. click. eject the round.

I pop another round in, click. click. click. click. click.

This goes on for another four or five rounds and then Bang. Hmmmmmm pop another round in, bang. ***? Another round click. click. click. click.
And I never got it to fire again.

I was using the federal bulk 550 pack of .22LR from wallyworld, wish I had brought a different brand of ammo.

Sorry, my camera sucks, these are the clearest I could get for now.

These are two rounds that did manage to fire.
IMAG0074.jpg

Here's another
IMAG0073.jpg

Here are some of the rounds that DIDN'T fire
IMAG0076.jpg

Was the firing pin not hitting hard enough? They all looked the same to me, except for that one on the far right.

Here's a picture of the underside of the bolt. Notice the hairline crack in the center of firing pin assembly. Something I had NOT noticed before but it does look like it has been there a while
IMAG0081edit.jpg

Here's a look at the receiver
IMAG0082.jpg

And another
IMAG0084.jpg

And one down the barrel, for artistic sake :)
IMAG0085.jpg

Now I thought this was interesting, look at that gap between the bolt and receiver. I didn't notice that either until the multiple FTF.
IMAG0077edit.jpg

Here's the same shot but with some brass in there. Is that supposed to be like that?
IMAG0086edit.jpg
What the heck is going on? Is the spring for the firing pin to weak? Did I screw something up when putting it back together, I was careful. Could it be the ammo?

Could I be loading it wrong? I didn't have a manual. You just start the round in to the bore and then close the bolt behind it right? Am I missing something?
 
The gap you see between face of breech & bolt may indicate excessive head space.
You may able to have the root of the bolt handle welded, then dressed down to get back the proper headspace.
 
There is something quite puzzling going on here.

First off, I am not a licensed gunsmith.

However, my Rat Gun, as I call it, has been in

My family for three generations, and I have kept it since 1954.

It does look like there is a problem with seating the cartridge.

But this is where I get stumped.

The handle of the bolt dies into a rectangular boss,

Whose rearward face fits clean against the righthand "tang" of the receiver

When it is locked..

There is no way I can imagine either the bolt boss

Or the tang of the receiver being worn to the point

Of what your pictures seem to show.

The front face of the bolt is counterbored to

Accept the rim of the cartridge, plus its outer diameter is chamfered

To fit into the chamfer milled into the breech.

The breech also has a very slight counterbore, to

Fit the cartridge home.

On my gun this mechanical lock is still perfectly tight.

So try this, without a cartridge.

Lock the bolt.

Then, using the bolt handle, try to push the bolt

Fore and aft in the locked position. There should be no play at all.

By the same logic, if the cartridge is jamming in the breech, or

For whatever reason, the rim of the cartridge is not seating in

The counterbore of the bolt

You should not be able to lock the bolt.

This is what is so puzzling.

Hope this helps in your figuring.


isher
 
Last edited:
So I took it back to the range and got it to fire consistently. It's NOT the ammo, although i did try different brands this time. It has to do with that gap between the bolt and the receiver. How I got it to fire was to hold the bolt forward while pulling the trigger as to close that gap and it shot every time. Pretty accurately too. What is that gap called, is that excessive head space?
 
At this point, if it were me I would take it to a smith for evaluation.

Again, if it were me, I would not consider the gun to be safe to fire.

Note: the potential cost of the fix might well exceed the

Market value of the gun; 67a parts don't exactly grow on trees.

So you might end up judging between sentimental value and $$.

isher
 
It looks like excessive headspace. Try putting some tape on the head (base) of a cartridge and closing the bolt on it (while pointing the gun in a safe direction.) Keep adding tape until the bolt won't close and tell us how many layers that was.

To cure excess headspace, as mentioned earlier, add some metal to the root of the bolt on the back side and dress it down until the bolt just closes on an unfired round (again, while pointing the gun in a safe direction.) While adding metal, you might as well weld up that hairline crack in the bolt.
 
Also possible.

Additionally, the gun could have been bubba'd in a couple ways I can think of.

None of us have actually laid our hands on the piece.

We are just speculating.

Which is why I recommend an evaluation by a smith.

isher
 
OK. Headspace.

That got me going.

So I went and loaded a cartridge and slipped

A scrap of paper between cartridge and bolt.

Paper miked out at .003

Not a problem.

Doubled paper, next, thus .006.

Serious friction fit for bringing the bolt home.

And did it again at .009.

Absolutely no go.

This is neither scientific nor does it have anything to do

With what the original spec might have been,

Just a gun that has been in continuous service since sometime in the 30's,

According to family history

And still shoots very well.

Heres a picture of the old girl............


http://www.thehighroad.org/attachment.php?attachmentid=108325&d=1257046888


That weird line in the buttstock is where my Dad sawed it off

To fit my LOP

When teaching me to shoot at about age five.

I refitted it years later with a 1/4" masonite shim.


isher
 

Attachments

  • P1010429.JPG
    P1010429.JPG
    433.9 KB · Views: 42
Last edited:
It looks like excessive headspace. Try putting some tape on the head (base) of a cartridge and closing the bolt on it (while pointing the gun in a safe direction.) Keep adding tape until the bolt won't close and tell us how many layers that was.

It took 10 pieces of Scotch brand masking tape before it wouldn't close. That's pretty bad huh?
 
"It took 10 pieces of Scotch brand masking tape before it wouldn't close. That's pretty bad huh?"

Holy Headspace, Batman. That ain't just bad, thats awful.

Hope you can get 'er fixed for less than an arm and a leg.

Because they are really nice little guns.

isher
 
It took 10 pieces of Scotch brand masking tape before it wouldn't close. That's pretty bad huh?
Look on the bright side -- at least we know what the problem is now.

I'd get a gunsmith to build up the bolt root at the back size, adding a tiny bit of metal and dressing it until the bolt just closes on live round. He can probably weld up that crack in the bolt at the same time.
 
Took it to a gunsmith. He said it would be at least $100, just for labor. As I was not happy with that I went to Lowes and bought a piece of steel and some JB Weld. I cut a piece to size out, cleaned it and the back of the bolt, sanded it and now the JB Weld is curing.

I know what you guys are thinking. OMG, this moron is gonna kill himself! Right? I'm gonna sand it down slowly until I get the proper headspace.

But, if I don't post back in a couple of days, check the news! :D
 
I went to Lowes and bought a piece of steel and some JB Weld. I cut a piece to size out, cleaned it and the back of the bolt, sanded it and now the JB Weld is curing.
The only problem I can see is if you can't sand the added steel down far enough to get the bolt to close without cutting through it. Barring that, you should have a gun that will last another hundred thousand rounds or more, and you've saved at least $95.00.
 
Good 'ol JB weld!

Actually that is pretty darn ingenious.

I could tell you, actually, no,

I won't tell you what all I have fixed with JB over the years.

Four of the basics in my everyday SHTF kit are

JB Weld, duct tape, WD40, and 550 paracord.

I went and stacked up 10 layers of masking tape and miked it @ 48 thousandths.

Minus 3 thousandths headspace = 45 thousandths.

So, if my math is right, you are playing with right about 3/64"

Of space to fill.

Keep the news coming.

isher
 
As I was not happy with that I went to Lowes and bought a piece of steel and some JB Weld. I cut a piece to size out, cleaned it and the back of the bolt, sanded it and now the JB Weld is curing.

I think thats a darn good idea. I would enjoy seeing a close-up photo when you are done.

Four of the basics in my everyday SHTF kit are

JB Weld, duct tape, WD40, and 550 paracord.

I understand everything but the WD-40.
 
"I understand everything but the WD-40."

Magic juju juice for fishbait, or crab traps, for that matter.

I know, Urban Legend and all that hoo hah......

Plus it is really good for freeing up frozen up parts,

Along with Kerosene.

isher
 
So i'm sitting there sand the shim the down to size when, Phewwww, it goes flying off! I guess I got the JB Weld to hot and it broke down? Anyway, i'm removing all the old JB Weld now and then i'll reapply it and sand MUCH SLOWER!
 
Status
Not open for further replies.
Back
Top