Your favorite paper target mods

On a somewhat related note, I kick myself to this day for not taking a couple pricing guns I could have had at a manufacturing plant I worked at years ago. There were about 10 pricing guns and 2 of them didn't work all that great but they really just needed to be looked at and I know if I had asked for one I could have taken one. I'm going to go on Uline.com and see if I can find one.

They are awesome for taping over paper target hits. That would be a great way to step up your paper target game and get to use targets longer and more efficiently versus having to fool with pasties and ripping off lil pieces of masking tape.
 
With optics - scopes in particular - I'm not very picky.

With an aperture sight I really prefer a black circle of 3" to 6" until the range gets pretty long. Out past 600 yards or so, I just need it big enough to see it...

With open irons - square notch and blade, rifle or handgun - I strongly prefer a black square of one to three inches, on a white or tan background. I keep rolls of 1" square black stickers in my range box and will often just turn a target around backwards and stick on some squares (a Sharpie works just as well). The resulting sight picture looks something like an exclamation point: the front sight post forms a rectangle in the rear notch, and the target is the square dot perched on top. It's supremely easy and repeatable, and costs close to nothing.
 
I'd like to say, for scope use white in your square or round let's you see the cross hairs real good
 
For 50/100 yard accuracy testing with 22LR and .223 load development, I made one inch square target pdf printed on copy paper - https://www.thehighroad.org/index.php?resources/inch-square-grid.22/

Inch squares help line up crosshairs on scope, POI deviation/bullet drop from POA (I usually circle POA), help approximate group size and pretty cheap to print out.

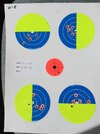
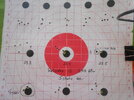
Below is 50 yard target from 10/22 22LR comparison test. Top left two 10 shot groups with boxed Aguila were used to verify scope zero with second group POI at POA after final turret adjustment. CCI SV slower velocity showed lower POI on target by 1/2". Norma Tac-22 that comes lubed showed seasoning of barrel with final group tightening up after "barrel seasoning". Bottom left loose bulk Aguila produced larger groups with higher POI to indicate higher muzzle velocities. Last group on bottom right was confirming group with boxed Aguila verifying scope zero maintaining and POI on POA (If reference ammunition shoots same at the end as starting, POI deviation/vertical stringing/larger groups are due to ammunition and not the rifle)

index.php
That’s pretty impressive, but for me, looking at that target is like looking at an Excel spreadsheet and my brain just says Nope!
 
That’s pretty impressive, but for me, looking at that target is like looking at an Excel spreadsheet and my brain just says Nope!
Using Burris FF E1 6.5-20x50, Vortex CFII 6-24x50/Strike Eagle 4-24x50 and Athlon 10-40x56 scopes at 100 yards make that inch square grid very usable to reduce shooter induced trigger/muzzle push "flyers" so I can better capture "truer" comparison of ammunition accuracy, bullet drop, group elevation/scatter, etc.
 
For scoped rifles, adjust the size for distance & scope power. Use a magic marker.
index.php


For handguns, iron sights, NRA precision pistol targets @ correct distance.
 
I usually just shoot postage stamps at 100 yards.

Ok. You caught me. That’s a bald faced lie.

For defensive practice I cut 8 1/2 x 11 card stock or copier paper in half. I figure if I can hit that I can hit center mass.

For more precise shooting, I buy rolls of stick on Shoot’N’See and put them on full sheets of paper.

IF You practice long enough ,take a playing card turn it on edge post it on the 100 yd target and let us know how that works out :)

One of My oldest dearest friends stuck playing cards flat and on edge in small sapling up Montana way and we used his .36 Cal Colt Navy and I actually cut the edge card in half . Too bad I wasn't aiming at it ,should have seen his face ; Knowing I normally Don't shoot BP !. :rofl:
 
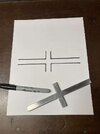
This is kind of an oddball I cooked up a few years back for scoped rifles.
It’s easy to center the crosshairs, and the long horizontal lines will show any tilt (I use a cheap torpedo level when pinning the target…o.c.d. I guess).
Anyway, it’s cheap, easy to trace with a Sharpie on just about anything, and works well with or without added dots or stickers.
Oh, and the bars are 1/2” wide (I also have one in 1/4” around here somewhere…mostly use for rimfire at 50 yds.) 017857D0-274A-454E-8F98-8428EDF1177C.jpeg
 
I generally use a plain cardboard backer with neon green squares for aiming points. So far, of all that I've tried, it's been the best for my eyes. I do use EZ2C targets sometimes, but I generally go back to my cardboard backer.
 
FWIW I have never understood the use of blaze orange on targets, other than they appear way cool in the store, LOL! A material fact - that many are ignorant of - is that due to the way the rods and cones in our eyes work, they cannot focus on both red/orange and black objects at the same time. Maybe the issue is less with a scope, versus iron or aperture sights.
I was wondering why blaze orange dots seemed to float off the paper and move around.
For red dot sights I like a small black square on a large white or tan background. About twice the size of the dot.
You can turn the dot way down with a black target which seems to make it more precise.
 
Last edited:
I have made a 9x12 white paper with 1 inch squares and a large black dot from my computer. Lee die company has some targets one can download for free too. In winter I print on blue paper to reduce glare and to shoot peep sites like from my Garand. I also found fluorescent stickers can help in bright sun. But I also cheat. I find Bird S*** targets in the waste bins that have only one or two holes in them and I use masking tape to tape up holes and use them again.
 
I find Bird S*** targets in the waste bins that have only one or two holes in them and I use masking tape to tape up holes and use them again.
So I am not the only one to garbage pick paper target! Have done the same thing and have used 3" and 4" peel off Shoot'n See targets to cover holes.
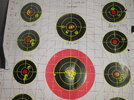
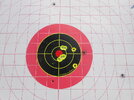
The ones circled were previously shot holes. On this target there were about a dozen holes under the Stick on.

DSCN0852.JPG
 
I will occasionally turn a B-27 sized target around so it’s a big blank sheet. Then at 5-7 yards (10 if Im feeling reeeal lucky) I shoot one shot. Then I decock snd pit on safe (if applicable) and set the gun down. Then I pick it back up and shoot another shot, trying to put bullet #2 into the same hole. I continue this until I clearly miss the hole, then I start anew with a new shot a few inches away.

You can do this with a friend, alternating shots until one misses. ( First to five misses loses.)

Stay safe.
 
I only joined a club and got the chance to shoot at 50 and 100 in the last year and am learning what works and doesn't work compared to indoor ranges. I have recently picked up a cheap magnifier to test. Haven't gotten it out yet but so far Without magnification for me it has to be simple and it has to be black on white at 50 yards. red bull's eye on black human shape splatter targets also work. I've been leaving everything I'd accumulated with multiple diamond patters in lighter red, greens and oranges at home. Looks sharp holding it at arm's length but Just won't show up well for me to the naked eye through a non magnified optic outside 25 yards. Hopefully if the 3x magnifier works like I hope I can start making use of them again.

For fine adjustments, I use purchased small bull's eye pistol targets, stick on splatter bull's eyes or something I make with a marker. If I am sighting in something for the first time I'll throw 3-4 of the small 1 inch bull's eye targets or makeshift dots along the top of the backer then a small man shape splatter target on the bottom. Start on the man shaped target to get on paper and into the red with irons and optic.

Then Go to one of the bull's eye targets on top to sight in an electronic sight. Then another to sight in the backups or irons. On the Last one or two small bull's eyes, longer groups with each to be sure it's all dialed in like I want it.

Have it worked out to where with one set of targets if I have my binos with me I can completely dial in the sighting systems on a rifle at 50 yards without ever calling a ceasefire until I'm finished, even if something starts out off by a ton.
 
Last edited:
My eyes are weird. For accuracy testing I cut out an inverted triangle stencil out of cardboard and I spray black paint on a big sheet of cardboard and aim at the sharpened point. Probably not the best system but it works ok.
 
For accuracy testing I cut out an inverted triangle stencil out of cardboard and I spray black paint on a big sheet of cardboard and aim at the sharpened point.

You're in good company...Ken Hackathorn likes this approach, too. At least for sighting systems like irons where we focus on the front sight.

For sighting systems where we focus on the target (e.g. red/green dots), he suggests that using a contrasting circle that helps our eyes automatically center the dot (like what happens with an aperture rear sight) works better.


Skip forward to about 7:30 in the video.
Interesting. Great minds etc 😄
I also use his standing braced idea but I use a sturdy camera tripod. His stepladder idea is better.
 
This is my favorite 100 yard rifle target. I find the squares easy to dissect with the crosshairs, and the heavy black lines emanating from the center help me check cant.
 

Attachments

  • MOA Target.pdf
    41.1 KB · Views: 11
Some years ago I drew a repair centre in MS Visio (which we had on the PCs at work) for the UIT 25m target, printed as A3, and then a 'tin hat' aiming mark version. These are pdf prints of it.
 

Attachments

  • PL7 centre.pdf
    4.2 KB · Views: 11
  • PL7 semicircle.pdf
    142 KB · Views: 8
I recycle used printer paper and junk mail by taping blank side out onto an existing silhouette target. Half a sheet for center mass and a 1/4 sheet for the head.
 
I used to print up all kinds of paper targets but found out that cheap paper plates with a sharpie square, dot or stick on dot works way better. Heavier stock than standard paper.
 
Back
Top