Amateur Knife Making

Status
Not open for further replies.

Mokwepa

Member
Joined
May 2, 2009
Messages
307
Location
Madikwe Game Reserve, South Africa
Hi guys

Im sure im not the only one that modifies existing knive/machetes into (what i think) nice looking knives or weapons. Lets see yours.

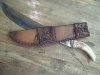
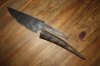
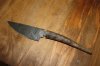
Here are sone pics of knives that i have made out of pangas/machetes. The one "Wakizashi" has a Hippo tusk handle and aluminium gaurd. The hippo was killed by our resident dominant male, and his tusks robbed. The aluminium came from some or other telephone line gadget. The other Wakizashi has a wood coverd in puff-adder skin handle with the same aluminium gaurd. My pig sticking knife has a warthog tusk as a handle. The colors are due to heat treating, decorative on the Wakizashis (done with a blow torch) and functional with the pig sticker(heated in a fire and dunked into dirty engine oil). Machete steel makes very good knife steel when heat treated and holds a good edge for a while. The pig sticker is carried when hunting with my BP rifle.

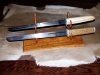
These knives have been made for the fun of it and im aware that there are many talented knife makers out there. I would like to see other pics of "AMATURE" knives, not custom built stuff out of fancy steel, even though they are beautiful. I live in the middle of the bush and use what i can find or have. The pig stickers scabbard is made from a wooden tamato box coverd in leather.

Lets see your creations.

Dylan

Oh yes, im busy with a glorified machete at the moment. Ill get a pic up soon.
 

Attachments

  • Wakizashis 1.JPG
    Wakizashis 1.JPG
    64.6 KB · Views: 290
  • Panga-Knives.JPG
    Panga-Knives.JPG
    68.1 KB · Views: 289
Ah, backyard knife making! Near and dear to my heart, this is....

I built a charcoal forge 4 years ago, and have dabbled in hand forged knives since, turning out maybe a half dozen a year. I forge most from leaf and coil springs (5160 for all intents and purposes), though I forge small pen knives and arrow points from 1/4" music wire (1085).

I harden by heating to transition (dull red, 1085 goes non-mag), and quenching in used engine oil. Then temper by temper colours according to the hardness/toughness the knife will need in it's intended service.

I don't own most of these anymore, I give most away as gifts. Many have seen hard service, none have yet been broken. they all hold a decent edge for a decent time.

Spear, 6' X 1.125" hardwood shaft, 13" OAL spearhead, 6" blade.... Forged from HC railroad spike (1040)

100_3733.jpg

100_3737a.jpg

A throwing knife even I can stick:

Thrower.jpg

A selection of pen knives and spring shears I made for family member's stockings last Christmas:

100_3590a-1.jpg

A pair from the year before for scale:

100_2742Small-2.jpg

My EDC utility fixed blade (2-3/8" blade)

jasonsEDC.jpg

A star:

100_2737Small-1.jpg

Hunting knife made for a co-worker:

100_3717Small.jpg

Dagger w/ oak handle and sheath:

100_3725Small.jpg
DSCF0002-2.jpg

"The Wicked", whimsical slasher made for an old friend....

Knife005.jpg

The first knife I forged, a 5" hunter/skinner

hunterno1small.jpg

The "Foggy Forge".... Crude spot, but lots of fun!

IMG_0051Medium.jpg

J
 
I like your style 7X57 and I love your forge! Looks almost like mine only mine is a little more "portable."(which means everything gets hauled back in the garage when I'm done.) Great idea for a thread Mokwepa. I don't have any new photos to post yet but hope to this weekend. Good Luck!:)
 
My goodness, ive got some work to do. Ive been keen on the home forging process but my problem is that all my work is done in a staff village at the lodge where i work ie. they will get pi#$%d with all the DING,DING, Ding and then some more.

Are there any good sites that will tell me how to build a very simle furnace?
 
Thanks guys!

Mokwepa, my forge is loosely based on Tim Lively's forge, Messerist linked to his site...

Anvil Fire is another good smithing website, much more than just knifemaking...

Also, "The Art of Blacksmithing" by Beale is an invaluable book of general techniques in the forge.

Those were my info sources to start out....

J
 
Very nice bro. Keep up the good work and youre gonna be GREAT at this stuff. Youve got the talent obviously....now just harness it and go nuts. :) Keep on keeping on.
 
Ive started building my forge. Thanks for the links. I used a pressure chamber from a water pressure pump and stuck a piece of steel tube drilled full of holes along the bottom. All i can get to line the forge with is fire cement that they use to plaster fireplaces with, do you think that this will be OK?
My air sorce will be a small compressor. Will the steel tube that supplies the air not melt in the high heat or will it be ok due to it being at the bottom of the fire?
 
I believe that the fire cement will do fine. I've seen forges lined with plan old dirt that made some fine stuff The fire cement should keep your pipe from melting but eventually you will need to reline your forge and replace the pipe.
 
Are there any good sites that will tell me how to build a very simle furnace?
Here are some links to help with building your own forge;
http://gbrannon.bizhat.com/forge.htm

Here are a couple of e-books that might be of interest as well:
http://ftpforge.chez-alice.fr/Blacksmithing.pdf
http://www.metalwebnews.com/howto/blacksmith/farmshop.html

I do a little amateur making myself; here's one made from an old file, an elk tine and a piece of brass from an old punch:
8zh4b8.jpg
2s7go3o.jpg
My forge (only for heat treatment, I do stock removal) is just some firebricks and pavers stacked together (skillet holds the quench medium):
2i03cbp.jpg
The heat source is a modified weed burner from Harbor Freight; I replaced the stock burner assy. with a homemade one:
2e4ym4k.jpg
Here's a shot of the blade right after being quenched:
r908qd.jpg
Regards,
Greg
 
Tried my forge out but the compressor contraption doesnt work that great, but a hairdryer does:)

What would cause the steel (leaf spring) to crack when its beaten, am i beating it when its cooled down too much?
 
Usually, it's forging cold.

When I forge from files, first thing I do is cook the temper out. Just toss it on the fire and heat it until it's past blue temper colour, and it's good. This prevents the cold part you hold from shattering due to impact.

Heat in the forge to yellow heat, and then forge only until about dull red. Never forge black steel.

About your air-source: You need good volume at medium-low pressure. Hair driers may cut it for a very small forge, but are generally a bit low pressure, especially as the fire matures and the fuel particles begin to "clump up". The compressor is really the worst choice, all about pressure without high volume....

Alot of guys use a fairly large diameter squirrel cage blower with a waste gate arrangement. Blower runs all the time and a butterfly style valve directs the air either to the fire or out a waste gate....

An old hand-cranked forge blower really is the best way to go, so keep an eye out. Small-time smithing is probably more alive in Africa than anywhere else in the world, I'd bet you can find suitable equipement quite easily!

Be aware, though, this is addictive! It eats more time than money, at least....

J
 
If you have a propane torch and access to fire brick you can make a simple, but effective, gas forge in minutes.

My one brick that was used all weekend to forge knives at the ABS Youth Hammer-In is little more than a single fire brick and a propane torch.

Just hollow a fire brick carefully and then drill a hole through the upper 1/3 into the chamber to fit the tip of a propane torch. Fire up the torch and you have a forge that will heat steel to forging temperatures. Since the torch is naturally aspirated you don't have to worry about a blower.

I think there were 5 or 6 knives forged with my dinky little portable gas forge this weekend. I used a Colman bottle adapter so I could use 20lb propane bottles, but I've forged using just the disposable bottles before.

Here's a 2 brick that is fundamentally similar to my single.

Image4.JPG


If you have a coffee can and refractory wool and cement you can make a coffee can mini forge.
turboforge.jpg
 
Last edited:
Hi guys

Thanks for the tips and advice. Ive started my first hand forged blade, still a bit of work to do. Got yelled at by the boss for making too much noise :D though. I think it came out good for my first attempt. I had to do a bit of trimming and i did cut the tang out with a angle grinder, is this considerd cheating? I realy like the black, dented, textured look. Im not being lazy, i just like the hand forged look, people can see that it is not a cheap(i supose its cheaper, you know what i meen) store bought knife and that someone has slaved over a fire, hammer in hand. The handle will be a horn from a waterbuck and im planning on doing a hammer forged gaurd the same shape as the horn. Do you glue the handle on some of the tangs, if so what do you use? I would like to keep the handle clean (no rivets). Let me know what you think and what i should have done differently.

You are right, this is very addictive. Cant wait to start the next. It gives you that, im proud of what ive done, feeling:)
 

Attachments

  • Can1 003.jpg
    Can1 003.jpg
    83.9 KB · Views: 78
  • Can1 001.jpg
    Can1 001.jpg
    79.1 KB · Views: 69
Drill a pilot hole for the tang in the horn and then heat the tang to burn it into the handle. Then pull it out and fill with epoxy.

Then carefully drill a hole through the whole thing and drive a piece of small rod (welding rod) through and nip it off. Peen the rod to smooth it and you'll have a knife that won't come apart.


Traditional methods would have involved the use of tree sap and wool/hair wrapped around the tang to serve for the epoxy.
 
Not too shabby! Keep your hammer face parallel to the anvil to avoid those hammer face marks....

Hso's handle mounting method will be great on this one. I'd suggest using brass rod for the pin, easier to peen. You're probably gonna want to anneal the tang a bit after heat treat to ensure your drill can cut it!

Heat treat normally (heat to uniform dull red (magnet doesn't stick), quench in oil, clean up the surface and heat slowly to desired temper colour. I'd suggest a straw to brown colour for the working edge, brown-purple for the bulk of the spine, blue at the guard area of the tang, and cooked out past blue for the bulk of the tang. The last thing you want is a brittle tang.

J
 
Thanks for the info. I will try that when i get to the heat treatment part.

Tell me though, after all the shaping and annealing part, where im at now, I want to get the blade ready for heat treatment. The blade is coverd in scale, how do i get this off? On one of the sites, they said that i must put the blade in white vinaagar for a few minutes the wirebrush it. I tried this and it doesnt work.

What should i try next?
 
Ah, scale....

Forget vinegar.

I use a wire wheel on my 6" bench grinder. There is no need to remove it before hardening, but it has to be removed before tempering so you can see the colours...

After the hardening quench, a bunch of the scale will have come off, probably 30-40%, from the thermal shock. Now, dry the knife as best you can (no need for perfection), and CAREFULLY use the wire wheel on your bench grinder to remove the scale. Expect to spend half an hour or so, less with more experience. You'll be left with a bright, but "marked" blade. Be aware that if you drop the blade on a hard surface now, it will likely break (it is VERY hard and brittle... A file will not "bite" and will just skate on the blade). It doesn't need to be perfect, but you've got to be able to see the colours progress thru the steel.

Now comes the fun part, tempering.

Get a nice mature bed of coals going in your forge. Lots of small, fully involved coals, no black (cold) spots. Lay the knife on top of the coals with the tang fully over the coals, the spine of the blade over coals, and the edge and point out of the coals about 1/2" or so... Watch and wait, DO NOT BLOW THE FIRE. In a couple minutes, you'll start to notice the hottest parts of the knife (hopefully the tang) begin to darken, then yellow. The yellow darkens to brown, then startes to blue, then purple..... Finally back to a dull metallic colour....

Cool the blade. Quench or air cool as is your preference.

If you do it right, and move the blade now and again to keep heat where you need it and away from where you don't, you'll end up with a blade that's purple/blue along the tang, spine, brown at the tip, and yellow at the most used areas of the edge. A tough flexible spine and tang with a razor holding edge.

If you screw up, just go back to hardening, and try again. Most of my early knives took several attempts to get the HT right.

The biggest trouble I had at the start was warping blades in the hardening process. This is caused by 2 things: Either you're quenching one side faster than the other (hold the knife edge-down and vertical in the quench medium, and move it up-and-down, not side-to-side)...... Or..... Your last forging operations were done with too-cold steel. I've made a habit of doing several straightening heats at the end of forgeing, hammering very lightly to finally straighten the blade. Avoid just bending straight, that warps more...

Man, if you're ever by this corner of the world, I'd show ya.... So many words for an ultimately simple process, and I'm not sure I explained well....

J
 
Get a nice mature bed of coals going in your forge.

Or buy a $20 toaster oven at Wal-Mart. That's how I temper my carbon steel blades.

Cool the blade. Quench or air cool as is your preference.

Do not quench after tempering! Let it cool on it's own to room temp.
 
Status
Not open for further replies.
Back
Top