JimGnitecki
Member
- Joined
- Mar 28, 2010
- Messages
- 1,258
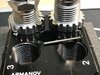
Armanov fixed toolhead + Armanov floating die rings + Redding Comp seating die + Custom insert for Redding die REALLY reduced my COAL variation
Some of you who have followed my recent postings have seen that I have struggled with diagnosing and solving a significant (.010") extreme spread in my 9mm cartridge COALs. I'm happy to report that I think I have finally solved it.
It took 3 changes to my progressive Dillon XL750 setup: Armanov floating die rings, a Redding 9mm Competition seating die, and customizing the die seating insert for that Redding die.
If my sample production run of 35 cartridges turns out to be representative of what I can do long-term, I will have reduced the extreme spread from .010" to .003". To give you a least some idea of how closely the new setup holds the target COAL, the standard deviation for COAL for these 35 first-run cartridges is just .0008".
Here is what each component of the solution did:
Armanov fixed toolhead: This toolhead replaced the Dillon pinned toolhead. This CNC machined toolhead has tighter tolerances than the cast Dillon toolhead, and unlike the Dillon, is BOLTED to the Dillon press frame. This takes out the linear and angular displacement that the Dillon toolhead suffers, and transmits as forces, to the 5 stations on the press, whenever there is an imperfect alignment of case and die in any of the 5 stations.
Armanov free floating die rings: These die rings replace conventional die rings, and "secure" the individual dies, but do so in a manner that enables each die to move just a bit within the 14 TPI standard threads that hold the dies in the press. Each floating die ring is tightened to each die (not directly to the toolhead) via a circumferential bolt after the die has been positioned where you want it. But the die ring is in turn secured to the toolhead with just one bolt that is undersized for the hole it resides in within the die ring. This allows the die ring, and thus the die, to move just a bit anytime movement is needed to accommodate an imperfectly presented case or bullet. PROPER installation of these die rings is a bit complicated, but once I got the hang of it, it went very smoothly. A key concept is that the die-ring does NOT have to be tightened tightly against the toolhead, but rather is tightened only to the DIE, and then is itself restrained by the one undersized bolt thta is bolted into the toolhead.
Redding Competition bullet seating die: This die has 2 important design features. It has a micrormeter adjuster to set bullet seating depth and thus control COAL. Secondly, it seats the bullet via contact with the bullet's ogive, not the bullet's tip. This is because on jacketed hollow point bullets, which I am using, the ogive dimensions are very tightly controlled, but the tip dimensions are harder for the bullet manufacturers to control, so they are an unreliable way to control COAL. The die's seating insert is a very finely desgined and built piece.
Customized insert for the Redding bullet seating die: I realized after trying unsuccessfully at first to get good COAL control that the "compatibility" of the die insert and the Hornady HAP 115g bullets I am using is not good. The Redding die insert helped notably, working with the Armanov toolhead and floating die rungs, getting me down from .010" ES to about .005" to .006" spread. But, it features a narrowing cone to guide and then seat the bullet via its ogive, aloowing the tip of the bullet to "pass through" a passthrough hole built into the top end of the narrowing cone.
The problem was that the passthrough hole was too small to pass the tip of the Hornady HAP bullet, since the tip of that bullet has a diameter that is hard to measure because of its rounded perimeter, but runs "about" .2300". The pasthrough hole was only a bit over .2000" (also had to measure without the proper pin gauges!). So, the tip of the HAP bullet was "catching" on the edges of the passthrough hole, and that made the bullet seat via THAT contact versus via the ogive.
The solution was simple, but required precision equipment I don't have. I asked my local gunsmith, who has a lathe, and also has access to a buddy's CNC machine if he could bore out the passthrough hole to .2500". He did that, and that enabled the die insert to work as Redding intended: by catching the ogive, not the tip, to seat the bullet.
That reduced the ES from that .005" to .006" range down to the .003" figure, and brought the standard deviation for those first 35 cartridges down to .0008".
I am posting this hoping that it might help someone else experiencing COAL variation beyond what they want on a progressicve press setup. I realize that it will be msotly rifle shooters who will be interested, not pistol shooters, but I am a bit detail oriented, and so used this approach on my 9mm Luger setup. Since I am shooting a SIG P210A Target model, I feel that I have a pistol that just might notice the difference.")
Jim G
Some of you who have followed my recent postings have seen that I have struggled with diagnosing and solving a significant (.010") extreme spread in my 9mm cartridge COALs. I'm happy to report that I think I have finally solved it.
It took 3 changes to my progressive Dillon XL750 setup: Armanov floating die rings, a Redding 9mm Competition seating die, and customizing the die seating insert for that Redding die.
If my sample production run of 35 cartridges turns out to be representative of what I can do long-term, I will have reduced the extreme spread from .010" to .003". To give you a least some idea of how closely the new setup holds the target COAL, the standard deviation for COAL for these 35 first-run cartridges is just .0008".
Here is what each component of the solution did:
Armanov fixed toolhead: This toolhead replaced the Dillon pinned toolhead. This CNC machined toolhead has tighter tolerances than the cast Dillon toolhead, and unlike the Dillon, is BOLTED to the Dillon press frame. This takes out the linear and angular displacement that the Dillon toolhead suffers, and transmits as forces, to the 5 stations on the press, whenever there is an imperfect alignment of case and die in any of the 5 stations.
Armanov free floating die rings: These die rings replace conventional die rings, and "secure" the individual dies, but do so in a manner that enables each die to move just a bit within the 14 TPI standard threads that hold the dies in the press. Each floating die ring is tightened to each die (not directly to the toolhead) via a circumferential bolt after the die has been positioned where you want it. But the die ring is in turn secured to the toolhead with just one bolt that is undersized for the hole it resides in within the die ring. This allows the die ring, and thus the die, to move just a bit anytime movement is needed to accommodate an imperfectly presented case or bullet. PROPER installation of these die rings is a bit complicated, but once I got the hang of it, it went very smoothly. A key concept is that the die-ring does NOT have to be tightened tightly against the toolhead, but rather is tightened only to the DIE, and then is itself restrained by the one undersized bolt thta is bolted into the toolhead.
Redding Competition bullet seating die: This die has 2 important design features. It has a micrormeter adjuster to set bullet seating depth and thus control COAL. Secondly, it seats the bullet via contact with the bullet's ogive, not the bullet's tip. This is because on jacketed hollow point bullets, which I am using, the ogive dimensions are very tightly controlled, but the tip dimensions are harder for the bullet manufacturers to control, so they are an unreliable way to control COAL. The die's seating insert is a very finely desgined and built piece.
Customized insert for the Redding bullet seating die: I realized after trying unsuccessfully at first to get good COAL control that the "compatibility" of the die insert and the Hornady HAP 115g bullets I am using is not good. The Redding die insert helped notably, working with the Armanov toolhead and floating die rungs, getting me down from .010" ES to about .005" to .006" spread. But, it features a narrowing cone to guide and then seat the bullet via its ogive, aloowing the tip of the bullet to "pass through" a passthrough hole built into the top end of the narrowing cone.
The problem was that the passthrough hole was too small to pass the tip of the Hornady HAP bullet, since the tip of that bullet has a diameter that is hard to measure because of its rounded perimeter, but runs "about" .2300". The pasthrough hole was only a bit over .2000" (also had to measure without the proper pin gauges!). So, the tip of the HAP bullet was "catching" on the edges of the passthrough hole, and that made the bullet seat via THAT contact versus via the ogive.
The solution was simple, but required precision equipment I don't have. I asked my local gunsmith, who has a lathe, and also has access to a buddy's CNC machine if he could bore out the passthrough hole to .2500". He did that, and that enabled the die insert to work as Redding intended: by catching the ogive, not the tip, to seat the bullet.
That reduced the ES from that .005" to .006" range down to the .003" figure, and brought the standard deviation for those first 35 cartridges down to .0008".
I am posting this hoping that it might help someone else experiencing COAL variation beyond what they want on a progressicve press setup. I realize that it will be msotly rifle shooters who will be interested, not pistol shooters, but I am a bit detail oriented, and so used this approach on my 9mm Luger setup. Since I am shooting a SIG P210A Target model, I feel that I have a pistol that just might notice the difference.
Jim G
Last edited: