Disturbing problem: Cartridge with Lyman cast bullet handloaded to COAL spec will NOT chamber in my rifle

JimGnitecki

Member
Joined
Mar 28, 2010
Messages
1,258
I just changed over to a new bullet mold for casting: The Lyman #457125, which is a 500g bullet for use in .45-70 Sharps replica rifles like my Pedersoli rifle.

The COAL spec, per Lyman itself in the Lyman Cast Bullet Handbook, is 2.835". I loaded 4 test cartridges to that exact dimension. They will not chamber. They each stop going into the chamber with about 3/16" still protruding.

My best buddy just spent about 40 minutes with me on the phone helping me try to figure out WHY.

We reasoned that the only difference between this handload and the last one (which chambered just fine) is this bullet. It replaces a 485g Lee hand cast bullet that had a notably "sharper ogive profile. Here's a photo with the pointy bullet and the Lyman 457125:
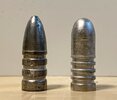
Bullets shapes Lee 485g vs Lyman 500g - 1.jpeg

Note that the prior bullet has a MUCH "skinnier' head, making it far easier to chamber of course.

Please disregard the conditon of the prior bullet. It has been filed and then hardness tested, hence the flat spots and dimples in its shank.

BUT, the 500g Lyman bullet is supposed to work just fine in a Sharps or Rolling Block or Trapdoor rifle.

We know that the shank OD of bullet is an actual measured .4595" after going through the Lee .460" sizing die (same sizing die as used for the prior bullet). But of course the sizing die does NOT do any sizing on the ogive. I reasoned that perhaps the powder coating has added just enough thickness to the new bullet's ogive to perhaps make it a tight fit. So, I did take a properly resized case, belled its mouth, seated an UNcoated Lyman bullet in it to the exactly correct 2.835" COAL, and tired to insert it into the chamber. It did go FURTHER in than the powdercoatd bullets did, but is still more than a 1/16" and less than 1/8" from fully chambering.

SO, it APPEARS that despite this being a bullet that should chamber just fine in my rifle, for some reason it does not. I am presuming it is contacting either the rifling or the throat.

I know I can try to "force" it the rest of the way into the chamber, but that would create some problems:

- No jump, which means the peak firing pressure would increase before the bullet starts to move, and COULD possibly end up being too high

- No way to extract an unfired round except by pushing it out via a brass rod from the muzzle

It has akso occurred to me that simply seating the bullet deeper into the case could alleviate the problem. The peak pressures with the loads I am planning to ladder test are, per the loading tables, in the 14,000 to 18,000 psi range. But would seating the bullet deeper potentially raise the peak pressures enough to be unsafe?

This Lyman bullet is apparently virtually a copy of the 1870s 500g bullet used by the U.S. Military to replace the 405g bullet in the 45-70 Trapdoor rifles, to enable "volley fire" to 1000 yards. Its bulbuous shape and its 1.316" length were designed for black powder. Hence the 4 lubricant grooves and the high momentum 500g weight. Maybe reducing the amount of free space between the base of the bulelt and the modest 21g to 27g charges of 5744 powder would actually help?

Any of you have expertise that could help me here?

Don't tell me to return to the slimmer Lee bullet. It is great on accuracy at 100 yards (3-shot groups as small as 0.62"), but goes through the transonic region starting at 125 yards and fails to group at any distance past that.

Jim G
 
I already know that it's not exactly
what you're looking for
The slimmed down short version
is to get a different mould that fits
your rifle, or a new rifle that will
work with the mould
You're exactly right on the one
thing. You don't force ammunition
in any way

The only similar experience I have
personally is trying to make some
"recomended" bullets work in one
of my Marlins that wouldn't feed
without jamming, or chamber properly.
 
Can you photo one of the rounds that won’t chamber? I assume you’re seating at the top or above the last lube groove to reach the 2.835 COL?
 
My initial thought was to seat deeper. Then my brain jiggled and I remembered reading about nose sizing, where you just size the nose basically making it a bore rider.

Well I did a search and came up with more work than it was usually worth unless it was for a very specific purpose. Most who had used it were either shooting 308 or similar caliber rounds.

The overall consensus mentioned was to have a custom mold made to your specific dimensions needed. If you consider that, I highly suggest Accurate Molds. Contact Tom, explain your situation, and he can deliver you an awesome piece of equipment to work with. Might look through his catalog and see what he has already made or drawn up. He might already have just what you need.
 
It's not a "disturbing problem"... it is an enviable position.

Two diameter(can be more,but for brevity) bullet is exactly that... your body is one diameter,the nose is another.

Stop thinking "push through" dies. NO,THAT IS NOT A CONDEMNATION of that style die. It's the wordage that causes understanding. Just because you have a die,doesn't mean you gotta push through it.... it can be an in and out.

Look up for your education(we ain't buying anything) a "plain ring gage". Plain in this sense that it's not a threaded ring gage. This is the basis of a nose sizing die. Pics below. A ring gage is a parallel bore....

On a nose die,it can be(remember,trying to simplify the description) either no-taper as in parallel.... or a tapered. There's a several advantages to a tapered die in how it gets applied to rifle bullets.... mainly it creates adjustment potential for OAL by how far into the die you press the bullet in. The further the bullet goes in the die....... the longer your cartridge OAL will be. It simply allows you to adjust exactly where on the long axis of the bullet,the assembled round engraves.

A straight or no-taper is not as adjustable. However.... sometimes a straight nose die works absolutely perfect. It depends on the dropped bullet and that particular chamber. Saying this to mean tapered isn't the end all...
 
I would pay more for a mould if the nose could be spec'd somewhere around .0005-.001" over std bore dimension. This way I get to control final diameter...with nose dies.

If the nose drops "under".... which is what most folks want. Well now my problem is it has to be "bumped" or swaged larger before it can be sized back down. So you're better with too large of nose vs too small. It's not that too small can't be fixed.... it's because it adds work.
 
To those that followed the above aren't bored enough.... try to follow this;

OK,we have a piece of round stock with a hole bored through. Without taking it out of the lathe chuck,peel off enough from the outside of the bar stock to make it perfectly round OD. Any taper reaming is done now. And this die needs a very well thought out leade in.... look at a typical Lyman H die...

Make the die about an inch long, now is where it gets interesting. The idea is that we're going to size the nose but,how do you insure that the bullets enter this die DEADNUTS straight? Chalk up another big point for tapered die.... they self center a lot better. Straight nose dies work for short bullets.... back to the story.

Your choice of presses for nose sizing may(means might,can,etc... not will) effect this next step a little so hope it's clear enough? We want to "start" the bullet into the nose die... practicing on a few culls to get the hang of it. Just get them started. Now roll the die on a flat plate and watch the arse end of the started bullet, .0005" wobble is easily detected by eye. This is why the die needs to be round,and all done without taking it out of the lathe chuck.

Once you understand this,it "should"(means more than likely) give you a clue on how dang important alignment in not only your bench equipment,but also upon chambering. The low tech'ness of rolling keeps this well understood. Vs a bunch of metrology lab tools that honestly,don't work as well.
 
Next,if you're using a tapered die is;

A goodly amount of testing to see where your rig prefers the bullet base location in the loaded case. Most folks assume it's all about where the OAL is in relationship to the rifling/throat/leade.... yes,that's all pretty important. But understand,as we change the jam,and OAL.....

The bullet base,over powder column height changes. This is not something anyone can prescribe. You're gonna have to test.... just like you have to test jam.
 
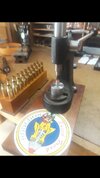
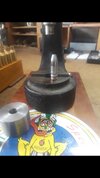
So,this is determined by how far into the tapered die the bullet gets pushed. Here's some terrible pics,hopefully you'll see something. Screenshot_20230903-041014_Gallery.jpg
Screenshot_20230903-041020_Gallery.jpg
 
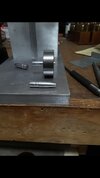
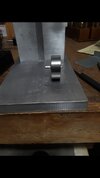
I swear,trying to make this simple... it's WAY easier to "do".... than try to explain. Here's another crummy pic showing how rolling certs (certifies) your leade in requirements.
Screenshot_20230903-040659_Gallery.jpg
Screenshot_20230903-040704_Gallery.jpg
 
We're standing on first base.... some may want to stop reading now.

Another way to size noses is with a "Little Goober"... LG for short. I coined that name because,well,seemed appropriate.

Technically it's an external spinner. It sizes the nose but WAY more important is it self centers to the point of refinement. IOWS,yes we can sorta make a silk purse out of a sows ear. It's a custom reamed piece of bar stock that has either, a very close to factory ogive profile.... or slightly different. Don't want to too radical on this,trust me.

What we're looking for is very similar to turning case necks in that; don't have to clean up 100% of the nose ogive profile. If you can get noticeably past 50% you'll see a difference on paper/target.

Found a pic. These are some stupid fast and deadly accurate 22-250. LG goes in a drill motor.
Screenshot_20230903-050749_Gallery.jpg
 
One other "instrumental" (vs intrinsic) lesson on the LG is;

It's instrumental because yes,it sizes the nose but it's educational towards the way nose lubes can(means may,might,hopefully) work some magic. Powder coating is all fine and good.... but it sure as heck ain't the only way to impregnate lubes. Leave it as instrumental though because you're gonna have to figure the lube chemistry out for your application. The LG in this respect,is a lube applicator.
 
There's a whole 'nuther way of sizing with a Mack truck's worth of refinement but.... it's beyond any technical writing skill I possess. And I swore would never discuss it again after getting banned from a cast site after a very poor description brought out the wrath of a cpl big shot members. It's an internal spinner,think low tech Junke machine.

To the OP,send me a handful of bullets through a PM and I'll cut you a nose die... will guvment it in. Throw some postage $,you can have the die.
 
I haven't read through everything here, and I have minimal experience reloading. However, I am an engineer and I have a recommendation:

Do a "blue check". This is in reference to the practice of coating machine parts with prussian blue, a dark pigmented, non-drying paste, which is used to check things like mating surfaces of valve seats for a valve that's being 'lapped" (having the seat of a leaking valve re-ground so it'll not leak when shut) to see if the valve disc is actually making full contact with the seat. You paint the surface on the valve seat with prussian blue, then cycle the valve shut and open. It'll show a mark wherever the two come into contact when mated together. If you get a full circle around the seat where the disc comes into contact, then you know the valve won't leak when shut. If you don't get a full circle, then you know the valve won't seal properly when shut and you have to continue your machining (or replace the valve).

A layman's way of doing this in your case would be to use something like a fat tipped Sharpie marker to completely darken the entire cartridge and then you can drop it into the chamber and see exactly where the cartridge is encountering interference with the chamber.

This will go a long way towards taking the guess work out of figuring this out.
 
Could be your alloy. For example, linotype will cast larger than #2 and result in a larger diameter nose.
 
Can you photo one of the rounds that won’t chamber? I assume you’re seating at the top or above the last lube groove to reach the 2.835 COL?
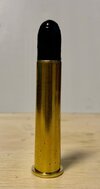
Yes, I am seating at just barely below the top of the top lubricant or crimp groove. Here is a photo:

Bullets 500g Lyman at correct 2.835 seating depth - 1.jpeg

In this photo, if you look carefully, you can see that the mouth of the case, crimped inward just slightly, is just below the topmost driving band, whch itself is just below the ogive.

IF it would be safe to push the bullet deeper into the case to enable chambering, the crimping would almost certainly need to be right into the ogive, since the top driving band is only about 1/16" high.

Jim G
 
My initial thought was to seat deeper. Then my brain jiggled and I remembered reading about nose sizing, where you just size the nose basically making it a bore rider.

Well I did a search and came up with more work than it was usually worth unless it was for a very specific purpose. Most who had used it were either shooting 308 or similar caliber rounds.

The overall consensus mentioned was to have a custom mold made to your specific dimensions needed. If you consider that, I highly suggest Accurate Molds. Contact Tom, explain your situation, and he can deliver you an awesome piece of equipment to work with. Might look through his catalog and see what he has already made or drawn up. He might already have just what you need.
That is apossibility. And thta would ensure that the cartridge would properly chamber. BUT, custom molds are costly, and there is no assurance that any specific rifle is going to "like" the resulting bullet in terms of accuracy at any specific ranges. So, it would be a risk, and a risk that is not only costly but also would take a LONG time to both make and then SHIP to me in Canada! So, it is not at the top of the potential remedial actions. :(

Jim G
 
It's not a "disturbing problem"... it is an enviable position.

Two diameter(can be more,but for brevity) bullet is exactly that... your body is one diameter,the nose is another.

Stop thinking "push through" dies. NO,THAT IS NOT A CONDEMNATION of that style die. It's the wordage that causes understanding. Just because you have a die,doesn't mean you gotta push through it.... it can be an in and out.

Look up for your education(we ain't buying anything) a "plain ring gage". Plain in this sense that it's not a threaded ring gage. This is the basis of a nose sizing die. Pics below. A ring gage is a parallel bore....

On a nose die,it can be(remember,trying to simplify the description) either no-taper as in parallel.... or a tapered. There's a several advantages to a tapered die in how it gets applied to rifle bullets.... mainly it creates adjustment potential for OAL by how far into the die you press the bullet in. The further the bullet goes in the die....... the longer your cartridge OAL will be. It simply allows you to adjust exactly where on the long axis of the bullet,the assembled round engraves.

A straight or no-taper is not as adjustable. However.... sometimes a straight nose die works absolutely perfect. It depends on the dropped bullet and that particular chamber. Saying this to mean tapered isn't the end all...
Thank-you for the idea. I do see how it could solve the problem. It might not be choice No.1 as a solution since it:
1. Adds another step to my bullet preparation processes
and
2. Distorts the shape of the supposedly "proven good" shape of this bullet (Mike Venturino loves it)

but yes, this is something that I could try. Thanks!

Jim G
 
I'm thinking along a different line. These guns and bullets were never intended to use coated bullets since the coating wasn't available at the time. Will an uncoated dummy round chamber? If so, you may try lubing instead of coating.

chris
 
We're standing on first base.... some may want to stop reading now.

Another way to size noses is with a "Little Goober"... LG for short. I coined that name because,well,seemed appropriate.

Technically it's an external spinner. It sizes the nose but WAY more important is it self centers to the point of refinement. IOWS,yes we can sorta make a silk purse out of a sows ear. It's a custom reamed piece of bar stock that has either, a very close to factory ogive profile.... or slightly different. Don't want to too radical on this,trust me.

What we're looking for is very similar to turning case necks in that; don't have to clean up 100% of the nose ogive profile. If you can get noticeably past 50% you'll see a difference on paper/target.

Found a pic. These are some stupid fast and deadly accurate 22-250. LG goes in a drill motor.
View attachment 1169664
I totally understand the "Little Goober" idea. But it scares me, because by rotating it via a drill, and using it to reshape and perfectly "center" the ogive of the bullet, you are creating a LOT of Lead dust in the air, which will first potentially enter my body via breathing, and then settle onto everyhting that is nearby, and thus pollute my work environment! I am VERY cautious about handling Lead! :)

Jim G
 
I haven't read through everything here, and I have minimal experience reloading. However, I am an engineer and I have a recommendation:

Do a "blue check". This is in reference to the practice of coating machine parts with prussian blue, a dark pigmented, non-drying paste, which is used to check things like mating surfaces of valve seats for a valve that's being 'lapped" (having the seat of a leaking valve re-ground so it'll not leak when shut) to see if the valve disc is actually making full contact with the seat. You paint the surface on the valve seat with prussian blue, then cycle the valve shut and open. It'll show a mark wherever the two come into contact when mated together. If you get a full circle around the seat where the disc comes into contact, then you know the valve won't leak when shut. If you don't get a full circle, then you know the valve won't seal properly when shut and you have to continue your machining (or replace the valve).

A layman's way of doing this in your case would be to use something like a fat tipped Sharpie marker to completely darken the entire cartridge and then you can drop it into the chamber and see exactly where the cartridge is encountering interference with the chamber.

This will go a long way towards taking the guess work out of figuring this out.

Excellent idea! Thank-you!

Jim G
 
Because your rifle is a single shot, crimp basically doesn't matter. Load a start charge, seat the bullet till it fits and shoot it. Your concerns of jam are unfounded in my opinion and slightly into the lands helps accuracy and prevents bullet deformation. I'm not talking hard jam here...
 
Could be your alloy. For example, linotype will cast larger than #2 and result in a larger diameter nose.

I thought about that, especially since my bullets are coming out of the casting process weighing 514.7 grains versus the 500g supposedly expected if using Lyman No. 2 alloy (which is 5% Tin, 5% Antimony, and 90% Lead).

HOWEVER, the REASON my bullets weigh 514.7g is because I am using >30 years old wheel weight alloy, which apparently has far less Tin (0.5%) and Antimony (don't know how much), and I added only 1% Tin to that alloy. So, the bullets were EXPECTED to be heavier than Lyman No.2 bullets.

In general, I think harder alloys cast larger, and softer alloys cast smaller, and my alloy is reasonably soft (about BHN 10.7 via a Lee Hardness Tester). In fact, without the powder coating, which adds a couple thousandths to the diameter, the shank of the raw bullets would be too small a diameter for good obturation in my Pedersoli Sharps replica, as the raw diameter averages .4593".

Jim G
 
. . .
To the OP,send me a handful of bullets through a PM and I'll cut you a nose die... will guvment it in. Throw some postage $,you can have the die.

Thank-you for that very kind offer! Before I would ask you to do that for me, I really should see first if there is a simpler solution. if there is not, I will PM you!

Jim G
 
Because your rifle is a single shot, crimp basically doesn't matter. Load a start charge, seat the bullet till it fits and shoot it. Your concerns of jam are unfounded in my opinion and slightly into the lands helps accuracy and prevents bullet deformation. I'm not talking hard jam here
I thought about that, especially since my bullets are coming out of the casting process weighing 514.7 grains versus the 500g supposedly expected if using Lyman No. 2 alloy (which is 5% Tin, 5% Antimony, and 90% Lead).

HOWEVER, the REASON my bullets weigh 514.7g is because I am using >30 years old wheel weight alloy, which apparently has far less Tin (0.5%) and Antimony (don't know how much), and I added only 1% Tin to that alloy. So, the bullets were EXPECTED to be heavier than Lyman No.2 bullets.

In general, I think harder alloys cast larger, and softer alloys cast smaller, and my alloy is reasonably soft (about BHN 10.7 via a Lee Hardness Tester). In fact, without the powder coating, which adds a couple thousandths to the diameter, the shank of the raw bullets would be too small a diameter for good obturation in my Pedersoli Sharps replica, as the raw diameter averages .4593".

Jim G
Hot molds also cast larger bullets, but based on the wrinkles observed in your other thread that is also a non-issue. A round nose bullet will always give you shorter oals before jam than modern bullet shapes.
 
Back
Top