I think I found the problem!

Status
Not open for further replies.
Check the shell holder for a piece of stuck tumbler media, or a bur.

Something is preventing the case from entering the shell holder all the way so the punch is centered on the primer.

rc
 
Is the mainspring ground narrower on the 15? Some folks do that to lighten the trigger pull. It should be the same as the 586.

How's the headspace and end shake?

Firing pin protrusion through the breach face?

Have you checked for push off in single action? Improperly modified/damaged hammer hooks or improperly stoned single action sear on the trigger can create that condition. Cock the hammer and apply about 5 #s of force to the hammer with your thumb. It should not fall. It only takes about 5 #s to check. More than that is too much.

Not likely that you have it, but Walt Sherman in Tallahassee does a roller action conversion that makes for an incredibly light double action pull. C&S offered a similar conversion for a while, but no longer. Both used full power mainsprings, so light strikes should not be an issue with those. The identifying feature is a small roller pinned into the end of a modified version of the hammer dog (double action fly). That's the spring loaded thing on the front of the hammer that the trigger engages in double action.

In case it hasn't been mentioned, if you do take the side plate off, do not mix up the screws. The flat top screw under the grip is easy to keep straight, but the yoke screw is fitted to the yoke and should not be mixed up with the screw behind the trigger guard.

One last trick - You can temporarily put a spent primer over the end of the strain screw where it bears on the mainspring, effectively lengthening the screw to apply more tension on the spring.
 
Replace the mainspring with a factory new spring and replace the strain screw while your at it . 20 bucks in parts and your good to go. as for the primer issue clean your shell holder and clean the primer pockets in your brass. dirty primer pockets will cause you to press harder to seat primers. try that and let us know how it went !!!!

ps if you just want to try this swap the mainspring and strain screw with your 586 and see what happens :eek::):):):):):)
 
Those reloads look very much like the primer seater may be crushing the primer compound, which will definitely give misfires.

P.S. On the sideplate, you folks are correct. I must have been very sleepy when I wrote that. Anyway, you don't need a suction cup and please don't pry the sideplate off.

Jim
 
took the cover off

Here is a picture with the cover off. I have no idea what I am looking at so your help is appreciated. Looks a little dirty to me is all I can see.

Bill,

Pushoff ~ Tried several times to make the hammer fall from the cocked position by pushing it with my thumb. It did not fall.

Lockup and endshake~ Just a little looser than the 586 but not much. The cylinder has slight movement when rotated on axis. It will slightly move back toward the hammer if I push it, but it springs right back toward the barrel. Firing pin protrusion is slightly less than the 586. Each hammer strike hits the primer dead center.

Mainspring appears to be the same length, width and thickness as in the 586.
 

Attachments

  • DSC_0881a.jpg
    DSC_0881a.jpg
    99.8 KB · Views: 24
Agree with David - get a new factory main spring. I've purchased several older K frames and it's a common problem.

While you have the sideplate off, it's a good time to do some polishing (Flitz works well).

You really don't need a "tool" for removing or installing the rebound slide - just use a narrow screw driver and take your time depressing the spring back on the stud.

If you care to attempt a poor man's action job, do this:

* polish the hammer stud
* polish the trigger stud
* polish the bottom of the rebound slide
* polish the frame ledge where the bottom of the rebound slide makes contact

Some light greasing when you reassemble (I like Tetra) and you should be good to go...
 
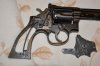
No push off. Great! At least we know that no one has monkeyed with the hammer/trigger and the pic verifies that you do not have a roller conversion.

The gun looks pretty good from here. Not much apparent wear. Little evidence of hammer dragging on the side plate (can't see the other side). The cylinder notches look good and the inside looks very clean. Doesn't appear to have been shot to pieces.

As noted, a new mainspring is cheap. While you're doing all this, measure the actual firing pin protrusion, head space, end shake, and cylinder to barrel gap. They are all related and end shake caused from wear or improper fitting can affect headspace and cylinder to barrel gap. Combined with inadequate firing pin protrusion and/or a weak mainspring, you will have a pretty paperweight. Firing pins are seldom short, but it is worth checking. More common to find an end shake/cylinder to barrel gap problem. Does your cylinder latch into place easily when closing (yoke straight)?

As for polishing, without knowing your sense of when "enough is enough" and what not to touch, I advise caution. I won't say don't. Just proceed with caution. Resist any urges to "clean up" the machining marks on the single action hammer hooks (yeah, the do sometimes look rough up close) or to stone the single action sear surface on the trigger. That's a quick way to generate push off problems and destroy the single action trigger.
 
hmmm...

Okay now I am going to add this to my discussion... after reading this, http://www.thehighroad.org/showthread.php?t=725457 I realized ~

I used Remington 1 1/2 primers which are apparently thinner in the cup than 5 1/2 primers. Maybe this is why my hand primer is making dents in the cup? I also now remember one of my shots with the model 15 had blow back through the primer. I examined the firing pin and hammer after that shot and it was coated with carbon.

I also primed some .357 mag loads with them (medium loads) with no problems. . . yet. Will not repeat that mistake.

And state this...

I will be purchasing a new main spring and set screw shortly. Keep you updated!
 
I will be purchasing a new main spring and set screw shortly. Keep you updated!

By set screw I presume you mean strain screw.

These two items will likely fix your issues. If not, then we can evaluate further.

Look forward to the update!
 
Status
Not open for further replies.
Back
Top