New Holster: Frontier Scout 62

Status
Not open for further replies.

Dr.Rob

Moderator
Staff member
Joined
Dec 23, 2002
Messages
17,151
Location
Centennial, CO
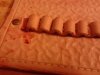
Holster for Colt Scout .22. I made a couple of tiny errors on this, glad I made it for me and no one else. Hand stamped, carved, stitched. Antiqued finish.

DSC02337_zpse2595069.jpg

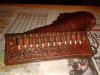
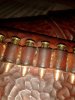
Another view of Colt .22 holster. Not as much boning as I wasn't sure the stamping would hold up. This was from a pattern I found in Craftool's "how to make holsters" by Al Stohlman. Some parts were easier than making my own pattern, but it still had some tricky bits (all the instructions aren't together for starters) .The 'yoke' is of my own design, just liked the shape, inspired by a piece of scrap.

DSC02338_zps43212650.jpg
 
Very very Nice!!!

I really like the shading tool stamping!
Never seen that before that I recall!

And you were wise not to try to bone it to fit the gun after tooling.
Because, You can't.

What did you oil it with?

rc
 
Hey Doc, that holster looks good to me. Like RC stated, you can't wet shape after tooling. My OWB holster pictured in the thread "I met an artist at a gun show" was tooled after I wet shaped it. I have a good time experimenting with things that you can do with leather. Keep up the good work. Joe
 
OMG hand stitching 22 cal loops was a BEAR. Actual blood, sweat n tears.
 

Attachments

  • 1558540_10152590610158235_747259693235190941_n.jpg
    1558540_10152590610158235_747259693235190941_n.jpg
    109 KB · Views: 14
Last edited:
and... done.

That was a LOT more work than I expected.
 

Attachments

  • 10702204_10152591045983235_5354218006912386763_n.jpg
    10702204_10152591045983235_5354218006912386763_n.jpg
    130.5 KB · Views: 18
  • 1513802_10152591046093235_8295755767055861181_n.jpg
    1513802_10152591046093235_8295755767055861181_n.jpg
    176.2 KB · Views: 8
Geeze!

I bet it was!

I used to do them with 'really wet' formed loops, formed over slightly smaller then caliber wood dowel sticks pressed in place by a matching wood form.

Then after the leather was dry, glue the bottoms of the loops down with contact cement and poke & sew them.

Then wet again and insert cartridges in each loop to stretch each loop, and let them dry enough they would stay tight later.
Then take the cartridges out and let then finish drying and tightening slightly.

Much less blood involved doing it that way!

rc
 
I spaced and glued down 12 .22 mag rounds on a piece of paper with Elmer's glue and let it dry. Then wet the leather and kind of formed it into rough shapes. Then in between each round I placed a round toothpick, then I put 50 pounds of sand over it. The idea was this would give me a rough idea/form of how to keep the loops centered on my pre-made slide. I started sewing from the middle and worked outwards.

I STILL had to stretch n pull and poke each loop, and keeping the leather 'straight' was nigh impossible. Each loop only got about 4 stitch holes.
 

Attachments

  • DSC02372.JPG
    DSC02372.JPG
    50.9 KB · Views: 7
  • DSC02373.JPG
    DSC02373.JPG
    57.6 KB · Views: 11
  • DSC02397.JPG
    DSC02397.JPG
    51.1 KB · Views: 10
Last edited:
Dr.Rob

Very nice looking guy and great play by play narrative and photos too!
 
The loops look great to me!

Big caliber loops are a whole lot easier then .22 loops.
No matter how you do it!

rc
 
Status
Not open for further replies.
Back
Top