Paco Kelly - Acu'rzr - application jig- (quite long)

Status
Not open for further replies.
For all the generous help

Thanks to everyone for their imput, I think I got it now. I'll fix these photos and hopefully have them up shortly.

I must say, I'm really impressed with everyone's generosity and the back and forth exchange of ideas. You guys deserve a good slap on the back, so feel free to give yourselves one.

Thanks, again for helping this newbie.

Harley, member OPMC
 
Targets and larger photos

Thanks for all the help guys. Hopefully this is going to work.

Enclosed are larger photos of the tool setup.

Also, there's a closeup of the tool showing the index mark. The idea of the index mark is to orientate all the rounds the same way when they are processed. A small mark is made with the magicmarker on the base of the cartridge and I load the rounds with that mark in the same position in the rifle chamber, usually 12 o'clock.

The rifle used was the Biatholon Basic with 4x12 scope ($279.00, tax included, purchased through a local shop). Scope was extra. I hope to be able to compete with this setup in .22rf Benchrest and Silhouette (?), later this summer.

All targets have 5 shots in them, and they were fired at 25 yards from a bench rest. (edit:Target A show unaltered factory rounds as a control.) And they were fired in sequence A through F. The numbers, i.e. .065, .070, refer to the dial indicator reading from zero, as the amount of force applied. The tool swages to either .223 or .224, so that information is included also. Targets A and B included group measurments with Outside Diameters, just for reference.

Reading targets is like reading tea leaves. But I think I can conclude that this particular rifle doesn't like the .224 sized rounds. Also, it wants to through the first shot outside the group. ( I have a theory about that phenomena, but I'll save it for a new thread, as soon as I figure out how to do that.) Also, I couldn't locate my cleaning rod while at the range and had to resort to using the old weed whacker cleaning method, as marked on target D. Cleaning every 20 - 25 rounds would have improved the groups, I'm sure. Oh well, next time.

Now I notice they only allow 5 files to be uploaded at a time.

I would certainly like to hear everyone's opinion as to which course to follow here with the various ammunition and what size to swage to, etc.

harley, member OPMC

I'll post the remaining targets in a separate post.
 

Attachments

  • tool.jpg
    tool.jpg
    44 KB · Views: 128
  • A CONTROL GROUP.jpg
    A CONTROL GROUP.jpg
    20.9 KB · Views: 105
  • B AQUILLA SE.jpg
    B AQUILLA SE.jpg
    41.2 KB · Views: 132
  • C 224 AQUILLA SE.jpg
    C 224 AQUILLA SE.jpg
    39.9 KB · Views: 114
  • D 223 WOLF.jpg
    D 223 WOLF.jpg
    45.8 KB · Views: 110
More photos

Here's a photo of the index tool and remaining targets. Sorry about that.

edit: I forgot to mention,the numbers with the X behind them indicate that those rounds were indexed rounds. I think they show some improvment over the non indexed. What do you think?

Harley
 

Attachments

  • E 223 AQUILLA GOLDEN EAGLE TARGET.jpg
    E 223 AQUILLA GOLDEN EAGLE TARGET.jpg
    49.5 KB · Views: 104
  • F 223 AQUILLA GOLDEN EAGLE TARGET.jpg
    F 223 AQUILLA GOLDEN EAGLE TARGET.jpg
    46.7 KB · Views: 97
  • tool alignmenA.jpg
    tool alignmenA.jpg
    28.1 KB · Views: 135
Harley - you have put a great deal of effort into all this - excellent... and thank you for all the trouble taken. Pics are doing good - you cracked that nicely.

I am slightly unsure why the indexed should show a difference but .065 indexed does seem a good setting in two or three cases. I need to go thru these again a time or two to see the trends better - it's not easy at a glance to determine all the variances.

I do also bear in mind - well for me from a bench - I know it ain't necessarily rock steady every shot and so ''trends'' are what seem best to analyze.

When I (eventually) get to do my tests - I will probably only do one or two ammo types but have thought of doing a larger sample perhaps. Say 10 shots ''untreated'' vs 10 shots ''treated'' - using my ''dropper'' Really must get to doing it soon.

What tho are your own impressions?
 
Indexing Rounds

P95Carry, et al,
Years ago, L. E. Wilson in an advertiisment showed how a bullet that isn't perfectly aligned with the cartridge will shoot to a different impact point. Using a cartridge runout gauge, and marking the high side, you could then have these cartridges shoot left, right, up or down in the group. Basically, for benchrest shooters.

My fear in using this tool is that some cant to the bullet is being introduced in the process. So, by marking the round as it's put in the tool, you can then insert it in the chamber of the rifle with the same orientation, using that mark. It seems , if you compare any of the X (indexed) bullet groups with the non-indexed groups (with the exception of the first shot flyer), the indexed groups look a bit tighter. Even the .055 and .060 groups look tighter.

I'm sorry that I didn't index any of the Aguila SE (finally read the label on the box), for this test, since they show so much promise. Next week when I get to the range, I will certainly include those in testing. I also came across several hundred rounds of Remington target ammo that has been separated using a headspace gauge. I hope to include those in the testing as well. Those were left over from previous testing that went nowhere.

As an aside on headspacing rimfire ammo in terms of accuracy: there was an article in Precision Shooting by a prominent rimfire gunsmith, located in Indiana, (whose name I don't recall), that asserted headspacing has little or nothing to do with accuracy in rimfire ammo. In his opinion, consistent ignition was much more critical to accuracy than was headspace. And also, the shape of the firing pin. And, in the article he went on to show this to be true using a Winchester target rifle with which he could alter the headspace. I agree with him on the basis of the testing I have done using various headspace gauges. That's probably the subject of a new thread.

So, hopefully, if the creeks don't rise, I'll get to the range next week and be able to nail some of this down by eliiminating the cleaning issue and the first shot flyers. And, I agree on the ten shot groups being more informative in terms of trends. Thanks for the advise.

Anybody else out there with some results from the range?

harley
 
Thx Harley - I see your point re the indexing - for test purposes probably a wise move. I have several selections of ammo types but will I think stick to just one and use larger samples.

A lot of us (self included) are using Fed Champion ammo at pin shoots - and this will probably be my main choice tho - as a matter of interest I want to run tests also on the bulk box Fed - and tho it it is HP - will still see what changes might occur with tweaking.
 
I don't mean to interrupt ya'll's picture takin' and picture postin' thread :D but has anyone gotten around to accuracy testing these modified rounds yet?
 
Yanno, Chris, I'm gonna have to show up one of these days and see yer new toy. Maybe get some .22 rounds redone too.

PS, TSA swiped my .45-70 round.
 
Chris - well I really do hope to do some tests soon - one day! If you are over then yeah - we'll ''redo'' sokme rounds.

That 45-70 - WHAT! That inert round? Swiped? Why ? In your pocket when you flew? :rolleyes: :mad:
 
So solly,

:p :rolleyes:

I keep forgetting that what I'm reading is not an article and that conclusions, test results, etc. are rarely at the end. My bad.


Keith
 
more photos - may be of interest

This is a little test I did with Paco's ACU'RZR tool. The two photos show the results of different forces applied to the tool using the arbor press and the dial indicator. The cartridges used are Remington Hi Speed, old stuff, and their OAL before processing were from .983 to .992. Big variation. I think part of the equation here is making all the rounds the same over all lenght.

The numbers on the cartridges are the dial indicator readings and the other photo shows the OAL of the cartridges after processing.

In my rifles, .070 and down seemed to have the best accuracy. Some of the .100 and up failed to chamber about 25% of the time.

Hopefully, some will find this of some use.

harley
 

Attachments

  • THR PROGRESSION.jpg
    THR PROGRESSION.jpg
    27.7 KB · Views: 130
  • THR PROGRESSION A.jpg
    THR PROGRESSION A.jpg
    29.3 KB · Views: 132
Good work harley! :)

Maybe I'll try a set of impacts from my ''dropper'' and see what I come up with for comparison. I have tended to use the max drop which makes for quite a significant dishing. I'll post when I get it done.
 
Yeah, I was thinking about people using a hammer to whack the tool or your drop method; just to give some comparison to measure by.

harley
 
while we're on the subject....

P95Carry, curiosity killed the cat...

Any chance you could post a picture of your fly press? Been looking for just the right one for years and it might have an application here, somewhat.

harley
 
Chris - well I really do hope to do some tests soon - one day! If you are over then yeah - we'll ''redo'' sokme rounds.

Nifty. Any plans to attempt to scale this up to larger rounds, out of curiousity?


That 45-70 - WHAT! That inert round? Swiped? Why ? In your pocket when you flew?

Yea, it was when I last flew to train some soldiers going to Iraq. I pulled a TSA agent aside when they indicated they wanted to look at my laptop bag. Said laptop was an Army issue red sticker with deployment information on it (ie, Iraqi war stuff), and showed my ID, orders, etc. I explained hell would freeze over before it got out of my sight. They didn't like me telling THEM how it was gonna be.

So naturally, they gave me extra serious frisking and went over my bags with a extra fine tooth comb. The .45-70 was in one of the pockets of my bags, so they swiped it along with my lighters and a few other sundry items. A mordida, I suppose. I was in a rush, as you might recall, and didn't properly check my bags as I normally do.

I remember gritting my teeth, and thinking that I could have stabbed the guy in the throat with a pen, and then swiped his handgun in about three seconds. But no, I was a good sheep and just gritted my teeth while they put me in my place.

Edit : Just to be rude, they also stole my toiletry bag. Said I had a sealed pack of those cheap disposable razors, but they still swiped my entire bag. Contact solution/case, toothbrush, everything.
 
More than one post coming up here ..

Chris - no, this technique would I think lend itself to any other calibers - strictly a .22 LR deal IMO. Deformation of larger bullets would required a great deal more force and so much more cumbersome equipment I think. Mind you, swaging machines could produce ''specials'' and do!

Guess with the 45-70 - you just gotta ''bite the bullet'' - well you could if you still had it! :rolleyes: :p

So - RevDisk = -1, TSA +1. :rolleyes:

Total bummer too re that wash bag - :rolleyes: - sheesh. :(
 
OK harley - now re your latest posts -

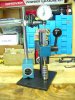
I have taken a pic of fly press - and will put it at bottom of this post. Note however, this and some other stuff around my bench got badly affected by a Ferric Chloride spill a while ago (not caught for ages!) - flash rusting was not in it. This did once look much cleaner!! So - sorry it looks such a mess! The usual ball on top was missing when I got it so - that I replaced with a lead filled tube. Does the job. This one is referred to as a ''Norton #2'' BTW.

~~~~~~~~~~~~~~~~~~~~~~~~~~~~~~~~~~~~~~~~~

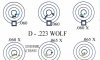
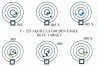
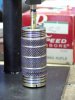
I have done a test run thru my dropper and below is a pic. For convenience, I marked off one guide rail in one inch increments. Zero was with drop bar touching Paco tools. I then dropped sequentially on 11 rounds - 1" thru 10" and finally a 10+ which was max achievable - maybe 10 3/4" tops. One sample round also included - this is Fed Champion BTW. 1" drop was just a dimple as expected!

You may notice, #5 and #6 show minimal OAL change - as do #7 and #8. Now I admit, I did not pre- measure the rounds to start - should have done really, so maybe there was slight variation in the unmodified rounds. Secondly, of course ..... whilst the dropper is very free, there have to be small frictional variations, and even my release technique too perhaps.

Things don't really get useful until the 6" region - this was why I made the MkII version with the longer guide bars. Probably the 8-9" area is a good compromize tho max deformation could well do even better - of course - shooting tests still not done.

One other minor point - with the greater impacts and deformation - bullet sizing is more obvious and so slightly more effort needed to push round out of die - I doubt that would radically alter or add to the main result but could reduce OAL perhaps by further extra thou or so.

Probably I need to make some sorta release device, so as to make better consistency there - this ain't perfect but - has to IMO be an improvement on just whacking with rubber hammer every time!


paco-prog-747-cr-s.jpg

~~~~~~~~~~~~~~~~~~~~~~~~~~~~~~~~~~~~~~~~~~~~~~

The messy fly press!!! -- yuk! -


flypress-s.jpg
 
A Real Beauty

P95Carry - thanks for the photo of the fly press! She's a real beauty. Norton's a good name to have, and no apology needed there. Thanks again for your effort. I'm envious. Someday, I'll pick one up....

I made the same mistake with my little test - not keeping track of the OAL for each round. Or, better yet, starting with rounds with the same OAL. Back to the drawiing board. I was surprised by the inconsistency in the OAL of the factory rounds. I thought they would all be the same. I only measured those ten rounds and had .009" spread. No way are those going into the same hole. Using this tool, a certain percentage of the accuracy gain, is probably coming from making the cartridges the same overall length.

That 5-6" & 7-8" spread in OAL would have me scratching my head. I doubt that your drop technique or friction from your drop tool could account for that. Sometimes, when the die gets gunked up with the bullet lubricant, the forming rod doesn't want to zero out. In other words, it's being impeded by that waxy gunk. That may be cushioning the impact of the drop. Or, sometimes, it impedes the round from completely seating in the die(rim flush with base of die), and therefore, it's being cushioned in that way.

Extracting the rounds - I've gotten into the habit of just turning the die upside down and giving it a good rap on a hard wood block to get the round out. I keep thinking in the back of my mind: "There goes all that precision and careful measurement out the window and up in smoke". It's the lube that's causing all the problems. Only way to get rid of that is soak the rounds in gasoline. Now, there's an interesting idea... I don't think I'll try.

Just eyeballin' it, but, I think you're going to find that the 5"-7" drop area is going to have the best accuracy. They seem about the right shape and reducttion in OAL. We could start a pool here on which is going to be more accurate. Only one way to find out...

You take excellent photos.

I think I will sort out some rounds with the same OAL and try them, just to see if the results come up the same. That's about the only way to have a fair comparsion. Later

harley
 
Yep - me too - definitely have to ''grade'' some rounds for exact OAL - I'll try this too and see if we don't get slightly better results.

I was thinking too - with my drop technique - there has to be a logarithmic relationship with height - acceleration of block due to gravity, tho of course for convenience I was using a linear scale for graduation. That however may well be almost cancelled out by the increased surface area as the dimple forms ... thus at the extreme end, we have a depression of some 0.175 wide, compared with a mere 0.100 at the 2" drop end. Seems to make things almost linear in the result.

I am still puzzled on those two pairs with close OAL - for now I'll assume discrepancies in starting OAL as one probable cause - and I wonder also how consistent the bullet lead malleability is - it should be very consistent but again - even from one make to another - this will be a factor.

I think our quest for perfection is somewhat of a holy grail - as certain variables are hard to eliminate but for sure we must be producing more consistent results than we'd get just from the ''whack 'em'' technique! :p

You may well be right - and the 7" deformation is perhaps what I'll use for a test run at the range - have to see - as time will be the deciding factor ultimately.
 
harley - I think you'll find this interesting!

I graded rounds carefully this time and took out approx 50% thru sampling that were 0.975-0.976. So 10 of those to use. Many rounds were well plus on 0.975 - some 7 or 8 thou plus!!! None so far came out minus on that length. Oh and - Fed Champion again BTW.

I also screwed up slightly last time because, I set zero on my guide rails with punch sitting in an empty die! DUH!

This time I achieved a genuine incremental inches drop - by setting zero on the die with a round already in - much better!. This gave me a top max drop of 10" with little extra space to go.

I therefore went thru again - 1" thru 10" - see pic. No undropped sample this time - we know what that looks like!

You will note - with some pleasure as I do I expect - that the odd couple of close reading problems has disappeared. The increments on OAL are much better spaced - and the vernier caliper is probably reading +/- a thou I reckon. I notice the last couple of whacks show a smaller change of length which I ascribe to the significant increase in surface area of the depression at that stage - harder work even tho extra drop height.

I will probably range test eventually a 6" or 7" drop result.

Oh and a final point - didn't remove treated rounds by whacking - just pushed hard on punch until round released (not overly comfortable on hand!) - this therefore minimized any additional length increase IMO.


paco-prog-780-cr-s.jpg
 
For all the work you guys are doing...

Might I suggest an easier alternative to tightening those group sizes?

Note the "dingus" on the end of the Biathlon Basic pictured below:

biathlontitusville.gif

It fired these groups, using Wolf Extra ammo, two weeks ago on a gusty Florida Sunday morning:

wolfextrawind.gif

The barrel tuner has indeed arrived and made it's presence known in the rimfire community. It's probably just a matter of time before it spills over into the centerfire stage. ;)
 
Okay, I'll Bite....

Gewehr98 - That's some pretty goood shooting in the wind. And, a nice setup with the rifle. What scope are you using there? Rings? Just curious - lookin' good! I just happen to be testing a Biathlon. Willing to try anything once, so where might one stumble across one of these "dingusses" thingamabobs, that should you come to own you get to sleep nights? How does it attach to the barrel? Friction fit? Threaded? Gunsmith only installed? More INFO, please.

harley
 
Harley, nothing tricky, really.

It's a Supertuner, as sold by Time Precision. Remember the Browning BOSS system? The concept's all grown up these days, and has a lot of momentum in the rimfire target shooteing world. Here's what it looks like up close:

supertunewr.gif

Here's where you buy them:

http://www.benchrest.com/timeprecision/SUPERTUNER/supertuner.html

You have to send them the outside diameter of your barrel at the muzzle, then Time Precision will build you a Supertuner that fits square and snug. All you do is then tighten down the two allen screws to make it solid. If you don't like silver on your Biathlon Basic, a spritz or two of semigloss or flat black high-heat engine paint goes a long way. ;)
 
Status
Not open for further replies.
Back
Top