
GW Staar
Member
- Joined
- Feb 26, 2009
- Messages
- 3,699
My Case Feeder for my RCBS Pro 2000 is working, it's simple, and it's fast. This is as finished as it's likely to get for a long while excepting to add more calibers down the road.
I tried various ideas to link its operation to press handle stokes, but there was always a gotcha that made me abandon the idea. But that's ok. I could have have used a solenoid, but I really didn't like the idea of the noise or the requirement for electricity.
Really, I don't need it anyway. The same hand that would manually feed cases and bullets is idle anyway, and manually pushing the spring-loaded tube-fed case shuttle is frankly an extremely fast, painless, and sure way to keep the shell plate full.
In fact there are advantages. More control. One has the ability to rotate the shellplate without dropping a case (even when the case feed tube is not empty). A case that somehow gets upside down gets fed to nowhere (it drops off the shell plate) and you can just push the shuttle again immediately to fill the same spot.
One thing to note: If I wanted to spend another $220 plus caliber conversions, YES, I can mount a Dillon 650 Case Collator directly, to drop into my shuttle. For now, and maybe for a long time a Lee style shaker I made fills 4 36" tubes with .45, .40, .38/.357, 9mm, and even .223, .243, and .308 rifle cases so quickly that it makes the Dillon option not needed. Caliber changes are faster without one. I would get the Dillon Case Collator for sure if I had to support an IPSC, for other pistol competition habit where reloading pistol rounds in one caliber and in mass was the rule.
Anyway.....I have a Video. The first part just shows the case feed action, then I load a strip of primers and load a few complete .40 S&W rounds.
Click the next Picture to see the video.....the rest of the pictures detail how I built this contraption, with only hand tools, a grinder, a vice, and a Dremel.

The limitation with the Pro 2000 design is the location of the APS primer system, which precludes any case shuttle system that raises and lowers with the ram and picks up a case somewhere in the ram cycle.
Therefore I chose to build a stationary shuttle at the bottom of the stroke when the primer is pushed in. That means there is no syncing to do, except to make the shuttle the same height as the shell plate when it fully seats a primer.
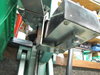
Notice primer counter below is mounted to the press with a heavy-duty “L” bracket using the holes RCBS provided for there tube primer system option. The next picture shows that I mounted the case shuttle to that bracket …. notice a second bracket on top stops any flexing of the lower bracket.

The mounting bracket above was made from 1 ½” 2mm thick strap, bent to the "el" shape in my vice using a big hammer. Cuts were made with a hack saw, and of course drilled and bolted where needed.
Since nearly all who might want to tackle this project themselves won’t probably have the primer counter, they will have more direct access to the mounting holes at the front of the press casting. Mount should be a little easier for you.

ABOVE: The shuttle track is just aluminum channel from Tru-Value Hardware, mangled with a hacksaw, dremel, hammer, and channel locks to get the shape shown below. The cases can’t possibly be pushed to the shellplate in a straight line. I first tried a sweeping curve. The result was 90% effective…not good enough. I had to find a way to get the shuttle in closer. The “S” curve did the trick. This shows the track while the shell plate is at the rest position (press handle up) BELOW: This picture shows the track while the shell plate is at bottom (primer inserted). This is when the next case is shuttled.

Notice the steel circle with ears cut and bent up under the shuttle channel. That is how I mount the case feed cylinder…see the holes drilled in the ears.

Above: My two piece shuttle. Just like a train going around a curve, I had to articulate the case shuttle. The wire is heavy piano wire. The shuttle material is UHDPE plastic. I needed something with self-lubing properties to reduce friction. UHDPE can’t be glued so screws become the only way to attach things.
The front of the shuttle, where the case is pushed needed to have a way to keep the shuttle down tight and slip underneath RCBS’s spring keeper. That’s what the steel plate with the notch is for. The notch captures the spring keeper and the spring keeper captures the shuttle and holds it down. The metal plate is recessed.

I added in this picture to show the detail on the end of the shuttle. It's rough textured since I used a Dremel with a small sanding drum to shape it. Notice the ridge near one end that slips into the extraction groove of cartridges that have them. So far the groove doesn't seem to adversely effect .357. Haven't tried 30/30 rifle. But if I need to...making a second "front car" is just a Saturday project away. The notch on the right allows the shuttle to reach into the target hole better.

The wire screwed to the back “car” is dropped into the front “car”.

Pushed forward the shuttle catches the spring in the notch, pushes it aside, place the case into the shell plate. Retrieving the shuttle releases the spring, which keeps the case where it needs to be…centered below the sizing die. There is a small notch in the bottom left corner of the front shuttle piece to allow it to overlap the shell plate in the left corner. That makes it possible to push the case all the way in.

I needed a spring on the back of the shuttle, so I screwed a plate to the bracket that gives me a place to mount that, plus a smooth area to feed primer strips.

A short piece of 1¼” PVC, carved out on one side to less the shuttle just pass through, and carved out on the other side to let a .308 case pass through, was my goal in making the case feed cylinder. I later painted it with satin black auto trim paint, to make it prettier.

Case feed cylinder mounted, with a case feeder adapter setting inside. My idea is to just make a new case feed adapter for different calibers as needed. That’s pretty easy.

So far so good. Time to anchor and spring-load the shuttle. Then mount the Case Feed Cylinder.

Case feed cylinder painted black. Notice the two holes topside. One’s a mistake and I filled it in. I tapped threads in the other one and added a thumb screw to tighten each Case Caliber Adapter in place. Notice the three notches on top. I drill matching hole in the adapters, tap them, then screw in long set screws to position the adapters perfectly each time. Notches are spaced so it only goes in one way.
I tried various ideas to link its operation to press handle stokes, but there was always a gotcha that made me abandon the idea. But that's ok. I could have have used a solenoid, but I really didn't like the idea of the noise or the requirement for electricity.
Really, I don't need it anyway. The same hand that would manually feed cases and bullets is idle anyway, and manually pushing the spring-loaded tube-fed case shuttle is frankly an extremely fast, painless, and sure way to keep the shell plate full.
In fact there are advantages. More control. One has the ability to rotate the shellplate without dropping a case (even when the case feed tube is not empty). A case that somehow gets upside down gets fed to nowhere (it drops off the shell plate) and you can just push the shuttle again immediately to fill the same spot.
One thing to note: If I wanted to spend another $220 plus caliber conversions, YES, I can mount a Dillon 650 Case Collator directly, to drop into my shuttle. For now, and maybe for a long time a Lee style shaker I made fills 4 36" tubes with .45, .40, .38/.357, 9mm, and even .223, .243, and .308 rifle cases so quickly that it makes the Dillon option not needed. Caliber changes are faster without one. I would get the Dillon Case Collator for sure if I had to support an IPSC, for other pistol competition habit where reloading pistol rounds in one caliber and in mass was the rule.
Anyway.....I have a Video. The first part just shows the case feed action, then I load a strip of primers and load a few complete .40 S&W rounds.
Click the next Picture to see the video.....the rest of the pictures detail how I built this contraption, with only hand tools, a grinder, a vice, and a Dremel.
The limitation with the Pro 2000 design is the location of the APS primer system, which precludes any case shuttle system that raises and lowers with the ram and picks up a case somewhere in the ram cycle.
Therefore I chose to build a stationary shuttle at the bottom of the stroke when the primer is pushed in. That means there is no syncing to do, except to make the shuttle the same height as the shell plate when it fully seats a primer.
Notice primer counter below is mounted to the press with a heavy-duty “L” bracket using the holes RCBS provided for there tube primer system option. The next picture shows that I mounted the case shuttle to that bracket …. notice a second bracket on top stops any flexing of the lower bracket.
The mounting bracket above was made from 1 ½” 2mm thick strap, bent to the "el" shape in my vice using a big hammer. Cuts were made with a hack saw, and of course drilled and bolted where needed.
Since nearly all who might want to tackle this project themselves won’t probably have the primer counter, they will have more direct access to the mounting holes at the front of the press casting. Mount should be a little easier for you.
ABOVE: The shuttle track is just aluminum channel from Tru-Value Hardware, mangled with a hacksaw, dremel, hammer, and channel locks to get the shape shown below. The cases can’t possibly be pushed to the shellplate in a straight line. I first tried a sweeping curve. The result was 90% effective…not good enough. I had to find a way to get the shuttle in closer. The “S” curve did the trick. This shows the track while the shell plate is at the rest position (press handle up) BELOW: This picture shows the track while the shell plate is at bottom (primer inserted). This is when the next case is shuttled.
Notice the steel circle with ears cut and bent up under the shuttle channel. That is how I mount the case feed cylinder…see the holes drilled in the ears.
Above: My two piece shuttle. Just like a train going around a curve, I had to articulate the case shuttle. The wire is heavy piano wire. The shuttle material is UHDPE plastic. I needed something with self-lubing properties to reduce friction. UHDPE can’t be glued so screws become the only way to attach things.
The front of the shuttle, where the case is pushed needed to have a way to keep the shuttle down tight and slip underneath RCBS’s spring keeper. That’s what the steel plate with the notch is for. The notch captures the spring keeper and the spring keeper captures the shuttle and holds it down. The metal plate is recessed.
I added in this picture to show the detail on the end of the shuttle. It's rough textured since I used a Dremel with a small sanding drum to shape it. Notice the ridge near one end that slips into the extraction groove of cartridges that have them. So far the groove doesn't seem to adversely effect .357. Haven't tried 30/30 rifle. But if I need to...making a second "front car" is just a Saturday project away. The notch on the right allows the shuttle to reach into the target hole better.
The wire screwed to the back “car” is dropped into the front “car”.
Pushed forward the shuttle catches the spring in the notch, pushes it aside, place the case into the shell plate. Retrieving the shuttle releases the spring, which keeps the case where it needs to be…centered below the sizing die. There is a small notch in the bottom left corner of the front shuttle piece to allow it to overlap the shell plate in the left corner. That makes it possible to push the case all the way in.
I needed a spring on the back of the shuttle, so I screwed a plate to the bracket that gives me a place to mount that, plus a smooth area to feed primer strips.
A short piece of 1¼” PVC, carved out on one side to less the shuttle just pass through, and carved out on the other side to let a .308 case pass through, was my goal in making the case feed cylinder. I later painted it with satin black auto trim paint, to make it prettier.
Case feed cylinder mounted, with a case feeder adapter setting inside. My idea is to just make a new case feed adapter for different calibers as needed. That’s pretty easy.
So far so good. Time to anchor and spring-load the shuttle. Then mount the Case Feed Cylinder.
Case feed cylinder painted black. Notice the two holes topside. One’s a mistake and I filled it in. I tapped threads in the other one and added a thumb screw to tighten each Case Caliber Adapter in place. Notice the three notches on top. I drill matching hole in the adapters, tap them, then screw in long set screws to position the adapters perfectly each time. Notches are spaced so it only goes in one way.
Attachments
Last edited:


")


