Paul Gomez
Member In Memoriam
The Blackhawk Serpa…A ‘How To’ Guide
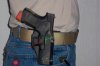
Following the widespread distribution of my ‘Damning Review’ from November 2005, I have had multiple conversations with Blackhawk and the holsters have undergone several design improvements. The instructions that accompany the Serpa duty holsters are much clearer than those that came with the earlier units. If the end-users actually read them, and pay attention, they will go a long way toward minimizing the risks.
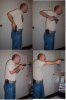
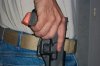
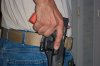
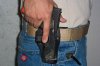
In July 2006, I was tasked with training a group that was issuing the Smith & Wesson M&P pistol and utilizing the newly released Blackhawk Serpa Duty Holster. Given my previous writings concerning the Serpa design, this was an ironic turn of events, to say the least. What follows is a photographic sequence illustrating the method of operation that I have come to advocate for the Serpa holster. As an aside, I am often accused of fixating on meaningless details. Some of you may find this to be one of those instances. So be it. My concern, in my initial writings concerning the Serpa, and in this piece, is to provide legitimate information to the community. The Serpa design is not going away and I encourage anyone who is not aware of the design to familiarize yourself with it. If you are currently utilizing a Serpa holster, please try this method of operation and let me know what you think. If you know of anyone using a Serpa, pass this along to them. The more feedback, the better.
The ‘drawstroke’ or ‘presentation’ of the handgun, as I teach it, is a four count process wherein ‘1’ denotes establishing a full firing grip on the holstered pistol, ‘2’ is both a high pectoral/retention position and the beginning of the horizontal line of presentation, ‘3’ is the point at which the weapon enters the peripheral vision, under the dominate eye, and ‘4’ is appropriate extension or compression.
Following the widespread distribution of my ‘Damning Review’ from November 2005, I have had multiple conversations with Blackhawk and the holsters have undergone several design improvements. The instructions that accompany the Serpa duty holsters are much clearer than those that came with the earlier units. If the end-users actually read them, and pay attention, they will go a long way toward minimizing the risks.
In July 2006, I was tasked with training a group that was issuing the Smith & Wesson M&P pistol and utilizing the newly released Blackhawk Serpa Duty Holster. Given my previous writings concerning the Serpa design, this was an ironic turn of events, to say the least. What follows is a photographic sequence illustrating the method of operation that I have come to advocate for the Serpa holster. As an aside, I am often accused of fixating on meaningless details. Some of you may find this to be one of those instances. So be it. My concern, in my initial writings concerning the Serpa, and in this piece, is to provide legitimate information to the community. The Serpa design is not going away and I encourage anyone who is not aware of the design to familiarize yourself with it. If you are currently utilizing a Serpa holster, please try this method of operation and let me know what you think. If you know of anyone using a Serpa, pass this along to them. The more feedback, the better.
The ‘drawstroke’ or ‘presentation’ of the handgun, as I teach it, is a four count process wherein ‘1’ denotes establishing a full firing grip on the holstered pistol, ‘2’ is both a high pectoral/retention position and the beginning of the horizontal line of presentation, ‘3’ is the point at which the weapon enters the peripheral vision, under the dominate eye, and ‘4’ is appropriate extension or compression.