Colt Open Top Clones/Copies: What mods do you do/have done

Status
Not open for further replies.

45 Dragoon

Member
Joined
May 18, 2013
Messages
2,772
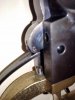
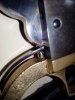
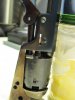
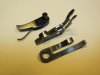
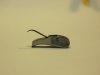
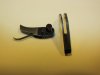
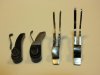
I was wondering what mods (if any) most folks do or get done to their Open Top revolvers (including cartridge O.T.'s). I go through mine as soon as I get them (before shooting) to "fix" what the factory did or didn't do. Keep in mind, I am not complaining. I think the Italians do a great job filling a huge need for us and at a reasonable cost. I add things that are needed such as a hammer stop and filler in the arbor hole as needed/ if needed. I start with the hammer stop, which stops all movement and prevents bashing of the hand. I do this by drilling and tapping a hole in the trigger guard and installing a set screw for the mainspring to bottom out on. The stopping point is dictated by the engagement of the full cock notch. At full cock, the trigger sear snaps under the notch and at the same time, the bolt locks the cylinder. The Colt S.A.A. (1873) has a built in stop. The hand has a boss where it attaches to the hammer. As the hammer is thumbed back, this boss contacts the stop when the hand reaches it's full travel.

Since our clones/copies don't have stops built in, this would be a worthwhile mod. If your revolver was in time before the stop was installed, it should still be "in time" ( as long as it's not binding while holding the hammer back). This will save you from replacing "worn out " hands ( they shouldn't wear out).

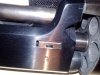
After smoothing and polishing (correctly) the action, I tune the springs to my liking. Then it's time to attend the barrel / cylinder gap. Yes, the short arbor thing !!!

Since this has been covered VERY well here at THR, I will spare the time and space. The only thing I would add is, resurfaced metal moves. It "sets", "wears in" when you shoot (That's why new guns are tight when you get um, loose after you shoot um !!!) I install cartridge conversions to be permanent so I go for a tighter gap (.003-.005) (I also don't reload any blk. powder). In doing so, I fit them to zero tolerance. This means NO binding of the cylinder whatsoever and a free spinning cylinder at half cock but no observed gap when pulling back on the cylinder with hammer down. When fired at the range, the natural "setting" will give you your barrel/ cylinder gap. My Dragoons will go to the range with a .004" gap, shoot all day and come home with a .004" gap. Life is grand !!!
 
Last edited:
I havnt done it yet, but you could cut a dove tail on the rear of the barrel and install a better sight. This would require a taller/better front sight too. You could use an adjustable rear sight also. Another thing that could be done is a dovetail rear that would extend back over the cylinder so it would have a longer sight radious. Some of the original Dragoons i believe did have a dovetail rear. For some people that want to make their open top guns shoot better for target shooting or hunting this would be a big help.
 
kituwa,
I had a 3rd Mod Dragoon by ASM that had a folding 3 leaf sight and was also cut for a shoulder stock.


Wish I still had that un . . . . . .
 
I would imagine a 3rd model dragoon with the folding leaf site like that, would be a good setup for someone wanting to hunt with one.
 
I agree! That was a sweet gun but so was the 1st mod and the 2nd mod ! The 2nd mod (also an ASM) had nickel plated trig. guard and back strap with rose wood grip!!! It was purtty!! Wish I had um all back. Wish I new then what I know now, but that's the way it always is.
 
45 Dragoon,
Do you have a photo of this here hammer stop? I've got a lot of guns that have overtravel of the hammer when cocked and I'd like to eliminate that if possible but can't quite see where you are drilling.
 
Hellgate, I will post some pics. late this eve. I went shooting today and will take some pics of a Dragoon with the stop. It will be the same on all SA's. rcflint is correct but I don't drill all the way through. Don't want a hole through my trig. guard.

Also, I will take some pics of a bolt block should you be interested in that as well.

45 Dragoon
 
Here are pics of the stop and the location of. You could drill all the way through and be able to adjust it but, you shouldn't ever need to adjust it unless you get a new hammer. I'd rather not have a hole through my trigger guard.Install with blue thread locker. Also, pics of my bolt block in this Dragoon. Fitted to zero tolerance, it allows absolutely NO side movement of the bolt (They ALL move without one, all mine have one.). Yes, the bolt you see in the pic has a cavity. Right up into the ball of the bolt (I make um lighter so the spring doesn't have to work as hard as everybody else' has to). The last pic is of my flush wedge. I did it with anticipating an ejector showing up on this and my other Dragoon. These Dragoons were made to allow fanning and no, I don't shoot them that way but, I can if I want to without fear of destroying them. These are BIG guns to be doing that kind of stuff with! This gun today shot a 1.25 inch group, off hand, 33 ft. First time out after some experimental surgery. Guess it worked. Barrel/cyl. gap didn't move so is still shy of .0015. we shall see . . . . .

45 Dragoon
 

Attachments

  • hammer stop1.jpg
    hammer stop1.jpg
    58.3 KB · Views: 274
  • hammer stop2.jpg
    hammer stop2.jpg
    76.7 KB · Views: 248
  • bolt block new 1.jpg
    bolt block new 1.jpg
    70 KB · Views: 299
  • flush wedge.jpg
    flush wedge.jpg
    110.9 KB · Views: 259
Glad to help. The bolt block has a tail that (can't see in the pic) hangs on the bolt screw. That keeps the back end of it located.
 
It will def. hold everything still!! The main thing with having a block is making SURE the chamber/bore is dead on! Misalignment could cause higher than norm. pressures and wedge destruction a sure thing. Once done though, you are good to go. Another reason for the block or guide is to keep the bolt from moving and allowing cylinder throw-by and wrecking lock notches. When cycling the action fast, you can hear and feel the difference that solid lock-up makes. All these things together - hammer stop, bolt block/guide, tuned springs (don't like wire springs so much) makes your SA a fine "sports car" rather than a "grocery getter". Just like high end upgrades for a fine car, these are upgrades that will take your SA to the next level!!

45 Dragoon
 
Last edited:
I have a ASM Richards conversion of an 1860 Colt in 38spl that came with a 1/2(8-9oz) trigger pull,pretty common with these. I had to refit the hammer and trigger and increased the trigger pull to about 3 1/2lbs. Steel on these parts are soft and needed case hardened.
 
I believe the guy on here named Strawhat also rebuilt an ASM conversion. I remember seeing them reviewed when they first came out, but I was just a child.
 
45 Dragoon:

So if I understand correctly, your bolt block is intended to prevent any lateral movement of the bolt, is that correct?

What does your bolt/trigger spring look like?

Thanks for the interesting photos.
 
J-Bar, you are correct. The bolt block is fitted to zero tolerance and allows zero perceived movement of the bolt. This is why you want to make sure of the bore/chamber alignment. The block/guide is used also for line boring the cylinder in the frame.If you were changing calibers in a revolver for instance, a .38-40 to .44 or .45 , doing it this way allows the gun to shoot 6 times like one gun (the most accurate) instead of 6 times like 6 guns ( like a norm. revolver)

The bolt / trig. spring is just like the normal spring. I put a spacer (washer) under mine and adjust the tensions for bolt and trigger separately to my liking. Most of the "wear till failure" comes from overly tensioned springs (like the way they come from the factory). That's why hand springs break. All S.A.'s should be treated to a good action job and the parts will reward you with a much longer life.

I might point out too, in the pic. with the bolt, the junction where the arms of the bolt join the body of the bolt is not square ( [ ) but rounded ( C). You do that (with a small round file) to spread the stress of the left or inside arm when it flexes as the hammer cam passes by.


45 Dragoon
 
Last edited:
Good stuff 45 Dragoon! Thanks!
Here's some parts I made in 1996, for a Signature Series 1851 I found at a gunshow.
Hand & cylinder locking bolt are made from automotive leaf spring. Hand pivot pin is 01.
Both springs are made from feeler gauges. Pick the thickness(s) that suit your fancy.
Hand spring is .012'' thick.
Cylinder is case hardened & tempered to stop wear in the locking slots & ratchet teeth, not for chamber strength.
Foto "Push Strip" shows nickel silver strip protecting cylinder face during barrel press-off. Aluminum & brass are alternatives.
 

Attachments

  • Push Strip.jpg
    Push Strip.jpg
    71.7 KB · Views: 138
  • 3 Parts Made.jpg
    3 Parts Made.jpg
    47.7 KB · Views: 140
  • Hand & Spring .jpg
    Hand & Spring .jpg
    30.4 KB · Views: 110
  • Hand Spring Insert.jpg
    Hand Spring Insert.jpg
    22.3 KB · Views: 107
Second set:
 

Attachments

  • Hand Spring Rotate.jpg
    Hand Spring Rotate.jpg
    19.9 KB · Views: 75
  • Fork Radius.jpg
    Fork Radius.jpg
    32.7 KB · Views: 79
  • Compared 1.jpg
    Compared 1.jpg
    41.1 KB · Views: 95
  • Compared 2.jpg
    Compared 2.jpg
    41.8 KB · Views: 82
WOW ! Darn good looking parts Doak !!! I might have to put an order in !!!!!!!!!!!!!!! Like the mount system for the hand spring. I'm sure these are holding up great in the '51.

Do you cut the head on all your wedge screws?

45 Dragoon

BTW, Everyone should take note that in Doak's pic of the bolt, the junction of the arms and the bolt body are rounded not squared. Great job!
 
Last edited:
Well thanks 45 Dragoon! That you're savy about stress risers & radii got me all excited to show that there's more'n'one of us.:-D Actually, stress radii being an industrial standard, I'm flummoxed that the factories don't follow suit.

A nice thing about the hand...should the spring ever break, ya can keep the hand, & fit another spring to it. There's no stress point on the spring, 'cep for the ears, & they split the load.

I think the revolver came to me w/the screw head flatted off. I keep meanin' to shape the screw head into an eccentric, like a cam, to jam down on the wedge top surface, but...

This 1851 is my only open top. The thought of makin' more parts scares me off from gettin' more.:-D Might hafta cave in & go there. ROA's 'n' Rem '58's keep me depleted.

Kindest Regards,
Doak
 
Understand and thanks so much for sharing your photos. Hope you get the bug for a big open top! The parts are easier to fool with for sure!!

45 Dragoon
 
On every BP pistol I've seen, the bolt is too wide to fit into the cylinder notches. When the bolt slides off of the hammer cam and the spring presses it up against the cylinder locking notch, only the "front" side of the bolt catches in the notch. What is holding the cylinder in alignment, most often, is the hand. But as the hammer falls, the hand, being pressed against the rear of the cylinder ratchet, also tends to try to rotate the cylinder a little bit backwards, out of alignment with the forcing cone. Not a good thing for accuracy, to say the least.

You can test to see if your cylinder locks up correctly by cocking your UNLOADED pistol, then, while gently lowering the hammer, with your other hand apply a little "reverse" rotational pressure on the cylinder (so as to try to "back it up"). If the cylinder, at any point during the hammer drop, can be rotated, then it's not locking correctly, and only the hand is holding it aligned at full cock.

So, on all of mine, I re-time the cylinder bolt so that it snaps up into the lead instead of right into the cylinder locking notch. (Snapping directly into the locking notch peens the side of the notch over.) Also I slightly thin the "rear" side of the bolt down so that it lets the bolt snap all the way into the cylinder notch. Too often the bolt is too wide to fit the notch.) As the cylinder is finally rotated into alignment, the bolt spring pressing upwards on the bolt allows it to snap fully into the notch, so it locks the cylinder from rotating in either direction.
 
Thanks tpelle, It certainly isn't good if your cylinder isn't locking up (not to mention rather dangerous!!!) Either me or you should be playing the lottery !! I'm not sure if I've had any that came not locking up but, I've def. had many that had some bad timing issues !! In either case, It's a good idea to always check all these things out, not just for your safety, but for those around you as well. Always make sure that you keep the sides of the bolt head (or ball) parallel and DO NOT make it a wedge shape. I'm thinking most of the probs. you've had has been just that. A wedge shape may pass a function test at the factory, but the isn't the right way to fit a bolt to the notches. And, you are right about the late drop (or rise ) of the bolt damaging the notches. That's why there is a lead or approach to the notch. While keeping the cylinder "cleaner" from unsightly scratches, it also allows the bolt to descend below the edge of the on coming trailing side of the notch and allow lock -up to occur. I think the norm. is for it to drop about a bolts width from the notch (I drop mine a little earlier, it's just me.).


45 Dragoon
 
Last edited:
Status
Not open for further replies.
Back
Top