Putting a little more power in a $15.00 Daisy

Very cool !
That piston turned out great, I always wondered why Daisy didn’t
use a similar o-ring sealed design.
Please keep us updated as this project progresses.
 
Very cool !
That piston turned out great, I always wondered why Daisy didn’t
use a similar o-ring sealed design.
Please keep us updated as this project progresses.
Definitely will. I’m waiting to get my hands on a OEM 499B plunger head to test against. I’d like to see if one or the other is more effective. After that experiment, I plan on porting the abutment a bit to smooth out airflow. I’d like to try taking some material off the face of it as well and shortening my o ring plunger to increase the volume of the air inside the tube when cocked. I attempted to shorten a plunger while still using the stock air tube design but unfortunately the cocking lever was just outside of engagement. I’d really like to break the 500FPS mark using as many stock parts as possible.
 
Definitely will. I’m waiting to get my hands on a OEM 499B plunger head to test against. I’d like to see if one or the other is more effective. After that experiment, I plan on porting the abutment a bit to smooth out airflow. I’d like to try taking some material off the face of it as well and shortening my o ring plunger to increase the volume of the air inside the tube when cocked. I attempted to shorten a plunger while still using the stock air tube design but unfortunately the cocking lever was just outside of engagement. I’d really like to break the 500FPS mark using as many stock parts as possible.

I’m guessing the oring design will probably work better, being rubber it will most likely seal better than the plastic (these chambers are good, but not perfect, they still have a weld at the bottom, it would seem like the elasticity of the rubber would create a better seal than the considerably harder plastic).
I don’t know if you’ve seen it or not, but Mark did some porting work on one of these, along with relocating the magnet, with good results…It’s in this thread somewhere, but may take some digging to find it.
I don’t know if increasing chamber length would have much effect. It looks like shot tube length has more to do with it. Standard chamber capacity is something like 1.2 cu. in., shot tube capacity is about .3 cu.in. Even though chamber volume is going to decrease some with compression, it’s evident that the bb is gone before the piston reaches the end of the stroke (best guess is within the first 1” to 1-1/4” of travel).
I ran an experiment a while back where I doubled the abutment to shorten the chamber to 1-3/4”. the chamber capacity was reduced to about the same as a model 25 (if I remember right, something like 1.056 cu. in.), but with the stroke shortened by 12.5%…the theory being that if a shorter stroke can compress the air more quickly, I might get a little more speed at the point where the bb leaves the tube.
Results were pretty inconclusive, it wasn’t any worse than a standard chamber, but gain (if any) was marginal. I can’t help but think that increasing chamber length would, if anything slow the rate of compression…but please note that I have been wrong before. 😕
Best of luck regardless!
Rex
I’ve contemplated these things along the way. Using the 499 setup eliminates the issue of the air tube. I’ve got a spare abutment to experiment with. It would involve a ram rod to seat but I’m curious about adding a spring loaded detent ball that would hold the BB and allow some dwell time for pressure to rise before moving.
 
I’ve contemplated these things along the way. Using the 499 setup eliminates the issue of the air tube. I’ve got a spare abutment to experiment with. It would involve a ram rod to seat but I’m curious about adding a spring loaded detent ball that would hold the BB and allow some dwell time for pressure to rise before moving.

Interesting idea !
Dwell time seems to be the big issue, higher compression can’t help but produce more velocity.
I know that Terry C. did at least one using a more powerful ring magnet to hold the bb longer, results seem to be pretty good. A spring detent just might be a game changer !
Hope you post if you try it !
r
 
Model 95 Single shot muzzle loader, almost 600 fps colbalt spring no spacer no air tube.
Shoots clean through a tin can at 95 ft.
Think it would shoot your eye out ?
T.C.
 

Attachments

  • DSCF3344.JPG
    DSCF3344.JPG
    126.6 KB · Views: 16
  • DSCF3341.JPG
    DSCF3341.JPG
    46.9 KB · Views: 16
Model 95 Single shot muzzle loader, almost 600 fps colbalt spring no spacer no air tube.
Shoots clean through a tin can at 95 ft.
Think it would shoot your eye out ?
T.C.
Terry,

Is that a magnet in the abutment?

Edit: Yes, yes it is.
 
Last edited:
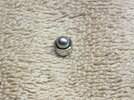
Yes the picture on the left is the magnet with a BB in it, I put the cupped side of the magnet facing out toward the muzzle .
As you can see it makes a good seal and it holds the BB pretty tight, I would think this is a good thing?
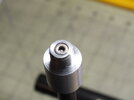
The picture on the right is looking at the breach end of the barrel, you can see the BB seated inside it.
If you dont mind the single shot type gun I feel this is a good system, but I'm sure there are other ways that will work just as well ?
Terry
 
For Christmas we bought my daughter a 105B Buck since she's been getting curious about guns in general. My childhood was occupied with Crosman pump guns and there are quite a few in the collection. I'd never really had an interest in Daisy until I spent some time shooting with her and found a new appreciation in the simplicity of being able to dump an afternoon's worth of BBs into a gun and go.

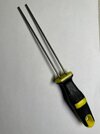
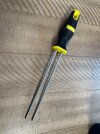
Fast forward to some internet searching and deciding to pick up an older 102-36 and a couple others to experiment with. Not being able to leave well enough alone, I stumbled upon Cobalt327 and his fine springs. We started discussing things and he mentioned there was no readily available spring compressor on the market. I jumped in and after sorting through way too many options that wouldn't work found an awesome handle that suits the purpose wonderfully. I'm a tool junkie, owning more Snap-On tools from a previous career than I'd ever openly admit to my wife, so naturally I wanted to build something that would outlast anyone who owns one and be comfortable to use. The rods on these are polished 304 Stainless and are sized to fit as closely as possible. The narrow frame guns will accept a larger rod allowing a more secure contact with the spring and have less flex when compressing the stronger springs and spacers we're all hooked on. The handle itself has a flared section that when gripped properly will protect your hand from the sheet metal on the gun should the tool slip off, around, or under the spring under load.

My eBay homepage is: https://www.ebay.com/str/thedaisytool?_trksid=p4429486.m3561.l161211


As a thank you to Mark for planting the seed and to everyone on THR feel free to use code "MARKSTHEMAN" for 5% off.


s-l960a.jpg s-l960.jpg
 
Last edited:
I have to admit that I am amazed at the creativity of the attempts to increase speed/accuracy of some of these Daisies. I am in awe of your dedication, creativity, and persistence.

Me?... I'm not so innovative. My attempt is a bit less involved ... I don't have a machine shop and/or a bunch of time ... but I found very satisfying ...

Was prompted by a comment on one of Cobalt327's Ebay listing for a 499 barrel/abutment ... something along the line of "put it in a 105? ... why not?"

So, I bought a $29 Red Ryder on bigA and got one the 499 barrel/abutments ... and bought a 499 piston assembly as well. Knocked the abutment out of the RR and tapped the 499 abutment into place ... changed out the piston assembly, put it back together omitting the shot tube of course and retaining stock spring. Big downside ... had to remove the loader door and front site to screw in the 499 barrel. And, it took about 3-4 shots to fully seat the abutment.

Results: 420 fps and easily the most accurate RR I've ever shot. It's ugly ... but so am I. It's my day to day shooter. My standard target is an aluminum can suspended at both ends by a string ... when I cut it in half, I then shoot the the two ends hanging there essentially until they "dissolve".

I also believe I read somewhere that the stouter spring probably wouldn't help due to restricted airflow around the magnet in the 499 abutment but I tried one anyway ... no perceptible gain in speed. I also tried removing the magnet and replacing it with a neodymium ring magnet that opened up the tube but again, no appreciable increase in speed.
I'd say that there is some velocity left on the table with the standard spring. I'm waiting on a Cobalt spring and a stock 499 plunger head to do some more testing with mine. I can say that a 1/2' spacer on the 1938B spring netted 446FPS average and jumping up to 5/8 pushed it up to 476FPS.
 
I have a question…
This morning I was doing the break-in on my latest Ryder build, and the thought occurred to me; does anyone else have a “standard” break-in procedure that they use ?
For me, the first 100 rounds (approx) are just to get everything seated and working together. Accuracy is abysmal because of all the oil, etc. (this is the only thing I use Crosman bb’s for), I mean, it couldn’t keep everything in a laundry basket at 65 feet !
After that I swab the bore, 2 dry patches to get most of the oil, 1 saturated with alcohol, followed by another dry.
After that another 50 shots, or until I start seeing big puffs of oil mist, then repeat the cleaning process.
I continue with shoot, clean, shoot, clean until the mist becomes minimal, and by this point it usually starts to settle down and act right.
It started out at minute-of-bucket, and after about 400-450 rounds (I didn’t count) it is pretty consistently hitting a soup can at 65 feet, which is about as much as this old pair of eyes is good for with open sights.
I’ve used this same process on the last 4 or 5 I’ve built, and results seem to be similar.
So, does anyone else do anything like this, or have a better method or suggestions ?
Rex

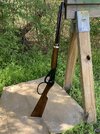
btw, this is the gun. 21A334D1-A6BB-4CAE-8B0F-B07847B08282.jpeg
 
I don't know how many follow that procedure, but after reading your results, I bet there will be plenty who will follow it!

And your gun looks outstanding- the stock and hoop lever turned out excellent!

There seems to be several "extra" screws through the receiver, or are they decorative?
 
Thanks Mark !
This was actually a pretty fun build (except for the barrel band, not sure if I ever want to do that again !)
The two upper screws on the receiver are for the trigger, the lower two are just leather rivets epoxied in place to dress up the saddle loop holes. I never had much use for the loops, they are in the way, get caught on everything, serve no purpose, and usually break off anyway.
r
 
Totally get it re the thong deal. That's one reason I'd prefer to start with a 1999 receiver, but they don't sell 1999 receivers and they've not been out long enough to be considered 'budget build' material yet.

In any event, and not to take anything away from the other killer builds we've seen here, it is one of the best B-gun builds around, IMHO.
Thanks Mark, thats very kind of you.
I see the same thing with the 1999’s. Ryders and Bucks show up for sale all the time. With the Red Ryder being pretty much THE Daisy signature product there are who knows how many million of them out there.
I’ve only ever seen two used 1999’s for sale, both had that gawdawful pink furniture, one looked like it fell off the truck on the freeway, the other must’ve been used as a boat paddle with dried mud on it/in it, and they were still asking more than I pay for decent 1938b’s !
I suppose it’s all driven by demand or more likely, rarity. What were originally budget models in the same series, like the 111b or the 103, with plastic stocks and no fancy doo-dads usually fetch much more, IF you can find one.
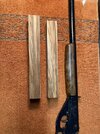
On the 103; I picked one up a while back that is rough on the outside, but surprisingly, was brand new on the inside. I don’t think it was ever shot, no wear evident and the felt wiper was not only dry, but still white ! I’ll eventually refinish the outside, but I’m holding off trying to find a big enough piece of wood to make a stock that matches one of these forearm blanks…This stuff is hard as a rock, and finishes nicely, but I have no idea what species it is, so the hunt continues…
r 653CA26F-CB23-48F1-8941-9D9542335EDD.jpeg
 
Back
Top