Putting a little more power in a $15.00 Daisy

Mr. Sparks,
Sorry to say, but I have none left. I only made a small handful a couple of years ago, and the last of my extras have found a new home.
If there are any further developments I’ll post.
Thanks for the interest.
Rex
Hello sir,Thank you for your response. It's alright it was worth a shot. Hey,Maybe you can possibly share how you made them 🤔
 
Hello sir,Thank you for your response. It's alright it was worth a shot. Hey,Maybe you can possibly share how you made them 🤔

The cover itself is no big deal, you can make that out of a piece of flat material hand-formed around something that is, well, round…
I use .015” thick stainless, a strip 3/4” wide x 2-1/4” long (best material I found was cut from an old cookie sheet I found at a thrift store for like 50 cents. You can also use shim stock or similar, but it’s more $).
I like stainless because it keeps it’s “springiness” even at that thickness, whereas plain steel, brass, etc. won’t. Also, this needs to stay pretty thin to avoid interference with the shot tube.
For forming, just work it around the mandrel (I use a 1/2” drive extension, long sockets also work if available).
I put the dimple in (before forming, with a couple of simple homemade tools) mainly to keep the cover from migrating under recoil, but I’m not sure it’s really necessary.
Hope this is helpful, If you have any other questions, please e-mail,
[email protected]
Rex
 
I was drilling out a couple of air tubes for upcoming projects, and got to thinkin’…

The method I use produces good results, but is very slow and cumbersome (see pics.)

Always in search of a better way, my question is; what methods do those of you who still use air tubes employ for this ? A17FFEDA-E9AA-4B8E-8043-EA4593201958.jpeg DC934046-4A2D-4319-9C46-C30AA2C4B0F5.jpeg 6E1575CC-C89D-4C12-BDC1-5E428982231A.jpeg
 
Boy! It's great to see yall still giving it a go on this thread. I'll have to say I am truely inspired and impressed with yall. Some new names along the road too joining in. I have been out for a good minute, but due to a workplace injury, I'm having alot more free time to dive back in to the passion. I have some builds on the table currently, and some new ideas brewing in the cauldron.
 
Jonathan,
Sorry to hear about the injury, hope recovery goes well.
It’s good to see you back though !
Looking forward to seeing what the “mad scientist” cooks up next !
 
View attachment 1177949spending the day getting the 1/8" BlueHare A/Ts turned out for the projects and inventory
Hello Johnathan hoping for a speedy recovery my friend.How soon are the new products going on your eBay store? Been checking everyday tring not to miss out this time🤜🏼🤛🏼.Great to see you back & the thread going again.As the saying goes.... It all starts with a daisy 💪🏽
 
Is there a list of piston diameters by model number?
Are there three different seal sets? Leather, small synthetic, and large synthetic?
 
I remember when I bought my first Daisy BB gun for $4.75 first thing we did was pull the rear sight , remove the stock, and access the large buffer spring. We would stretch as much as we could push back in its place and put the rear sight back in and stock. You sir are a few levels way above me. BTW the spring stretching technique then worked well enough that it would go through a can of peas or peaches or a soda can. Back then the soda cans were not the aluminum can we have now. We had to use a can opener.
I've learned a lot on this thread.
 
I'm glad this thread wasn't around 65 years ago or I'd probably gotten into trouble with a hot rodded BB gun.
Can't remember anyone in the neighborhood doing anything to improve the performance of the old Daisy's. Of course everyone thought they had a gun that was a little better than the rest.
 
Nice drilling fixture.
Hi Derf,
In posting this, I just wanted to see if anyone had any better ideas (short of a lathe, that is).
This is an old method, and it works as long as you follow a few rules.
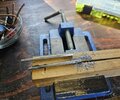
(1) Notice “front” written on it, this and the bolt heads always face me, even though I have carefully set the table to 90 degrees and NEVER move it, if it’s off just a little it would be off double if reversed. The hole for the tube is drilled with the same orientation as the tubes will be drilled.
(2) I run through a series of bits rather than trying to drill the finished size in one pass, and blow out the swarf between changes. I start with 3/32” (.094”), then go to #40 (.098”), then to #38 (.101”). I have done a couple out to 7/64” (.109”), but prefer to stop at .101”. This way I’m only taking out a few thou. per pass and don’t break bits, and still leaving about 1/32” wall thickness.
(3) This works for a lot of applications, I have several similar blocks drilled with different sized holes for everything from drilling old shot tubes to make trigger bushings, to drilling Tweco contact tips for peep-sight apertures, to center-drilling bolts and round stock, etc.
It’s only wood, so the holes (originally drilled slightly undersize) will eventually get loose…when this happens, I just “x” ‘em out and drill new ones.
It is a slow method, and I’m not in that big of a hurry. If however someone has something BETTER, I’m all ears…
Rex
 
After reading all these posts I decided to put a late model RR spring in my 499B to up the fps. I don't have a chronograph but it's definitely hitting harder. After doing the mod it;s hitting high at 5 yards and I've got the elevation all the way down. Had to glue and extension to the post sight insert to re-zero it.
 
Hmmm,
I haven’t tried mine at 5 meters/yards with the Ryder spring.
My targets start at 10 yards and go out to about 25.
The extra “oomph” gives a lot flatter trajectory at longer ranges, and produces good hits with minimal “Kentucky windage”, but I don’t recall any zeroing issues.
You would think that at about 15 feet it wouldn’t matter what spring you used…I’ll have to look into this when I get a chance.
 
For 5m competition, the emphasis is on making the gun as 'tame' as possible. The uber soft plunger spring helps make the recoil soft while still shooting flat enough for accuracy at that distance. Using weight in the forearm (there are cutouts for that) helps with that, too.

This is a link to a page on modifying the trigger: https://txsmith.net/4hshooting/bbgun_trigger.html. The drawing is from there, you can see how easy it is to make the pull lighter:

LIGHTER PULL.jpg
 
Last edited:
Mark,
Have you done this trigger mod on your 499, and if so, how did it turn out ?
I ask because I have 3 guns with this trigger (a 499b and 2-95b’s), and all have Ryder springs installed.
With more down-pressure against the plastic pawl due to the more powerful spring(s), I’m wondering about safety…and wishing Daisy had made the pawl out of metal.
These triggers could sure use a bit of help, but not if the gun develops a mind of it’s own.
r
 
Seems like that might be the best bet, that and the polishing he describes.
Daisy has a lot more faith in their plastic than I do. I have a box specifically for broken/junked parts (in case I need something for a future experiment, etc.) which contains a goodly number of broken levers, beartrap triggers, upper abutment halves, and loading gates…

And these pawls look pretty flimsy to me.
 
After reading all these posts I decided to put a late model RR spring in my 499B to up the fps. I don't have a chronograph but it's definitely hitting harder. After doing the mod it;s hitting high at 5 yards and I've got the elevation all the way down. Had to glue and extension to the post sight insert to re-zero it.
Just chronographed the lastest RR spring install in a 499B ….417 fps with Crosman bbs…shot so flat I installed a rail and 6x scope…..wear eye protection I’ve had some startlingly stout bounce backs from what I thought was ”way out there“….catch the rim of a soup can just right at 30 ft and that bb’s coming home p*ssed off seeking your eyeball…Be careful….
 
Last edited:
I'm using the match grade Daisy BBs. Don't have a chronograph but there's a very audible difference when they hit,compared to pre-Red Ryder spring.
 
Just chronographed the lastest RR spring install in a 499B ….417 fps with Crosman bbs…shot so flat I installed a rail and 6x scope…..wear eye protection I’ve had some startlingly stout bounce backs from what I thought was ”way out there“….catch the rim of a soup can just right at 30 ft and that bb’s coming home p*ssed off seeking your eyeball…Be careful….
Eye protection is always great idea (just in case).
I was also having a lot of “bounce-back” issues, so I started trying different things and finally landed on what you see in the pic.
These cans are pretty light, and this set-up hinges in so many places that a lot of the bb’s energy is spent moving the can rather than bouncing back. I often see the bb just about drop straight down, off-center hits tend to go sideways, and usually not far.
The swivel may not actually be necessary, but I use it because it gives another hinge point (and I ain’t gonna’ lie, I like to see the can spin !).
Upper wire attaches to a branch or whatever, lower wire I grab with needle-nose and wrap it around the nose 3 or 4 times to make kind of a ball, feed it thru a hole punched in the can from the inside, and I make this wire about 4”- 5” to the loop.
I leave the upper wire and swivel in place so when can gets shot up all I have to replace is the can and lower wire.
 
Back
Top