Sharing a couple simple mods. to my 499B.
3-weeks ago I got my 499B and fired some outstanding groups with it right out of the box. I commented that I was going to put a red-dot sight on the little rifle but changed my mind since it grouped so well with the stock peep sights. As you can see from the pics, I changed my mind again.

We live semi-rural and our property backs-up to National Forest land. We can jump in our side-by-side and drive literally hundreds of miles of forest roads right from our home.
I shoot my airguns off the back porch. My various targets (paper, steel, tin-cans) are set in the pines with varying light & shadows. There lies the problem with the 499B peep-sight. If I was just shooting paper in a well lighted area the peep sight would be hard to beat. However, I also like to use the 499Bs accuracy to shoot small steel & tin-can targets at farther distance. Trying to see a swinging tin-can at 20yds in the light & shadows of the trees is nearly impossible at various times of the day.
So, after using the 'sweet' shooting little smooth-bore for a few weeks I broke-down and mounted a red-dot. The rifle is now so much better for shooting all the various targets and light conditions I experience in the trees off our porch.
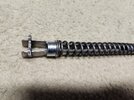
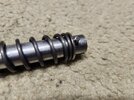
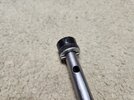
For those who have wondered about the dimensions of the rear sight mounting plate and whether there is a way to add an optic, I can tell ya that it works. It works well so long as you feel the 1-1/4" long spot-welded steel plate is strong enough to hold the optic you want to use. An 11mm to pic rail mount tightens-up just fine. I don't think I would trust the short steel plate to securely hold a long pic rail with a scoped optic, but a red dot or similar size sight mounts securely! I have had no POI shift with my red-dot in several hundred rounds fired.
If you want to use your 499B for targets other than paper in good lighting, a red-dot type optic might also work for you.


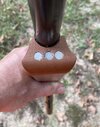
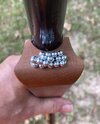
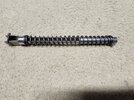
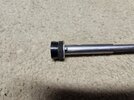
For $15 and 15-seconds of your time you can add 1" to the LOP on your 499B. This is just one fast & easy way to get added LOP.
This slip-on recoil pad is a Pachmayr Renegade, size-small.


Sharing a couple simple mods. to my 499B.
3-weeks ago I got my 499B and fired some outstanding groups with it right out of the box. I commented that I was going to put a red-dot sight on the little rifle but changed my mind since it grouped so well with the stock peep sights. As you can see from the pics, I changed my mind again.
We live semi-rural and our property backs-up to National Forest land. We can jump in our side-by-side and drive literally hundreds of miles of forest roads right from our home.
I shoot my airguns off the back porch. My various targets (paper, steel, tin-cans) are set in the pines with varying light & shadows. There lies the problem with the 499B peep-sight. If I was just shooting paper in a well lighted area the peep sight would be hard to beat. However, I also like to use the 499Bs accuracy to shoot small steel & tin-can targets at farther distance. Trying to see a swinging tin-can at 20yds in the light & shadows of the trees is nearly impossible at various times of the day.
So, after using the 'sweet' shooting little smooth-bore for a few weeks I broke-down and mounted a red-dot. The rifle is now so much better for shooting all the various targets and light conditions I experience in the trees off our porch.
For those who have wondered about the dimensions of the rear sight mounting plate and whether there is a way to add an optic, I can tell ya that it works. It works well so long as you feel the 1-1/4" long spot-welded steel plate is strong enough to hold the optic you want to use. An 11mm to pic rail mount tightens-up just fine. I don't think I would trust the short steel plate to securely hold a long pic rail with a scoped optic, but a red dot or similar size sight mounts securely! I have had no POI shift with my red-dot in several hundred rounds fired.
If you want to use your 499B for targets other than paper in good lighting, a red-dot type optic might also work for you.
For $15 and 15-seconds of your time you can add 1" to the LOP on your 499B. This is just one fast & easy way to get added LOP.
This slip-on recoil pad is a Pachmayr Renegade, size-small.
How does the red dot do vs. peep for accuracy st 10 yards or so?