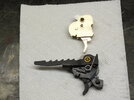
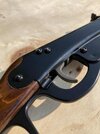
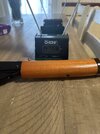
Putting a little more power in a $15.00 Daisy

Hello,

New to the thread. I purchased my first Red Ryder a few days ago and got busy with refinishing the stock/forearm, removed the anti bear trap, swapped trigger springs to lighten the pull, and ordered a 7/64” drill to drill out the air tube.

The one thing I’m not crazy about is the plastic trigger. Seems like a weak point. Does anyone know if it is possible to swap in one of the older stamped metal triggers? I seen a video where there was a spring inserted into the stock of the gun to reset the older style triggers which I am ok with adding if it will make it work. I just didn’t know if the rest of the components would still mesh together.

If so, what will the trigger pull be like? Is it worth doing or is the plastic trigger stronger than I think?

Thanks for the help!
 
The high performance spring I made won't break the plastic trigger. More plastic triggers get damaged by being installed incorrectly than any other reason.

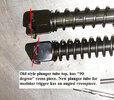
The problem with using a Daisy 1-piece steel trigger is the trigger holes in the guns are in different spots, and the new style rear plunger tube plate is angled, not
straight up and down.

PLUNGER  STEEL TRIGGER tube over modular tube.jpg

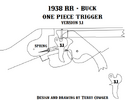
Terry Cowger who is a very talented craftsman came up with a 1-piece metal replacement, this trigger is below. You can read
more about it, it's a ways back from here so you'll need to search to find it.

1703764032310.png 1703764066423.jpeg
1703764289946.jpeg

He also made a metal modular type trigger, based on the original 1938B trigger. He showed it being made, step-by-step. It's a work of art.

1703764513042.jpeg
 
Last edited:
It is definitely possible.
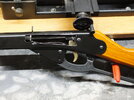
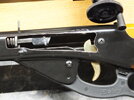
I went a different route with mine which involves drilling and tapping a separate hole in a spot that approximates the location used on the older guns. This allows the original hole and bolt to be used (via a slot on the trigger) as a trigger stop.
There are some things I like about this design; I can offset the trigger blade to the rear for more room in the trigger guard, a full width bushing made from a chunk of drilled-out air tube eliminates most trigger wobble, it doesn’t contact or wear against the crossbar at the bottom of the frame, and they don’t break (I have several broken plastic units in my junk-parts box).
It also allows for reinstallation of the original trigger if you ever decide to give away/sell the gun.
There are a few downsides as well, I can cover that later if there is any interest. C61DC541-F840-448B-9FA3-1C774F433AC0.jpeg
 
Thank you both for the replies. I’m not really interested in drilling any additional holes in my gun at this time. I really like the looks of that metal trigger unit that is basically a replication of the factory plastic trigger. Is there a write up for that somewhere or does he sell them?
 
Is the diameter the same? I may slice and glue the difference of the original rubber abutment seal behind the plastic seal of the 38B my original seal is 23.3mm in diameter and 6.6mm in width
Thank you both for the replies. I’m not really interested in drilling any additional holes in my gun at this time. I really like the looks of that metal trigger unit that is basically a replication of the factory plastic trigger. Is there a write up for that somewhere or does he sell them?
Terry shares some details of that trigger on page 71of this thread.
There are some things you can do to the plastic init to improve function also (you’ve already done the most important by removing the beartrap bar, as that spring is pretty stout, and the continual “jackhammering” from the ratchet teeth WILL eventually crack the housing).
In all fairness, the current-issue modules do appear to be higher quality than the earlier, original non-beartrap units. They tended to crack and separate a lot. I’ve replaced several with modified/reinforced newer ones with no problems (so far).
 
Seems I’ve been following this thread for years…when questioned , “Why you messing with BB guns at your age?”

My philosophical brain hemisphere went into hyperdrive….
What American male child from sea to shining sea did not have some version of a BB gun as a kid?…( it’s rhetorical )

Childhood BB gun ownership is a major component to adult male mental health….BB gun ownership teaches the important life lessons skipped over by formal education….life and death, the roots of morality, the consequences of stupidity, Zen discipline, responsibility, loyalty, honesty and integrity….Soccer balls are cool but BB guns build character.

“Daisy RR facit virum”…..”The BB gun makes the man”.
From what I’ve seen, the people who ask that question, or roll their eyes, or some other negative reaction are (probably) the ones who didn’t have bb guns as a kid.
The ones that did are pretty easy to identify. If you’re looking for “stuff” at a woodyard, a welding/fab shop, or hardware store, and the reaction is; “cool !” when you tell them you are working on an old Daisy gun, it was probably a part of their youth.
Some you can see having a momentary flashback, some will ask what model or even tell you about theirs.

I actually feel kind of sorry for those who didn’t get to experience this growing up…In a way, it’s sort of a “rite of passage”. Even if you don’t pursue shooting or related activities later in life, it’s still a phase in learning values like safety, respect, responsibility, focus, etc. that will serve you throughout your entire adult life.
 
Well after watching some of the RestOModDaisy videos while having several beers I decided it was a good idea to jump into this rabbit hole. Figured it would be a cheap and easy project. Ordered a Red Ryder with adult stock and a 25.

I've read through part of this thread. Sorry if this has already been brought up before.

I want to use a 25 shot tube in a brand new Red Ryder. It screws into the old Red Ryders, but won't work with the new style of barrel assembly.

Heard that a 499 abutment has the same threads as the 25 tube. Is it as simple as swapping that part or does it need to be modified?

Couldn't find much on the internals of the 25. The only diagram I could find didn't show the part that the barrel screws into. Probably a non replaceable part that was pinned and staked to the receiver like older Red Ryders. Anyone know if the new ones are removable?
 
Did some more searching. Wasn't able to find answers to my previous questions. Think I figured out what was needed for what I want to achieve.

Earlier Daisy's have an abutment that is held in with pressed tabs.
https://www.youtube.com/watch?v=eFotG8mBc_Q&ab_channel=RestOModDaisy

That part won't be hard to make since I have a lathe. I'll have to do some reverse engineering to figure out the dimensions. Then drill the receiver and hold it in place with a few spot welds.
 
Did some more searching. Wasn't able to find answers to my previous questions. Think I figured out what was needed for what I want to achieve.

Earlier Daisy's have an abutment that is held in with pressed tabs.
https://www.youtube.com/watch?v=eFotG8mBc_Q&ab_channel=RestOModDaisy


That part won't be hard to make since I have a lathe. I'll have to do some reverse engineering to figure out the dimensions. Then drill the receiver and hold it in place with a few spot welds.
The 499b abutment has different threads (5/16-24, if I remember correctly) than the screw-in shot tubes (7/16-14)
I don’t remember exactly where this was posted, but I have seen where someone drilled and retapped one for the 25 tube. This would probably be easier than making something from scratch…and doesn’t require permanent modification (you could always pop this abutment out and reinstall a standard shot tube if you wanted to).
 
Well, that might rule out trying to use the 499 abutment. Haven't been able to find if it even fits a Red Rider. Drilling and tapping for the correct size is doable, but doesn't matter if it can't fit.

Looks like making my own is how I'm going to have to proceed. Would've liked a drop in solution. Got plenty of scrap steel and a lathe so making one isn't going to be too hard.

This is going to be an upgrade. No need for it to be removable.
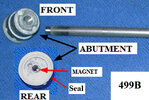
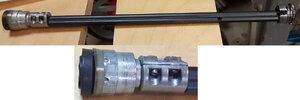
It is the same diameter as the R.R.

I’m not sure what you’re trying to accomplish with this swap, but if you are just trying to avoid the “rattle-trap” effect and feed failures,
there is another alternative.
Starting around page 72 of this thread, a member here, Terry Cowger, came up with a way to eliminate the spring-feed on a 25 tube, replacing it with a thin brass tube and a stopper at the end.
This mod slightly increases velocity and consistency by sealing any air leaks, increases capacity from 50 to about 65, eliminates removing the shot tube every time you reload it (which can change point of impact on some guns), and you don’t lose or double-feed the first bb after reloading, which ALWAYS happens with a stock 25 tube. I’ve built 2 of these, and will be building more.
You can do a similar mod on a stock 1938b tube with similar results, I’ve done one and absolutely love it. It takes a bit of tinkering to build it, but for me it has been well worth it, and again, I will be building more.
btw, Terry also linked the suppliers for the tubing and stoppers (page 73…I think).
Rex
 
Having a fixed threaded abutment will allow the barrel to easily be swapped.

Not trying to achieve the same performance that some of you guys were able to do. Just going to be a few simple internal changes.

The 25 shot tube is superior to the current Red Ryder design. It can be repeatedly fired with out reloading. The lack of rattling is a plus. Can be quickly swapped out for a 2nd one so you don't have to stop and reload bbs. Being able to clean the barrel is another advantage, though not all that important with a bb gun.

With a fixed threaded abutment I can change the barrel out for other projects. I'm more into airsoft than bb guns so I'd like to make a barrel for that. Maybe one for corks.

Got a few airsoft barrels with hop up assemblies. After a quick look it doesn't look like it will be too hard to adapt one to work with these guns. I'll start with a muzzle loader. Might be able to make a repeater with a similar design to the 25.
 
Interesting…
Swapping pre-loaded tubes is a novel approach, the only issue I see is that these tubes can (very often do) have slightly different points of impact. Wouldn’t make much difference at close range, but out past 50-60 feet you’ll notice.
I’ve seen this swapping and testing these tubes in various guns.
The airsoft mod is intriguing, however, forum rules would prohibit any in-depth discussion except for a brief mention in passing. Shane at Restomod Daisy built a single shot that he shows in a couple of videos.
Accuracy apparently is not that good, so a hop-up would likely be necessary.
Daisy did make a cork tube for these with a recess at the very end to stuff a cork into. I can’t see it being much use (unless you want to shoot cans off the top of your tv at 10 feet, or something). They show up on ebay occasionally, but at ridiculous prices. I got a rifle a while back with one of these in it for half of what they’re asking for just the
tube !
btw, these tubes will also shoot a bb, but there is nothing (spring or magnet) to keep it from rolling out.
 
Great info here!

Sounds like drilling and tapping a 499B abutment will get you where you want to go. The 499B abutment seal is different than the one used on the 1938B shot tube assembly. One member "Old George" out in CA (hey George!) did one of these and posted about it here, I believe. Or maybe he posted about it on Daisy Talk? Anyway, he used both the 499B seal and a 7/8" rubber abutment seal like used in a model 102 and others. The reason for the rubber seal is to get a good seal on the air tube's OD, because the 499B abutment has no provision to seal an air tube since the 499B has no air tube to seal in the first place.

499B ABUTMENT DETAILS B.jpg

GT F.jpg
 
Great info here!

Sounds like drilling and tapping a 499B abutment will get you where you want to go. The 499B abutment seal is different than the one used on the 1938B shot tube assembly. One member "Old George" out in CA (hey George!) did one of these and posted about it here, I believe. Or maybe he posted about it on Daisy Talk? Anyway, he used both the 499B seal and a 7/8" rubber abutment seal like used in a model 102 and others. The reason for the rubber seal is to get a good seal on the air tube's OD, because the 499B abutment has no provision to seal an air tube since the 499B has no air tube to seal in the first place.

View attachment 1191734

View attachment 1191735
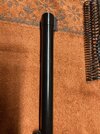
I'm new on this forum and have not figure how to aks a question.

I'm finding this an interesting forum. I have read the complete file and think what I want has been covered, but have not bend able to refind it.

With Terry Calgar's brass tube bb fill on a 1939B RR, does the bb slide fill door be removed ? If so, are there any suggestions other than to use tape to seal the opening?

Thanks for any thoughts.
 
The plastic loading door does have to be removed. There is only about a 3/8” hole through the middle of it for the shot tube to pass through, so it would be in the way of the feeder tube.
There are a couple of ways to cover the port. The easiest is to take a piece of thin sheet metal about
1-1/2” x 2-1/2” and wrap it around a socket (or something about the same diameter as the barrel shroud) insert and glue it in place. E-6000 works well for this. Just make sure you put the open part of this sleeve at the top so it doesn’t interfere with the tube, and deep enough to clear the front sight. You’ll still have the square port showing, but at least it will be covered to keep “stuff” out.
The other way is much more difficult, I’ve done it a couple of times, and it is a pain.
Wrap a short piece of 3/4” dowel with strips cut from an aluminum can until you get a good slip fit in the shroud, then solder in a piece the same size as the window over this (solder won’t stick to the aluminum, just to the steel around the edges). I cut my filler plugs out of a wrecked Ryder shroud, and did have to do a little “bodywork” to even things up. I also glued in a sleeve (as above) for added strength, and repainted it.
They turned out ok, but I’m not looking forward to doing another. 62C6F748-980B-476B-8B6F-83633E2E0640.jpeg
 
Oops!
Just realized something and don’t want to add any confusion…
Please ignore the band that is in line with the front sight. That is a separate mod for a different purpose, and has nothing to do with the loading port.
Sorry ‘bout that !
Rex
 
Thanks Mark !
This is actually the second one I did
(the first was a trial, and didn’t turn out as well… learn as we go, I guess).
The first two are soldered in place, I was soldering the underseam anyway, and figured “might as well while I’m at it”, but I think I’ll try high-strength epoxy (J.B., possibly Devcon) on the next one and see how that does.
r
 
The plastic loading door does have to be removed. There is only about a 3/8” hole through the middle of it for the shot tube to pass through, so it would be in the way of the feeder tube.
There are a couple of ways to cover the port. The easiest is to take a piece of thin sheet metal about
1-1/2” x 2-1/2” and wrap it around a socket (or something about the same diameter as the barrel shroud) insert and glue it in place. E-6000 works well for this. Just make sure you put the open part of this sleeve at the top so it doesn’t interfere with the tube, and deep enough to clear the front sight. You’ll still have the square port showing, but at least it will be covered to keep “stuff” out.
The other way is much more difficult, I’ve done it a couple of times, and it is a pain.
Wrap a short piece of 3/4” dowel with strips cut from an aluminum can until you get a good slip fit in the shroud, then solder in a piece the same size as the window over this (solder won’t stick to the aluminum, just to the steel around the edges). I cut my filler plugs out of a wrecked Ryder shroud, and did have to do a little “bodywork” to even things up. I also glued in a sleeve (as above) for added strength, and repainted it.
They turned out ok, but I’m not looking forward to doing another.View attachment 1191811
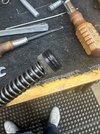
Thanks for the help.
David
 
Since it seems like this thread has died off a little I figured I'd add one of my latest small projects. Unfortunately I didn't take too many pictures along the way as it was kind of rushed. I'll have to add some of the complete gun too. I wanted to see what kind of velocity could be achieved so I took a brand new 1938b and stripped it completely. The shot tube was used to resurrect an old 86/70. In its place went a Model 499 shot tube and abutment. Without the collet and plastic sleeve the barrel is shorter so I made a sleeve out of black HDPE to support the barrel and fill the now missing loading gate. The "fins" were bored out of the inside of the front sight with a 1/2" end mill in the lathe and the last 3/4" of the barrel sleeve was turned to match. The roughly 4" long chunk of HDPE also adds a bit of weight to the muzzle end and helps to balance things out a little. I didn't find out until I was in the midst of this that there are currently no 499 plungers to be had. Back to the aforementioned HDPE stock and a .880 plunger with an o-ring groove was born. Initial testing was promising yielding 446FPS with a 1/2" spacer on the stock 1938B spring but curiosity got the best of me and I went back with a 3/4 spacer and tested again. Great success. Its averaging 475FPS using Daisy plated BBs. Accuracy looks promising, more to come on that later.


IMG_0783.jpg IMG_0784.jpg
 
Back
Top