Rebuilding a Daisy 99 trigger

teerex.otw

Member
Joined
Jan 17, 2023
Messages
256
The 99 trigger assembly is an ingenious little device, consisting of 6 parts, it works quite well within the limits of it’s materials.
There are some issues though, the trigger is made from some alloy that tends to wear out, along with the rivets, and the leaf spring (replaced by a coil spring design on some of the late guns, notably the 99 Champion) is problematic.
Daisy hasn’t offered replacement units in many years, so the only choices available if we are going to keep these old guns running are to replace with the more common folded metal trigger, build a “billet” type, or attempt to make new guts for the original.
I haven’t found a post here addressing this subject…so here goes.
The attached pics will show some of the steps as I continue this experiment. I can’t seem to get pics to show up in proper order, so here’s a rundown, you may have to match it to the photo.
The first shows starting point, hole drilled and outline traced on steel.
The second shows outline rough-hacked with band saw (note that it is still attached to larger piece, material has to be thinned from .250” to about .170” which is easier with a handle) final cut will be made after thinning and some shaping.
Third pic is trigger after a lot of filing, fitting, and sanding.
Fourth is function check in a test block
Fifth is various parts, this experiment will use 2 assemblies, one with new trigger and original Daisy steel latch, the other with new trigger and latch, rivets will be replaced with 8-32 threaded hardware using the shoulder as a pivot point.
The three remaining pics show some steps in forming a new spring.
I still have much work to do on these, and will post more as work progresses (started this about 3-months ago, and tinker with it as I get time/motivation).
As always, input, advice, and comments are welcome. E88D42D8-8959-4A9D-9CC9-5E6590857C1E.jpeg FBD72BC5-04EF-45B0-B6AA-D3E392D0DDE0.jpeg 610C64F1-CADC-457A-B5FB-6E5D8C17F3D8.jpeg 230CFB77-42FC-4AFE-A989-28EFFFA6B001.jpeg CB01B39C-CD13-4B41-934E-C9872FEB9C07.jpeg BCC6F0CE-614A-480D-A02A-E6812698F7EE.jpeg 874FB05D-8A65-4E15-BDDD-65339A7EA6CC.jpeg 41672609-D0CE-44C0-B79A-F929FFBBA12E.jpeg
 
Very cool! I do believe you're right that this is a first for the model 99 trigger. I'll definitely be watching for updates.
 
Very cool! I do believe you're right that this is a first for the model 99 trigger. I'll definitely be watching for updates.

Hi Mark,
This is going to turn into an ongoing project. Right now I’m concerned with function and safety. If I can work that out, I’ll be looking into better steels/heat treating.
I have like half a dozen of these, and only one that’s in good (safe) useable condition…so I had to do something.
Also, late last year I got my hands on a (very) used 99 Champion with the coil-spring trigger, so will also be looking into interchangeability and the possibility of upgrading all to coil springs…
But, many irons in fire, gonna’ be a while.
r
 
This will be an asset to the Daisy community. The 99 trigger has long been a problem area, especially the version with the flat return spring. Often the flat spring has lost tension or has gone missing altogether. It would be neat if it could be converted to a coil spring.
 
This will be an asset to the Daisy community. The 99 trigger has long been a problem area, especially the version with the flat return spring. Often the flat spring has lost tension or has gone missing altogether. It would be neat if it could be converted to a coil spring.

I don’t see a reason that they couldn’t be converted to coil. It looks like both the trigger and latch are shaped differently than the flat-spring type, but if pivot points are in the same place, it’s just a matter of replacing the “guts”.
As far as being an asset, the only possibility I see is that of sharing info, namely “what doesn’t work” and “this is what I’ve found that works for me”.
For not only legal reasons (of which there are several), but cost of manufacturing as well, this is not a product that can ever be offered for sale to the public…It will have to remain a d.i.y. proposition for those wanting to keep older guns working.
Having said that; I got the first one put together snd installed in my 99 this morning. It works (!!!), but there are minor issues, the main one being trigger shape…still not comfortable, which was one of my major complaints with the originals…just have to change shape of the blade a bit.
…More to come as I tumble ever deeper down this rabbit hole !
 
Rex you do really good work, very impressive !
Not many people do what your doing or would even attempt it .
You see a problem and not only do you fix it, you make it better.
Good to see good ole American ingenuity at work !
Terry
 
Rex you do really good work, very impressive !
Not many people do what your doing or would even attempt it .
You see a problem and not only do you fix it, you make it better.
Good to see good ole American ingenuity at work !
Terry

Thanks Terry,
Coming from you, that is indeed a compliment !
What started from the necessity of making a part that was not available has turned into a fun and interesting hobby. Some of my methods are pretty “off the wall” (hence the otw in my username), and not everything turns out as planned, but we learn, we grow, and hopefully improve along the way.
My son is 40 years younger than me, a machinist, and I’m constantly amazed by the things I’ve learned from him !
 
91D5940A-8D50-4B22-8EE8-C2A9EB730204.jpeg BA84FDAA-F817-4F9A-BA2E-81285E008531.jpeg Well…The new parts survived the initial 500 round test, unfinished and not case hardened.
So next step was to case harden contact points, bead blast and parkerize everything before assembly.
Next step in testing will be a few thousand rounds with tear-apart and inspection about every thousand.
Note: I can’t ever seem to get pics to show up in proper order, so you might have to match descriptions to photos.
Pics. 1 and 2 are both sides of trigger assy.
Pic 3 is test gun; 99 Champion with minor internal mods., a 96 stock, adult-friendly lever, and Daisy 5899 rear sight (adapter parts for this are also a test in progress)…I know this gun needs refinishing, but will have to wait until I get done tearing it apart another dozen times…probably next winter.
Pics 4 and 5 have nothing to do with this project…I just included them for the heck of it.
#4 is the beginning of a Ryder project that requires filling in the loading port
(that will be a separate post/thread if I can make it work).
#5 is what I did with a trashed 105b (Buck) stock that I didn’t want to throw out. 91D5940A-8D50-4B22-8EE8-C2A9EB730204.jpeg View attachment 1140863 91D5940A-8D50-4B22-8EE8-C2A9EB730204.jpeg BA84FDAA-F817-4F9A-BA2E-81285E008531.jpeg 1DD13994-6ED3-4BCC-AC32-39466B46AC53.jpeg 41EA937F-2AF7-4D94-86BD-29D485158CAE.jpeg 0534E941-2B64-4C8E-BC71-74CE123FAAAE.jpeg View attachment 1140864View attachment 1140865 BA84FDAA-F817-4F9A-BA2E-81285E008531.jpeg
 
Dang !
Why can’t I get these pics right ???
Duplication and improper order, like every time !
Sorry ‘bout that…(I’m a gun guy, not a computer guy) !
 
Outstanding work! The shape of the trigger blade, not to mention the cool lever are bad-a to the max.The Buck spring fork is a head turner, too. All of it- way cool!

There may be an easier way, but when I post photos from my computer, I do them one at a time by hitting "Upload a File" located just below the post text field when you are composing the post. Then after I pick the photo from my computer, place the cursor a line below my text and select "Full Image". This is repeated for each photo. The photos can be uploaded one after another or the post can be continued before entering another photo. Then when done, you can hit "Post Reply" to display the post with photo(s).

Thanks Mark !
I’m just doing this with an I-phone, but sounds like it would work in about the same fashion.
I’ll make note for next time, although it may be a while since grass-cutting, weed-whacking, screen-replacing (stupid cats !), and vehicle fixing season is nigh, and bound to lean in on my “hobby time”.
r
 
Heard that- my cat used to pluck the screen to tell me to let her in. When I got her a cat for company (that was my excuse, anyway) he never picked up on it- but she would do it for him! I'd open the door and in he'd come but she stayed posted up if she didn't want to come in herself. Darnedest thing.
 
hello all.. i just picked up a 99 this week and it has the trigger problems being discussed.it has a twisted coil spring that looks like was replaced for the leaf spring.i know some were coils,but this doesn't look right. question to teerex what did you use for your spring material and how thick is it?in the pics it looks really thick.and did you bend it cold or anneal and heat treat. I was thinking of using the spring out of a junk tape measure for spring stock. i haven't been on the site for a long time but had to come back because i feel sorry for these poor old bb guns,,,,,,,,,,,,,,,,bb nels
 
hello all.. i just picked up a 99 this week and it has the trigger problems being discussed.it has a twisted coil spring that looks like was replaced for the leaf spring.i know some were coils,but this doesn't look right. question to teerex what did you use for your spring material and how thick is it?in the pics it looks really thick.and did you bend it cold or anneal and heat treat. I was thinking of using the spring out of a junk tape measure for spring stock. i haven't been on the site for a long time but had to come back because i feel sorry for these poor old bb guns,,,,,,,,,,,,,,,,bb nels
Hi,
The material I use is made from common 2” binder clips.
The original Daisy spring is .020” thick, and .130” wide.
I cut my strips about .160” - .165” wide which usually fits inside the housing ok.
The clips you can get from Wally World run about .015” - .016” thick…they work fine, but feel a little weak (which doesn’t really matter much, as this design doesn’t rely on spring pressure to keep the trigger cocked).
I prefer the thicker “heavy-duty” clips (mainly for feel), they run about .020” - .021” thick. Probably have to get those from an office supply store.
I just bend them cold, they will tolerate being bent once on tight bends (like the loops),the larger radius bend at the rear does allow for some adjustment. The main thing to watch for is that rear bend, the material will try to bend in a “v” shape, which will spread the bending force over a relatively small area, and it will most likely weaken or crack. A “u” shape spreads this over a larger area, meaning the material flexes less at any given point (I make this bend around a 1/8” roll pin, the loops are formed around a 7/64” drill bit shank).
 
thanks teerex.just the info i was looking for.did you just grind off the rivets replace with your internals and use the original houseing?yours look very professional,much more so than the daisy.i may also have problems with the pot metal trigger.will see.thanks ....bb nels
 
bb nels,
I think first thing should be to make sure yours is a flat-spring type rather than a coil type with a bad spring. there is a difference in trigger shape, probably in the latch as well.
When I get home later I’ll try to get a side-by-side pic to show the difference.
I did grind off the rivets which were pretty worn and replaced with 8-32 Allen heads (have several details to relay on that if you’re interested).
I also have one of these with a good latch, but a junked-out trigger, I’m eventually going to try replacing only the trigger and see what happens.
r
 
Ok,
here’s the two triggers side-by-side (flat spring removed for clarity).
Note that the back of the coil-spring trigger on the left is taller with a flat area. This is where the bend would go on the flat-spring type.
Another distinction is that the flat-spring type can be opened to make spring installation easy, you can’t open the coil type.
Any other concerns or problems you can e-mail me if you wish (address is in profile contact info).
Rex
 
try this again… 5A01E32F-9B48-40B5-BF25-62C284E55541.jpeg
 

Attachments

  • 33FD1071-E85C-44C1-B3AF-A8F2ADB0C9C9.jpeg
    33FD1071-E85C-44C1-B3AF-A8F2ADB0C9C9.jpeg
    47.6 KB · Views: 13
A change of mind…
I finally got around to disassembling a coil-spring type trigger to have a look at the internals. While the parts would be no more difficult to replicate than the flat-spring type, there are issues. Because the latch and trigger travel in opposing arcs, it tends to put the coil spring in a bind (kinked spring shown in pics). I have long thought that I would prefer coil springs over the flat type, but now I realize flats might be the way to go.
Appropriate coil springs may be difficult to find, they are smaller than ballpoint pen springs (about .140” o.d.) and rather stiff, whereas flats can be hand made, are inexpensive (about a nickel each for material plus time served), and by changing width or thickness of material, some custom tuning of pull weight is possible.
I don’t know what order the photos will show up, so:
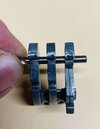
Pic one is of 3 triggers showing typical wear on contact surface.
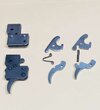
Pic two is flat and coil type “guts”side-by-side showing orientation of parts and differences in shape, note also that the housings are identical between the two types and are interchangeable (coil housing at top).
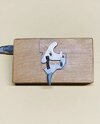
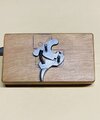
Pics three and four show coil type parts in the test block, cocked and at rest (note the kink in the spring).
I don’t know if this info will be of use to anyone, but thought I’d post it as a matter of curiosity.
Rex D63C7132-DD8F-4A96-87EF-182CB3F6DB49.jpeg 2C15C330-FC1F-4E0C-A48C-E4DFF9CD3077.jpeg 6CABCE8C-55D5-4478-91F1-A7F53BA56325.jpeg 5DA1E4D4-7366-4E46-A889-27C18B50B09C.jpeg
 
Back
Top