Sig P365 extended thumb safety

sgt127

Member
Joined
Apr 29, 2003
Messages
2,112
I like the little Sig P365. Weight. Capacity. Reliability. Accuracy. it’s a great little carry gun.

I’m also a huge fan of Off switches on guns. I carried a 1911 for many years. Shot IPSC.

So I picked up a P365 with a manual safety.

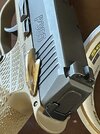
As a 1911 shooter, I’ve always shot thumb high, on the safety. Gave me a lot of extra control. The P365 safety worked properly, down to shoot etc, but, once I flipped the safety off, my thumb just kinda hung out there. The safety is far too small to rest one’s thumb on.

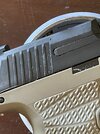
I think I fixed that.

upload_2022-10-17_9-19-22.jpeg

upload_2022-10-17_9-20-13.jpeg

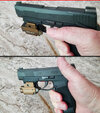
upload_2022-10-17_9-20-58.jpeg

May have to heat gun a few Kydex holsters for a proper fit.

But, just handling it. This may be a game changer.
 
Actually, I ground down the factory safety, flat. And made a thumb shelf out of a stainless Oneida spoon. Curved it. Silver soldered it on there and then ground, filed shaped it to what I wanted.

My silver solder skills are less than optimal. But, my first attempt. It’s not gonna fall off.

“Perfect is the enemy of good.”

upload_2022-10-17_9-44-17.jpeg
 
Very ingenious! I have a P365X and would love to get either a factory or else an aftermarket extended safety for it.
mRdSKTS.jpg
 
Well. That was the problem. There is no factory or aftermarket extended safety.

A buddy had a gunsmith make one. He just lopped off a 1911 extended safety and soldered it on.

upload_2022-10-17_19-44-38.jpeg

All i wanted was the paddle. The spoon was laying there.

:)
 
Last edited:
Someone on SigTalk also made a similar modification to his manual trigger safety lever.

While I don't personally find a need to extend my safety lever, I am all in favor of people modifying their firearms to better fit their needs. I cut the right side manual trigger safety lever off of my P365 to better fit my pocket holster. I also extended my magazine release button.

One size does NOT fit all!

The spoon was laying there.

There Is No Spoon - The Matrix (5/9) Movie CLIP (1999) HD
 

Attachments

  • image.png
    image.png
    98 bytes · Views: 1
Last edited:
Someone on SigTalk also made a similar modification to his manual trigger safety lever.

While I don't personally find a need to extend my safety lever, I am all in favor of people modifying their firearms to better fit their needs. I cut the right side manual trigger safety lever off of my P365 to better fit my pocket holster. I also extended my magazine release button.

One sizes does NOT fit all!

Funny you mention. I’m very close to grinding off the off hand safety.

I don’t find it THAT Annoying. Yet.
 
I’m very close to grinding off the off hand safety.

There is minor dilemma with removing the right side safety lever. If you really want it to look clean and stock, you need to grind the safety lever down far enough that it clears the inside edge of the grip module. Then you obtain a grip module WITHOUT the slots for the manual safety lever and cut a slot in the grip module on left side only.

Or you can leave an unfilled gap on the right side where the safety lever used to be.

Or you can just cut the lever off flush with outside of the right side of the grip module so that it doesn't leave a gap. This is what I've done for the moment. But it is bugging me that the cut off end of the safety lever is bright and shiny. Eventually I'll buy a grip module WITHOUT the slots and cut a slot on the left side only and then grind the safety lever far enough the clear the inside edge of the grip module.
 
I should mention that I have nothing against shiny guns, if that is what floats your boat. But for my concealed carry gun I want it to be as innocuous as possible, so I prefer black and dark grey colors.
 
For the OP, if it works for you. Never got in the habit of riding the safety on a 1911. Personally only use the manual safety for administrative stuff on the 365.
For instance, a Glock in a gun box wears a cheap Glock holster to cover the trigger. With the 365, just put the manual safety on. When mine goes on the shelf above my bunk at camp, same deal...
But it simply doesn't see use for carry. MHO.
But if you are going to wipe it off on the draw, bigger would be better. Wouldn't be surprised if the aftermarket (or SIG) doesn't make a bigger safety.
Moon
 
I should mention that I have nothing against shiny guns, if that is what floats your boat. But for my concealed carry gun I want it to be as innocuous as possible, so I prefer black and dark grey colors.

Im not that concerned about a stainless safety, that would be against my body, covered by the sweat shield, on a gun carried concealed.

I suppose a quick shot of flat black Krylon would make it more tactical though.
 
Update. I bought a P365XL WITHOUT a safety in December 2022 because that was all that was in stock in town at the time. I bought a manual safety lever, cut off the right side and then used a scalpel to cut the notch in the grip module on the left side to fit the safety lever.

I'll eventually buy a new grip module for my P365 and cut a notch on the left side only for the manual safety lever. But for now stockpiling more ammunition and buying more spare parts is more important.
 
Not everyone would want a manual safety lever large enough to rest your thumb on, but some might want the lever a little larger so that it's easier to disengage.

Self defense Attorney Andrew Branca, who runs the "Law of Self Defense" YouTube channel, carries a P365XL. He said he does NOT use a manual safety on his XL because it's not large enough to disengage reliably.

One of the design goals of the P365 series was to keep the control sizes to a minimum to reduce the possibility of a control catching on clothing, etc. So you can't really fault Sig for the smaller controls. But enough people wanted a larger magazine release button that Sig now makes a larger one that comes with the X-Macro grip module and is available as a retrofit for the XL and P365 grip modules.

I wonder how many people would prefer to have a larger manual safety lever on their P365 series pistols.
 
20D9249E-D500-4F51-BC24-CFE382FBC37A.jpeg 79A6D24A-7828-4B47-8B84-ABE730D31100.jpeg
I have since shortened and thinned the safety slightly. And bought a Wilson frame, no safety cut, and cut it for the left side only.
 
Pulled my P365 out and the safety is way to close to the base of the thumb to even think about resting my thumb on it. Of course due to shooting revolvers so much I hold my thumb parallel to the frameand on semi-autos, below the slide.

20230721_101446 Combined.jpg
 
Last edited:
Pulled my P365 out and the safety is way to close to the base of the thumb to even think about resting my thumb on it. Of course due to shooting revolvers so much I hold my thumb parallel to the frameand on semi-autos, below the slide.

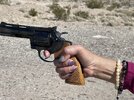
Yeahhhh. About that. I have small hands. Strong. But, digitally challenged. This is my 5’4” Filipina buddy holding my Colt Diamondback. She refers to it as my Dainty gun.

1689954622848.jpeg


This my 6’ self, holding the same gun.

1689954676061.jpeg

But….it’s only my hands..

1689954751369.jpeg

I should have been a proctologist. My patients would have loved me.

Reason I generally don’t like double stack autos.
 
Last edited:
My silver solder skills are less than optimal. But, my first attempt. It’s not gonna fall off.
What solder alloy did you use?

I've been looking at different solder and brazing alloys trying to decide what would work best. Also in question is which heating and soldering method to use. About 30 years ago I developed a hot inert gas soldering system to solder one very thin stainless steel tube inside another (0.012") for a medical catheter. The tricky part was finding the right flux for the job.

What I'm envisioning is using a whetstone to grind off the nitride layer from the outside of the lever perfectly flat. Then adding a thin flat solder preform with flux on it between the lever and the stainless steel extension and then heating it somehow, probably with a MAPP gas torch. I doubt that the solder would wet to the nitride coating still on the lever. Any excess solder that might ooze out of the sides would need to be physically removed by sanding or grinding. Since I'm only planning to add a shallow extension about 1/8" high, the solder joint would not even need to be that strong, so I could probably even use SN96, which is a 96.5% Tin - 3.5% Silver eutectic alloy with a 430°F melting and solid point.
 
@Alllen Bundy

I ground the right side off flush until it cleared the frame.

Ground the left side flat on a grinder. Trued it up with Emery Cloth on a flat surface. Wiped with acetone.

Locked the internal part in a vise. Gobbed blue heat block all over it.

Made a jig with tweezers and another Vice. (Crude, but it worked). Lined up the new paddle.

Heated it with a MAP torch. Flowed the flux on that’s on the stick. And then touched the solder around it. I was surprised how hot I had to get it for the solder to flow.

1690095805312.jpeg
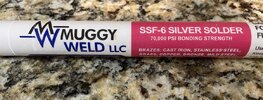
I’m good with soft soldering. This was my first attempt at hard soldering. I have a lot to learn, but, this worked for me. Literally, stuff I ordered on Amazon. It’s expensive. I’ll be happy to send you a chunk of it if you PM me, no charge.

And you are right. A file skips off those parts. They are harder the Superman’s kneecap.
 
Last edited:
This was my first attempt at hard soldering. I have a lot to learn, but, this worked for me.
From what I've seen that is one of the best and strongest solder alloys that you could have used for stainless steel. But VERY expensive! Their SSF-6 solder paste would also likely work very well. It has a rated tensile strength of 85,000 PSI, vs 70,000 PSI for the soldering rods. But it's only got a 9 month shelf life and it's also VERY expensive!

I plan to buy another manual safety lever and experiment on the right side lever, as I will eventually cut it off anyway. Once I decide upon my soldering alloy and method I'll extend the left side lever.
 
And you are right. A file skips off those parts. They are harder the Superman’s kneecap.
I find that a diamond whetstone works fairly well to remove the Nitron (nitride) finish. I like the diamond whetstones because they remain flat. I've got diamond whetstones starting at a rough 80 grit for removing material quickly to my finest which is about about 2000 grit. With the safety lever I'll try a fine whetstone as I really don't need to remove much material. It may take a little longer, but it's more difficult to screw it up using a finer grit and grinding by hand.

Hopefully they'll have a manual safety lever in stock when I order next week. The supply chain still doesn't seem that stable and it always seems like I need to order parts from multiple companies because of out of stock issues.
 
Back
Top