The Remington R51, Explained

Status
Not open for further replies.

barnbwt

member
Joined
Aug 14, 2011
Messages
7,340
The Remington R51, Explained:

I took the time this evening to do a near-total detail strip for the purpose of better understanding this radically different new design, and in hopes of diagnosing and finding solutions for the host of problems plaguing its early life so far. Suprisingly, I found a fairly simple and familiar trigger layout, a very simple but fairly effective safety design, and parts that are all pretty basic in construction, meaning higher quality replacements may be possible for not much effort.

The way this will work is I will go through each layer of the internal's functions, starting with the trigger, and ending with the safety. I put a numbered diagram of all the small internal parts on this first post so readers can hopefully not be as confused by the language. I'll just assume everyone knows the big, external parts already ;)

attachment.php

attachment.php

1-Disconnector
2-Sear Tooth
3-Hammer $ Strut Assembly
4-Trigger & Stirrup Assembly
5-Safety & Spring
6-Mag Catch
7-Mag Catch Release Button
8-Slide Stop

Chime in at any time if you have questions, and I'll try to see if I can figure out answers or at least get clearer pictures up :)

TCB
 

Attachments

  • Parts.jpg
    Parts.jpg
    125.2 KB · Views: 2,526
Trigger:
The trigger group is similar to the other auto pistol I have torn apart, the CZ52, with the exception that a separate piece deactivates the trigger instead of the slide acting directly on the transfer bar (which is what casues the CZ's trigger slap). I suspect it is similar to other pistols as well, since it is both simple and effective. What is very odd and different is the disconnector's design, which I will get into later.

The trigger is a simple lever below a pivot, which is pinned through a wishbone shaped transfer bar ("stirrup" #4). The stirrup is what actually impinges upon the sear tooth (#2). Pulling the trigger pushes the stirrup backward, which pushes the tail of the sear tooth. As the sear tooth rotates counterclockwise, the sear surface moves away from the hammer (#3) sear bent/hook until it is released. Aside from the stirrup which is there to get the trigger lever in front of the magwell, these are the same three parts as any other fire control group (sear, trigger, hammer).

attachment.php


Potential issues:
-The transfer stirrup is simple sheet metal, which, while not surprising in a cheaper gun, is incredibly narrow; almost like wire. It is no wonder it bows outward under trigger pressue and then contacts/drags on the frame walls. There appears to be lots of room for it in the gun, so one wonders if it could be made larger and stiffer
-The sheet metal is incredibly rough. The punching is incredibly messy, with chunks of metal ripped out of the edges where the tabs were broken, rounded/burred boundaries all around, and deformed holes. The parts are not sharp, but extremely unpolished (probably just tumbled briefly instead of deburred/sanded properly)
-The rear of the stirrup impinges on the sear tooth tail, which is concave. Were the tooth convex, it would roll/slide over a single line of contact on the stirrup, rather than slide on two. It would also potentially disconnect easier
-The pivot pin hole on the trigger is incredibly loose, at least a good .01" oversize (visual guess). It is also smothered with thick "paint" which may explain why the hole is so big (so the pin fits if paint gets in there)
-The pivot pin hole on the transfer stirrup is also loose, though much less so (it also matters less)
-The infamous "lack of tactile trigger reset" is due to the loose bits in the transfer bar not transfering the vibration of the transfer stirrup sliding off the end of the sear tooth tail back up in front of it upon release. As I will explain later, it is also (primarly) due to enormous drag of the disconnector turning a trigger reset "click" impulse into a "mush". The reset is plenty positive, it just happens slow enough that it won't shake your finger tip nerves
-Hammer and sear are straight MIM, but appear very well finished and higher quality than...anything else. Maybe Remington should do the transfer bar and disconnector the same way?
-The hammer mainspring is pleansantly easy to install. Probably a good 15lbs of force; and infinitely far cry from anything leaf spring based, or the CZ52, or the revolvers I've torn apart, or the AR70 spring, or anything else I've messed with. Miraculous it ignites even standard primers as well as it does, let along Wolf's (only 4 FTF out of 50, all but one firing subsequently)
-Hammer fits very tightly on the pivot pin, as is the sear (once again, why not do everything MIM if your machinists suck?)
-Trigger is of shockingly poor quality. Looks like it was dipped in paint, very messy mold lines, and again, horrendously out of spec pivot hole. Even the slot for the transfer bar is rough and much wider than needed, allowing it to flop and twist around when pushed
-Interaction with disconnector (discussed later) is extremely rough and prone to binding

Possible Remedies:
-Newly made, machined hammer, using low friction metals, proper hole and slot sizes, with spacer bushings to keep it centered in the frame cutout
-Newly made, larger size transfer stirrup (or machined) using stiffer materials if possible. Polish the end that pushes the sear tooth, and the edges which engage the disconnector
-Polishing/shaping of sear surfaces, if MIM system allows for this

TCB
 

Attachments

  • Trigger.jpg
    Trigger.jpg
    144 KB · Views: 2,465
barnbwt,

If nobody else has done it yet I am nominating you for inclusion in the unofficial THR Brain Trust. You are an invaluable asset to this forum. This thread is just one of many examples, that when they create an official THR Think Tank, of why you should be a member.
 
You are confirming my opinion based on shooter reports.
Remington has resurrected an old design and hamstrung it by cheap manufacture to sell it beside off brand pistols of the same size and caliber.
I think people would have paid more and complained less if it were of the same quality as their own R1.
 
Wow, Barnbwt, thank you for the work, the photos and the numbers, and the description of how it works.

I wanna like this gun. It does fit my hand well. I guess we'll all be waiting and seeing what Remington does with this.
I like atleast one other person here am noticing that cycling the weapon does tend to smooth out the roughness of the action .... so I have a smidgen of optomism left. ;)
 
Disconnector:
Here we get to probably the most complicated and trouble prone aspect of the mechanism. Disconnectors are always a difficult part of FCG design, since they operate based on the violent energy released by the cartridge, but act upon delicate trigger group elements tied directly back into the user's finger. Done wrong (CZ52) and they will beat the hell out of your finger tendons --trigger slap. Done right, and internal parts will shift to deactivate the trigger/sear interface in such a way that it is undetectable. Done really wrong, and the sear won't disconnect (hammer follow or out of battery events)

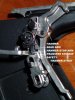
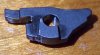
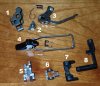
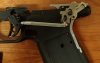
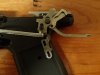
The disconnector (#1, "disco" if you're into the whole brevity thing) is a punched and folded sheet metal piece. Incredibly cheap construction for something that is 1) critical to proper/safe function, 2) is wrapped around and dragging over every other part in the fire control group (FCG) in this particular design, and 3) has a very inefficient design in terms of friction and fit-sensitivity. It is roughly U-shaped, two flat faces joined by a bridge at the front, with two very short "hooks" at the bottom, and two "ears" at the top. The ears are rounded cams which are acted on by the slide, the hooks link up with the transfer stirrup to disconnect the trigger from the sear after firing. The whole schma-goigle actually slides vertically on two slotted holes through which the sear and hammer pivot pins pass (much more on this later)

attachment.php


When the slide is fully in battery (or at specific points during the cycle where the action is too far out of battery for the hammer to hit the firing pin) the ears of the disco are not in contact with the slide, and a fairly stiff return spring drives it upward. When is free to move upward, the hooks at the bottom of the disco pull on mating hooks on the transfer stirrup, working to pull that piece upward. The stirrup can only move upward and in front of the sear tail if the trigger is released, however. When the hammer is fully cocked, and the trigger fully reset, the disconncector is fully raised, thus checking the slide is properly in battery and making the gun safe to fire. Once fired, the slide flies back out of battery, and strikes the ears of the disco, forcing it downward along the slotted holes. As the disco shifts down, the hooks on its lower end drive the rear end of the transfer bar down, pushing it off the sear tail. At this point, the action cycles, and the sear re-engages the hammer, without trigger input. Only when the trigger is released can the transfer bar slip back over the sear tail and start the process over.

This concept of knocking the transfer bar off its sear engagemnent to deactivate the trigger is how my CZ52 works, though it is accomplished by a lump on the bar being struck by the slide (hence the slap) rather than by a separate piece. The linear motion of the disco in this gun is why no slap is transmitted; the disconnecting force is perpindicular to your finger's force direction. It's a clever design, probably used in pistols before, and for sure used in some rifles. But, as I'll get into later, it is very dependent on high quality parts, of which the R51 has few, which means the action is less than stellar.

Potential Issues:
-The hooks on the disco are little more than burs. Rough burs. SHARP burs. Not sure what Remington was expecting to happen when you slide raw shorn edges across each other. If these hooks were better defined when formed and were more like little tabs (or whatever the opposite of a rabbet is ) the transfer bar would slide back & forth on them infinitely more smoothly.
-The slotted holes in the disco are stamped rather than machined. I know punches are cheap, but you really need machined surfaces in a fire control group. This is basic stuff. The holes are inconsistently oversize (multiple punch passes formed the slots, the material shifting and deforming a little each time) and the material around them is significantly cratered (dull punches). At least the holes were debured, well, probably because Remington knew the guns would go Kaboom or full auto if they didn't.
-For a part that depends on precisely tracking in a linear path, it is very poorly constrained to this motion. The loose holes allow it to shift/rotate forward & backward to the extent that it looks to a casual observer like myself to be a pivot on an axis further down in the gun, and they also allow it to pivot left to right if the ears are not loaded up by the slide symmetrically (and why would they be on such a loose gun?)
-The disconnector is also very loosely constrained side to side; a good .02" to .05" of play to its sides allows it to both slide to the left and right, and also more importantly allows one side to drop before the other if the ears are struck assymetrically, rotating the part along the barrel axis.
-When, not if, the disconnector does stray from its proper linear path, it readily contacts both other trigger group parts (hammer, sear, transfer bar) and the frame walls with rough, broad surfaces, and sharp bur-covered edges. The barrel-axis pivot is what causes the whole works to bind up almost completely, and is my theory for the stuck guns out there; one ear was a little too tall and got pushed down more than the other side
-The exact angle at which the slide contacts the ears is critical to determining how efficient the slide motion is transferred to the vertical disco motion. If the disco's slots are oversize and it rises too high, the rounded front contour moves up higher, and the slide hits something close to a vertical wall and damages the ears' surfaces or the disconnector itself. Likewise, if the slope is too shallow, it will not drop enough and the hammer will follow. I think that if too much force is applied, regardless of how efficiently it is delivered to move the disco, the action will bind, so it is critical that slop be eliminated as much as possible so the ears don't need to move as much to take it up (and the cam angle can then be as low as possible)
-In its fully raised position, I think the disco hooks actually bind up on the transfer bar between its hooks and the tail portion that pushes the sear tail. If not be design, it is due to the geometric discrepancies from all the burs here.

TCB
 

Attachments

  • Disconnector.JPG
    Disconnector.JPG
    84.6 KB · Views: 2,392
Sounds like the R51 would benefit from a fluff and buff like alot of keltecs.

Or they could quit being so price-point cut-throat and spend a few dollars on critical internal parts, and quit trying to compete with budget polymer pistols.
 
Very nice and thorough write up. Based on your description of the cheapness of the parts, it sounds like the benefits of hand polishing the internals could be substantial but insufficient in turning it into a decent gun.
 
Safety:
The only firing safety besides the disconnector's out-of-battery-event secondary function and the hammer block is the "manual" grip safety. I say manual because it's pretty automatic if you are gripping the gun so as to shoot it. The original Model 51 had a similar grip safety, and I believe the internal function is also very similar. There are many ways to do a safety, but the end goal is to prevent the hammer from falling when it is active, and in this gun that means you interfere with the trigger, transfer bar, sear, or hammer. I don't say 'disconnector' because the one on this gun is so flaky that such a design would be flagrantly unreliable. While the safety does have certain aspects I would prefer were different/better, it seems to be one of the more solid aspects to the gun, which is obviously a very important thing to note (the hammer/sear interface is also very well executed compared to other areas, which is similarly important)

attachment.php


The way the R51 appears to work the safety, is by blocking the transfer stirrup. In a sense, it is very similar to a cross-bolt safety in that it blocks just the trigger, but not the sear or hammer. By blocking the transfer stirrup rather than dropping it out of action, it is locked between the safety and the sear, so the safety effectively locks both (and locking the sear further locks the hammer from any rotation). So while the safety is dependent on a single small notched surface preventing movement of the trigger, it actually does lock up the whole gun.

The safety slides along the direction of the back strap, and downward against a return spring to disengage. This is a good thing, because if you recall, the disconnector moves down when the slide is racked (though the safety spring contributes to disconnector spring weight). If the safety was just a tab on the backstrap lever that moved forward/backward, the gun could not be racked without it being depressed (since the disconnector could not drop) and would actually be very likely damaged in the process (just imagine if you managed to shoot a round and a flinch caused you to lose your grip of the safety at the moment the sear broke; half the trigger group elements would be destroyed just like a gas-engine eating its guts when the timing chain breaks). So given the alternative, the additional sliding piece is a small price to pay. It is an MIM piece as well and has a slot in its back that tracks the hammer strut. An inclined lump on the safety lever pushes a tab on the safety to drive it downward. The safety rides smoothly and correctly along its pins on slotted holes, once again suggesting that Remington should have made the disconnector MIM as well, if quality sheet metal parts are an impossibility.

EDIT: After messing with the bare frame some this morning, a part fell out :confused:. It appears to be the hammer block, so not inconsequential. Still not sure how it stuck in there for so long on its own, though. Anyway, this part is identical in function to the sear tooth; it is spring tensioned to rotate a tooth on its upper end into a catch (the hooked one) on the hammer. Pulling the transfer bar back pushes it and the sear off the hammer simultaneously. When the safety is on, the transfer stirrup is blocked which locks the sear and hammer block against the hammer, and if the sear bent magically disappeared due to a hammer blow, the beefy and extremely positive engagement of the hammer block would prevent it from hitting the firing pin. This part is also an MIM piece, but is finished black for some reason (which is why I didn't see it) unlike the white metal of the others. It's function is a bit harder to position to show in pictures, but I'll figure out way to display it after work today). Sorry for the mis information, ya'll :eek:

Potential Issues:
-Hammer strut is a MIM part, and but unlike all the others has burs and broken tabs sticking off it. Wouldn't be an issue if the safety didn't ride along it on a groove. Doesn't seem to affect function on mine, but I can't imagine it helping
-While the safety is very hard MIM, which is definitely good, the backstrap lever is aluminum. If the safety-camming lugs (two, though mine only has wear on one) on it wears down first (and while it doesn't seem to be wearing much so far, it eventually will wear first) the safety will fail to deactivate. The combination of certain elements failing to "on" and others to "off" can contribute to a worn gun being very unpredictable and hard to diagnose. With the current terrible manufacture, I'm sure it contributes to some safeties failing on, and others off, and others to who only knows what.
-Sliding safeties (and disconnectors) are great and all, but require twice as many pins, more complex shapes, are more prone to misalignment and binding, and have broad surfaces that will generate friction compared to pivoting elements. Just sayin'

Possible Remedies:
-Nicer hammer strut without burs (I swear the MIM parts are the only smooth parts on the whole damn gun, and by far the most accurate)
-Steel bushing in the backstrap lever where it contacts the safety, for wear purposes

TCB
 

Attachments

  • Safety.JPG
    Safety.JPG
    83.9 KB · Views: 2,336
Last edited:
Good work. While you have it apart, blueprint it and let's find a machinist to make some real parts. Seems like we need 3, (trigger, transfer stirrup, disconnect)
 
I greatly appreciate the kind words, ya'll :). Hopefully I get some wheels turning amongst the crowd, and we can get some solutions rolling without waiting for Remington. Does anyone really want to wait for them to get their act together if we don't actually have to? I think of this as a natural disaster; you can either dig yourself out, or wait for the far off promised aid to fix things the way they promise when (they promise) they'll finally get around to helping you. It ain't fair that Remington screwed up probably the one gun design/layout that I'm genuinely excited about, but that doesn't mean it is impossible for me to end up satisfied, even absent their action on the matter. And luckily, since my gun is most of the way to 'satisfactory,' it's an easier job than it unfortunately is for too many others.

"Remington has resurrected an old design..."
It's actually a pretty original design. The Pedersen concept is the same, but the bolt design is completely different. The Model 51 had a BREN-like bolt, the R51 a FAL-like bolt. There's a reason the FAL replaced the BREN ;). The presence of totally new machining methods to make everything is also quite the departure, even if the mechanics may or may not be the same (my Model 51 knowledge is very limited). It is actually very clear there was a concerted effort to keep the layout/manual of arms identical to the original, while changing every single geometric feature that makes the gun.

"...and hamstrung it by cheap manufacture to sell it beside off brand pistols of the same size and caliber.
I think people would have paid more and complained less if it were of the same quality as their own R1."
Perhaps. I would have. But how well would a new and unproven, not to mention totally unfamiliar, design stack up in the "I want something easy and predictable that I understand already" market of 'name brand' 9mm's? The Steyr GB was an extremely good pistol by all accounts (the ostensibly un-licensed Rogak debacle notwithstanding) that was doomed essentially because the new cool kid Glock was basically a low-rent Hi Power/SIG action with some fancy new materials*, that did the same thing; big double stack 9 with lots of bullets :D. The Boberg is an exceedingly well made gun using not only an innovative design, but cutting edge (pun) 5-axis machining in its manufacture. Not surprisingly, the cost is commensurate, and there are few takers, though more every day. I'm sure not ready to tie up a grand on one yet, though (maybe when I start conceal carrying, and learn to hate big guns, I'll rethink that stance ;) )

"...quit trying to compete with budget polymer pistols."
Though I hate them, too, if Remington has a brain in their head they will make a poly-frame version with steel reinforcements (use the same molds to make steel-reinforced aluminum frames for version 2.0 :cool:). Too many people expect plastic for them to pretend there is no demand for it. The most common non-QC complaint besides "IT NOT SQUARE. IT UGLY" seems to be that the gun is heavy for its size/capacity, which is true when you logically stack it against Shields and what all.

"I wanna like this gun. It does fit my hand well. I guess we'll all be waiting and seeing what Remington does with this."
Well, it did take them 8 years to enact the latest recall...so I'm not very hopeful on a rapid response that isn't just to shred the first batch of guns (and I refuse to shred a gun that can be redeemed). Any near-term action will surely be direction from corporate offices to cut all losses; kill the program, recall the guns, and pretend the whole affair never happened. Nothing likely to follow, I wouldn't think.

*New materials are trusted more quickly than new designs, since users don't really have to understand how they work ;)
 
"While you have it apart, blueprint it and let's find a machinist to make some real parts. Seems like we need 3"
I'd be worried about stepping on Remington's (litigious) toes, and incurring the wrath of their lawyers. So I'll instead just measure the critical dimensions and design a new part from scratch that fits, and is better in every way while I'm at it :D.

So now we're reduced to installing American-made compliance parts into already American-made guns :p. At least we'll be set when Taurus buys out Remington and moves operations to Brazil :evil:. I kid :D. To be honest, I see this as not too dissimilar from the kind of development the 1911 got over the course of decades; they were loose, rattley, rough guns frequently with feeding, timing, and full-auto issues from various makers/abusers throughout the decades, and only recently ('70s or so, I've been told) were developed into the diamond-mythril-plated target-tuned excellence we expect now.

TCB
 
One of the things I really want to know is why the trigger changed for the pre-production solid trigger that in all photos looks clean and well made (and produced no complaints of wobble), to the skeletonized lumpy, bumpy wobbly dipped in paint thing that shipped. I think if we know that, we may know why the other parts are so pooly made.

I'm guessing the pre-prod models were made in Remington machine shops and not on the Para production line. And I'm also guessing there is some real internal conflicts at play between Remingtion and Para.
 
I see this as not too dissimilar from the kind of development the 1911 got over the course of decades; they were loose, rattley, rough guns frequently with feeding, timing, and full-auto issues from various makers/abusers throughout the decades, and only recently ('70s or so, I've been told) were developed into the diamond-mythril-plated target-tuned excellence we expect now.

Production guns yes, but the Gold Cup/National Match models were punching holes in paper well before the '70s. Jim Clark was winning championships with the 1911 in the '50s and he was just the first civilian to do it. Military shooters were doint it earlier.
 
Oops!

So, I missed a part. The hammer block safety fell out of the gun this morning! :D :D Not sure how, but it stuck around in there for a good 12 hours after its pivot pin was punched out. Anyway, it appears very similar in function to the primary sear, but obviously engages the hammer later in its swing and has a much bigger engagement surface, so if the primary fails or jars off, the hammer is halted right before the firing pin (this is the 'half cock' we feel if the trigger is released and the hammer pulled back). If feels super positive, like a half cock, because the return spring is really heavy (unnecessarily so, it seems).

TCB
 
Need new pics of the parts now. :D

I can get the pins holding the grip safety out, but the trigger, hammer and sear pins are another matter.

I'm still trying to get a pin to drift. I've heavily peened my brass starter punches without budging a pin. I'm not sire I want to go to steel starters. Probably going to have to rig up a jig and use a press.
 
I see this as not too dissimilar from the kind of development the 1911 got over the course of decades; they were loose, rattley, rough guns frequently with feeding, timing, and full-auto issues from various makers/abusers throughout the decades, and only recently ('70s or so, I've been told) were developed into the diamond-mythril-plated target-tuned excellence we expect now.

Uh, no.
The 1911 when manufactured as designed was neither loose, rattley, nor rough.
The only feeding "issue" was when somebody substituted nonstandard ammunition.
The only full auto "issue" I ever saw was with cheap knockoffs or basement gunsmithing.
Any such complaint as you see about the R51 was resolved by Mr Browning or Colt before the public or the Army got the finished product.
Nowadays the paying customer and the warranty clerk are the testers.
 
Nowadays the paying customer and the warranty clerk are the testers.

It's a model taken from the consumer software industry. Just substitute tech support for warranty clerk.

The way I see it, the design is solid and I suspect the prototypes were as well. I suspec the internal parts were MIM or machined. Then the production engineers were told to cut the production costs which they did by using stamped parts wherever possible. Add a poorly cast and skeletonized trigger at the last minute, and what you see is what we have.

I've heard reports (or maybe just rumors) that the long turnarounds being seen on warranty returns is due to REm waiting on a new batch of internals. Maybe they are cleaning up the stampings, maybe they are changing processes. Or maybe they don't know which way to go and are just sitting on the returns until they can figure out what to do without losing too much money.

I called Remington CS to inquire about a replacement for a pin I lost (the top pin holding the safety). They have no spare parts as yet so I either make a pin myself or send in the gun. The CS guy was having trouble getting my data entered into the syetem. Part of the conversation went like this:

RemCS: Sorry it's taking so long, this new system is acting up.

ME: Been there.

RCS: We paid a lot of money for this, you'd think it would work.

ME: Yeah, that's what I thought about my gun.

RCS: pause.... Oh, right.

I'm still looking for the pin.
 
barnbwt,

How do the materials and manufacturing technique of the R51 FCG parts compare to a Glock? At first glance the Glock parts do not appear robust enough but yet have proven to be. Even if the stock R51 parts are not sufficiently robust, it appears they can be made so. Please give us the benefit of your opinion.
 
Last edited:
barnbwt Great photos and explanations of parts and there functions. Even with the extra hide away part. Makes me wonder how this pistol could ever have made it to production but can see how its cost was so low . Thanks for the great info. Now lets hope some one at para can upgrade a few parts and works out the bugs on the top side and run a couple 5000 round test on production pistols.
 
"It's a model taken from the consumer software industry."
Our beloved Google and it's marketing of alpha/beta 'secret-squirrel sneak peak for only the special customers' garbage code, if I recall correctly. I'm sure others did it, too, but Google made the unfinished version of stuff 'cool.' Tom Sawyer would be proud ("paintin' this here fence is just sooo fun, you have got to try it" ;) )

That said, I am enjoying myself immensely painting this fence for Remington, but I am under no illusions regarding the situation, and I obviously understand others' reluctance to play the game.

"How do the materials and manufacturing technique of the R51 FCG parts compare to a Glock?"
The first, and only, time I took apart a Glock, I broke it --I kid you not-- within about five seconds. Put the 'ol guide rod in backwards because I was chatting with the owner at the time. The slide went back on pretty much as easily as it came off initially, but there was no way in hell it was ever coming off again :D. Much gnashing, bashing, and swearing later, the gun came back apart, but so had the guide rod. In the end, my pal got a shiny new stainless steel guide rod, and I learned a valuable lesson about how idiot-proof perfection can be :p.

Relating to the R51...
To be honest, the frames were probably about equal, giving the edge to the Remington since it is truly machined as a unit, whereas I do not know if Glock finish machines it's reinforcements to size once they are molded in, or if they are just jigged into place before molding. If the latter, I can imagine greater variance, gun to gun. The slide was surprisingly gritty and rough, more than any pistol I'd messed with up to that point. Due almost entirely to the sharp edges of the weirdo flat coil spring skating over the soft/rough plastic guide rod. The metal guide rod helped tons, but you could still feel a lot of friction. I am told this is normal. There's probably not much use comparing the FCG internals, since the Glock is striker fired, and is therefore both inherently simpler in design and wildly different. I suspect it could get away with looser tolerances without issue, too. I do recall the trigger safety was cheaper in construction than the trigger, and I have noticed this is the case with all trigger-lever drop safety guns I've bothered to mess with.

"Or maybe they don't know which way to go and are just sitting on the returns until they can figure out what to do without losing too much money."
My money's on this one (literally) which is why I won't bother sending it back unless I find reason to believe the design irredeemable or impossible.

I believe a number of changes have already taken place, though;
-Preproduction guns had a solid trigger. There was also early confusion as to whether the trigger pivoted or slid. Since the trigger does nothing but push the transfer stirrup straight back, there is no reason it could not be a sliding trigger. Ergo, I believe the original triggers slid, but that this made the gun less drop safe (drop on the grip safety; it depresses, trigger/linkage continues back on its own momentum --muzzle up discharge :eek:)
-Pins were incredibly tough to move, and heavly stippled on one end (LHS in my case; don't even try drifting them out the wrong way since you'll break the internal MIM pivot holes). Early reports had loose hammer/trigger pins. Now, the only non-stippled (and laughably loose) pins are those trapped by the grip panels.

TCB
 
You guys will like this photo. All FCG elements sans the disconnector for clarity, including the amazing Houdini hammer block:

attachment.php

I'm pretty sure that spring doesn't go there; It drives the sear into the hammer, and the tail bears on a little hook on the disconnector to drive it upward, otherwise there's nothing pulling the stirrup upward in front of the sear/safety levers when it resets. The alleged 'hammer block' is also attached for your pleasure. I have no idea why it is the only part finished black (something tough, too, there is nearly no wear on it despite all the dry firing). Most of the unanswered questions remaining stem from the gun basically exploding when the stippled pins are removed. Particularly the pin right next to the hammer pivot, which has (1, 2, 3, 4...) four different parts moving around on it.

My initial assumption about the safety blocking the transfer stirrup was only half-true. When the safety block is raised, it's fingers slip behind the sear and hammer block tails, preventing them from moving back. There is very little trigger take up before these parts move, so the transfer stirrup & trigger are effectively blocked (it's hard to tell by mocking the loose parts up on the outside of the gun, but there might be a third surface that stops the transfer stirrup tail, as well). It's a pretty thorough design, hinging on the truth that if you deactivate the hammer, the gun cannot fire. Obviously this omits muzzle-down discharges, but that's what the long travel and heavy return spring of the firing pin are for. This gun would require hundreds of G's of acceleration to bring that pin in contact with a primer. A muzzle up discharge I think is the more likely scenario, owing to the safety being on the back strap, and the trigger parts' momentum in that direction moving them towards 'fire'. A hook on the safety block that snags the transfer bar and prevents it from moving down if the trigger is pulled before the safety is depressed would fix this (since the trigger has a much lighter spring return than the safety) but would lock the gun momentarily if the user pulled the trigger without the safety depressed.

Currently, if you load the trigger, the gun will fire if you then press the safety. Personally, I think this situation, while better for getting a shot off in less than ideal circumstances (because if you squeeze the trigger hard enough, you will eventually squeeze the grip hard enough to press the safety properly), is counterproductive to good shooting. With the reports of people somehow pinching themselves on the safety with each shot, it is obvious that some people manage to release the safety under recoil (a mystery to me, but it explains that complaint, and also can explain locked up slides and triggers ;) ). If you do release the safety under recoil, when you go to squeeze the trigger again there's a good chance it's still blocked from firing the gun, and the shooter will tend to squeeze harder. As they do so, they both jerk the gun off target, and set the gun off later than they intended, which could easily be interpreted as a hang-fire malfunction of the fire control group (as easily as some people claim they can release the safety while shooting, I strongly suspect some of the 'delayed fire' claims stem from the person pulling the trigger, flinching, and finally releasing the safety block with the flinch).

If the safety actually hooked onto the trigger if it were pressed and not the safety, the shooter would be frustrated (probably flinching and shaking the gun like crazy as their hand progressively clamps onto it) until they relaxed the trigger and squeezed the safety properly. The only time I got the trigger to pull before the safety was when I was not shooting --and not expecting the gun to recoil-- and specifically when I tried to pick up the gun into shooting position with my finger on the trigger. If you draw the gun with your finger off the trigger like you're supposed to, the safety will always deactivate before you can poke it into the guard.

TCB
 

Attachments

  • P4220028.jpg
    P4220028.jpg
    138.2 KB · Views: 2,236
  • P4220029.JPG
    P4220029.JPG
    35.2 KB · Views: 78
Last edited:
There was also early confusion as to whether the trigger pivoted or slid. Since the trigger does nothing but push the transfer stirrup straight back, there is no reason it could not be a sliding trigger. Ergo, I believe the original triggers slid,

The confusion was just that, confusion. Confusing the Model 51 and the R51. About the only thing they share is the Pedersen action and a similar model #.

The Model 51 trigger slid like the 1911. Pedersen's original patent called for a pivoting trigger like the R51, and all of the pix I have seen of the pre production solid trigger models have the trigger pivot pin.
 
Ah, but pivot pins on this gun are just as likely (more likely, in fact) to serve as guides for slotted holes ;). I think you're probably right, though it still makes me wonder.

What's funny, is the sear/hammer/stirrup arrangement is almost identical to a 1911's except that the safety sear notch is caught by a hammer block, rather than beating the crap out of the primary sear. BTW, the initial stage of the trigger pull comes from pushing the hammer block out of the way (and it remains in contact with the stirrup throughout disconnection, so you almost don't need a trigger return spring) and the short second stage is pushing off the actual sear. I wonder as well if you could simply 'pin' the transfer bar to the tail of the hammer stop, so it is pushed and pulled by the trigger, and at that point have only the sear spring and positive sear engagement contributing to the trigger pull (the trigger would still be fully returned and block the hammer when the safety is released and the safety block slides upward into the FCG parts, but the first trigger stage would have zero weight). I think it would still function the same; only disengaging when the trigger is pulled, and otherwise blocking the hammer if the trigger and safety are released; just dependent on safety position, more than trigger pressure.

TCB
 
Status
Not open for further replies.
Back
Top