Creaky_Old_Cop
member

Thousands of dollars invested in reloading equipment. ALL of it paid back over and over after 25 years of match shooting.
Daughter who lubes and sizes all my cast projectiles....PRICELESS

Last edited:
 My "Man Cave"


it is a crime that photobucket is allowed or was allowed to take away what they promised or said was free... a lot of forum threads have been decimated by their actions. I pullwd all my photobucket pics and will have nothing to do with them ever again...
Hi Dan,Regarding "I also found a guy in the UK who makes inserts", could you provide some contact info?I would like to see what can be done for my press's.
Thanks
Dan


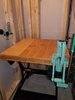
 The “benches” are all converted upright pianos. Very sturdy. Even left the sound board in one as you can see. Total investment for benches = $0.00. All were acquired at various times off of Craigslist. Still need to add that third press and powder dispenser from pic #5. And I need more shelving for the powder from pic #8. But it will come in time. Also need more ammo cans. I have thousands of rounds in bags and boxes that I need to combine into cans. But at this point, I just don’t have the time. I will next year. It’s not going anywhere.
 “benches” are all converted upright pianos.
I’m so going to lose “Guy points” for this. But the idea came from.....
 Haha... that is so cool! Please tell us that your wife found the idea and told you about it though. We'll all feel much better about the whole thing, even if you are lying to us!!!
  So that means two pieces of the 3/4" plywood fill the gap between WorkMate surface and frame. This is why you see a thick front in the pic. I put two pieces of the birch plywood (only about 3" deep for each) underneath the front edge - and they contact the frame quite readily.
Use, replace. Use, replace. But I can tell you honestly that if my reloading setup didn’t have its own dedicated room, it wouldn’t look as good as it does. And by some accounts, it’s still messy. Having enough storage so everything has a place is crucial. But a clean reloading setup, is a vital step in having a safe reloading setup.man, most of you guys are so much more organized than i am. i try and try but just cant seem to keep mine clean and neat. not a skill i grew up with. props for all the clean benches.