The Remington R51, Explained

Status
Not open for further replies.
IIRC Remington has a huge debt load, correct? It's likely why they don't have new machinery and continue to make things a bit less well than they could. I worked in a CNC shop, part of a larger operation. It was true for us, marketing could sell a job easier than we could make it. One example was an all aluminum fire truck - simple to bend and weld, right? Nope, it takes special tooling to bend step tread aluminum, we never got good results from using generic, worn out universal dies that allowed the material to crawl around under stress. Even less helpful was the lack of any gripping backstops to control the sheets in a press brake. We had a high reject rate, and then, in welding, things got worse. You can't easily reconfigure welders set up for galvanized sheet steel and operate them with that crew, it takes a learning curve that was apparently too steep. We lost the contract in months.

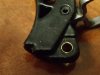
I see those decisions reflected in this tear down. Remington has likely converted machines set up for the ACR - which isn't moving along well at all. Those parts made from punches could well be universal turret press tooling that was already used on a lot of other stuff - a side cut down the length of the disco can be done with repeatedly hitting it with a long rectangular punch, and it will leave overlapping burrs, same for curves and inlets. Holes for pins can be the same punch some other part uses on another gun. No guarantee much of any new tooling was used, that's the entire point of all the changes. Minimize the costs.

I think it shows. Which goes to the Corporate decision makers simply going for the least costs because they can't make any other decisions. Cerberus took it out of their hands. In fact, although we tend to bash Remington, I have to ask, how much of this is in their purvey? Cerberus calls the shots and allows them to spend or not spend money.

If anything, the contract for 24,000 M4's is getting all the juice it needs to be a money maker. Any reject in that endeavor has huge consequences.
 
Tirod said:
Which goes to the Corporate decision makers simply going for the least costs because they can't make any other decisions. Cerberus took it out of their hands. In fact, although we tend to bash Remington, I have to ask, how much of this is in their purvey? Cerberus calls the shots and allows them to spend or not spend money.

I think your analysis is probably pretty accurate. The R51 is a Remington design carrying the Remington brand, but is is made in the (former?) Para USA plant. And Para was in pretty bad financial shape when Freedom Group acquired it a little over 2 years ago.
 
Last edited:
My Current Status

I purchased my R51 on April 6. As far as I can tell, I am the only one to own one in my county. As of 4/28/2014, I have fired 500 rounds in 4 combined range trips. In 150 rounds on Monday, I could fire 4 consecutive mags without failure on only two occasions. My issues are: FTF on the 6th round of the mag. It lies nose UP holding the slide open. Occasionally the same happens with the 5th and 7th rounds. I have not found any difference in the mags. Occasionally, I will have a Failure to Extract. The empty case will still be chambered and the next round will be nose up. A few times I have found an unfired round on the ground! I'm not sure how that happens.
Due to an injury in my left arm from a motorcycle mishap, I cannot slingshot the slide. I lock it back, insert the mag, and release the slide lock. Mine works perfectly in that manner - just like my Kahr pistols do.
My LGS contacted his distributor who is rather large. The distributor said at least 10 of 12 that have been sold, have been returned to Remington. He confirmed that they were not releasing any more at this time. The distributor said Remington told him the break-in was 500 rounds! That is ridiculous!
At this time, I intend to take it to the range with me each time I go. I will take a box of 50 factory ammo. (I'm not going to add the possibility of another factor by using my hand loaded ammo.) I will fire said ammo until there is a failure. At that time, I will put the little butthead up for that trip. I will clean it and try again next trip.
I will be watching to see when some of the returned R51s have been returned to their owners. When I see that they have been repaired properly, I will send mine in. I am simply not going to send her back to sit on a shelf for goodness knows how long.
Just thought I'd give you an update.....
 
I will be watching to see when some of the returned R51s have been returned to their owners. When I see that they have been repaired properly, I will send mine in. I am simply not going to send her back to sit on a shelf for goodness knows how long.

That is pretty much where I am. I realy want to see if they do anything with the chamber.

Unfired rounds on the ground? Been there. Sometimes it double feeds but I don't know how as I can't repeat it under close observation. But the slide will come back ejecting an empty followed by a live round as the slide returns feeding around into the chamber.

I've always considered 250-500 rounds to be an appropriate count for a break in of any semi-auto, rifle or pistol. Revolvers 200-300, and Bolt rifles 50-100. The only gun I expect to work 100% out of the box is a single shot. ;)
 
The bottom line is that I'm gonna keep this pistol even if it is declared unsafe and they issue a recall. I don't think that will happen, but I'm sure they won't send it back to me if they do. So I'll hold on to her. If the model is discontinued then I will truly have a collector's item!!! And who knows? Maybe 537 rounds is the magic number???
 
I wonder how long this update will take? More than that, I wonder if the update will actually fix the issues people have been having?

I'm going to hold out for it because I think it will be the pistol that will be what I would like to have for carry if they can get it running reliably. I like the size and feel of it quite a bit.
 
I'm not looking for my wifes to come back anytime soon after talking to some no-nothing guy at remmy's CS. All that guy knew was it made it to para 4 weeks ago and nooo idea whats happen in general. If it works well maybe I can find it a new home .
 
I just learned a new R51 'party trick'*! :D The gun be cocked with one hand! Now, this is a party trick, so don't do it loaded, but your four fingers can be placed atop the slide, your pinky at/near the muzzle (my pinky sits on the front sight rather than the actual muzzle), your thumb tip in the small of the backstrap. Grip the slide with your first two finger digits, and sweep your thumb down to lock the slide back on an empty magazine.

Stupid trick (as most tricks are), but certainly something I can't do with any of my other autos, at least, not with my non-Karate-badass fingers :p. Would probably look totally cool with enough rehearsal, though :D

*Disclaimer: party tricks are stupid. never mix guns and parties, or guns & stupidity, or whatever :rolleyes:. Don't be an idiot.

Oh, and the gun continues to get smoother...(still fly-cutter tool marks on the slide rails to polish out, though :rolleyes:)

TCB
 
If that disconnector was just a little smoother... Really. I don't have large hands, and my right thumb is only partially functional, but I can do this with either hand. It's better left handed though. Right handed, my palm gets pinched in the ejection port.
 
I won't be able to try the party trick until I get off of work, but it sounds exactly like how I take down a Glock....grabbing the top of the slide with thumb behind the rear of the grip where the web of the hand would normally be.
 
^^^ That's it. Almost the same grip for taking down the R51. Just have to grasp the slide closer to the muzzle in order to get a full cycle of the slide.
 
Disassembly, Part II:

I took the gun apart once more so I can re-install the hammer safety spring I neglected to put in last reassembly. It's worth noting that its omission had a barely discernible impact on trigger return spring force (nothing a better return spring couldn't do) and greatly improved the disconnector feel. I ran over two hundred rounds without trigger-related issue. So at this point I'm calling the part unnecessary; whatever it does purport to do could be better accomplished by a stronger trigger spring, tighter disconnector holes, and a slightly redesigned hammer safety (to guarantee it is always engaging the transfer stirrup)

I also took the opportunity to polish the dickens out of everything and note apparent wear patterns. Just used a small needed file for coarse stuff, a fine diamond honing steel for smoothing, and strop paste for polishing. Easy peasy.

Wear notes:
-Mag catch button has worn through the anodizing where it slides through the frame; perhaps these parts should have been smooth in finish rather than bead blasted all over
-At this point I'm saying the bolt is too soft a temper. The disconnector is still wearing a trench through the locking lug corner, this is the second time I've had to grind down burs that are raised and threaten to eat into the locking recess in the frame. A sharp punch's corner will snag the flat surfaces of the bolt; far too soft for all the camming/sliding it undergoes.
-The disconnector had a slight bur raised on one side of an ear; hard to tell if it was always there or recently developed.
-Peening of the slide/spring bushing stop on the frame appears to have ceased after I scraped away the first small burs on the sharp corners
-The bolt camming surfaces look the same as ever, and at least don't seem to be getting more gouged by the slide cams. I did notice a bur had rolled into the slot where the ejector blade passes, which I ground out. I suspect it has been there since the first gouging by the sharp slide cam corners
-The various safety bits haven't worn appreciably as I can tell

Polishing notes:
-The MIM sear tip and hammer bent are incredibly dull; like a .01" radius or thereabouts. Likely an artifact of the sintering which rounds off sharp corners. I stropped the tip a teeny bit so it was shiny all over instead of just at the contact point, but did not attempt to re-shape it
-The hammer strut had a ton of burs and sharp/rough corners on the back where the safety block straddles it; these ground/polished pretty easily
-The trigger stirrup was one bit mash of burs on all edges, including those when contact the sear levers and slide over the disconnector. Took quite a lot of filing, grinding, and polishing to get them normal looking. Polishing the sharp corners off the disconnector hooks was really annoying
-Polishing the disconnector was most significant on the flared-out 'rails' which ride on the stirrup. There were .01" burs all along these edges which were buffed out. There is less side-side engagement with the stirrup, but still enough to keep the part from slipping off, and it is much smoother now. I polished the inside flat faces of the disconnector and found the slotted holes were cratered inward significantly and bur-covered, so polishing inside there should help noticeably with binding.

And I think that's about it; about 1/2 hour of buffing. We'll see if it makes a real difference once I get everything back together (all the parts this time). If I find the slide is noticeably harder to rack due to the additional spring, it's goin' bye-bye and I'll make a better trigger return spring.

TCB
 
at this point I'm calling the part unnecessary; whatever it does purport to do could be better accomplished by a stronger trigger spring, tighter disconnector holes, and a slightly redesigned hammer safety

Probably the reason for two springs is to balance the load on both sides of the disconnector. I would think two springs of less power would be ticket rather than just one spring on one side.

Every time I field strip this gun, it has a different feel when it goes back together. Sometimes the slide has less resistance, some times more. Sometimes it is easy to rack immediately after assembly, but the nect day, it may take two to three times as much effort to get it to move.

One thing I noted is that the disconnector ears are angled on top to match the angle of the cut in the slide. But if the disconnector rises too high, instead of bearing on the angled top of the ears, the slide encounters the vertical front of the ear and drives the disconnector backward where it binds on the guide pins before being cammed downward. This is the first resistance taht is felt when racking the slide. The bolt really offers none as it is not being driven into lock, but being pulled by the slide which actually pulls it out of lock. This can be confirmed by pulling and holding the trigger while racking the slide. With the trigger pulled and held, the disconnector is pulled down and out of contact with the slide. The first resistance when racking the slide will be from the hammer, but once that is cocked, there is no initial resistance to the slide.

If the disconnector guide slots are too long at the bottom, the disconnector will ride too high and if the edges of the slots are rough, it will increase the binding. and is probably the main source of the gritty feel. Of all the parts, the disconnector would probably benefit most from greater precision in fabrication.

I'm still not ready to tear mine down completely until I see what Remington is doing with the returns. If they are addressing the problems we (mostly you) have identified, then I'll let them have a go at it. If not, I'll do it myself.
 
Yeah, I noticed what you noticed about the disco ears as well; not nearly enough extra margin on the ramped surface as you'd want to account for variance (especially on a piece as variable as Para made them). The other problem is that the two guide pins it rides on are far down inside the frame away from the ears; makes the torque applied to them (and binding) even worse. I think my concept of growing the ears out to the sides where the solid slide rails are would also have the benefit of better supporting the disconnector since the pins attached to the ears would ride inside slots milled into the frame and hit those before torqueing the guide pins.

I really need to CAD up a concept proposal and throw it up here.

TCB
 
I just reassembled the gun without the disconnector hammer for fun; slide rack is 5-7lbs as you pull it back, and smooth ('smooth' being a relative terms since the slide/rails aren't polished or anything). 5-7lbs consistent as you load up the spring; can't even notice the block being raised in there, it's all the disconnector's fault. I really think we need to develop a fix to keep the disconnector held down for the whole cycle (unless of course, Remington banked on its resistance slowing the slide down to safe levels :p)

TCB
 
barnbwt said:
I really think we need to develop a fix to keep the disconnector held down for the whole cycle

From what I can see, once the slide has depressed the disconnector, the bolt takes over and keeps it depressed until the disconnector rises again when the cutout on either side of the bolt passes over it. This cutout is there to provide clearance for the magazine when the slide is in battery.

Now, the question is, is there some critical function performed by the disconnector rising again once initially depressed? Or is this merely due to the presence of the mag cutouts in the bolt and nothing is compromised by letting it rise? If there is a reason that it needs to rise, any modification that keeps it depressed will compromise this. If not, then your idea may work, but would require extra steps during production.

My gut feeling is that maintaining closer tolerances when stamping the disconnector, followed by deburring and polishing the bearing surfaces inside the guide slots will do a lot. And perhaps further mods such as you propose would be best left for aftermarket tune-ups. OTOH, if you think it would not complicate production and raise production costs unacceptably, rather than post it here, you should send your CAD workup to Remington.
 
Finally, finally got the pistol put back together. I don't know why, but it was an almost impossible pain in the ass to get together this time. Once again, the magazine catch and sear pivot pins are the worst assembly design I've ever seen. I'm not even sure slave pins would help that much (removing the ejector to install the FCG parts would help greatly, but is not practical). Remington must have spent all their manufacturing/tooling budget on assembly jigs and labor.

"Mods" (nothing noticeable so far):
-Bought some 3/32" brass tubing and filed the exterior in a drill until I could easily press it into the oversized trigger hole. 3/32" is still .094" vs. the .093" pin diameter, so it wobbles about 2X as much as my Hi Power, but it's now below 1/16" so at least half was it was originally. Unfortunately, the bushing or the hole are not quite perpendicular so the trigger is tilted to one side, nearly contacting the frame (still contacts if you push it to the left). See attached
-Bent out the trigger return saddle spring so it actually does something; now the trigger returns fully, at the expense of possibly adding a few ounces to pull (not noticeably)
-Sharpened the sear and hammer notches; did not change the angles, just moved the engagement planes back a hair so there was less of a round tip than previously. A few thou at most. Trigger break is now more 'normal' than the brick-like wall of unnecessary positive sear engagement I had previously. Probably 5lb as opposed to 5.5 or 6 before.
-Polished the hell out of everything; stirrup, disconnector, the works
-Re-greased everything (I swear I've used more grease on this thing than my roller-delay STGW57 at this point)

Post-op notes:
-Adding the missing spring definitely increased resistance to dropping the disconnector; the slide now tries (unsuccessfully) to hang near the very end of its travel on the release stroke where it did not before. At least when racking it, the polishing seems to have helped greatly in that it is not much more noticeable than with the spring missing. I attribute the hang on the return to the much-steeper incline on the back side of the disconnector ears (wouldn't be an issue at all if it kept its head down for the whole cycle)
-Polishing the burrs off the hammer strut made the safety much smoother, even though I did not polish the actual camming points on the safety or backstrap

"Now, the question is, is there some critical function performed by the disconnector rising again once initially depressed?"
No. Allowing the disconnector to rise during the cycle accomplishes nothing but allowing the hammer to fall out of battery; no purpose, adds tons of friction/notchiness, and compromises reliability. Believe it or not, the disconnector doesn't even need to be pushed down in the first place since a full trigger pull will disconnect the sear on its own; the ears primarily function as an out of battery safety, albeit a crappy one.

The cuts on either side of the bolt are for the slide cams to ride in, and the underside is angled so the bolt doesn't crash into the feed lips when it tilts down.

"rather than post it here, you should send your CAD workup to Remington."
A corporation as bone-headed as Remington obviously is would never take a suggestion some random dude seriously; my hope is some posters here work in their design division and could pitch it to management as their own idea ;). Not like I have any dreams of working there, or anything (they don't pay engineers nearly enough)

Returning to the trigger 'mod' it is important to note I did not drill or modify the trigger in any way. That is actually how oversize the factory hole was (a good .02" in diameter). Also, can we get a round of applause for "Super Macro"? Huge fan of it, here :D. Were there no chance of me returning this for any warranty work, I'd have drilled the hole out to match the tubing diameter so the bushing would remain more concentric/coaxial (it's not) and to ensure the pivot hole was also perpendicular (it's not). If I were doing this mod for keeps I would also make the bushing wider so the trigger can't slide on its axis side to side (about 1/16" of play currently) and hit the frame cutout. This would require a new trigger return spring with larger loops, though. I'd probably also just make a new trigger out of steel ;)

TCB
 

Attachments

  • P5110055.JPG
    P5110055.JPG
    64.6 KB · Views: 52
Allowing the disconnector to rise during the cycle accomplishes nothing but allowing the hammer to fall out of battery; no purpose, adds tons of friction/notchiness, and compromises reliability. Believe it or not, the disconnector doesn't even need to be pushed down in the first place since a full trigger pull will disconnect the sear on its own; the ears primarily function as an out of battery safety, albeit a crappy one.

That's good. Then it won't hurt to reshape the ears abit to reduce the vertical face contact.

I would also make the bushing wider so the trigger can't slide on its axis side to side (about 1/16" of play currently) and hit the frame cutout. This would require a new trigger return spring with larger loops, though. I'd probably also just make a new trigger out of steel

So much for my idea of using the bushing as a slave pin. Making a new trigger seems like the best way. Doesn't llook like it would be too hard to do. Especially if you used aluminum instead of steel. Why steel, BTW?
 
"Why steel?"
Bluing :D.

"So much for my idea of using the bushing as a slave pin."
The spring appears to be about the same 'quality' as hobby store piano wire. I'll bet making an improved replacement isn't very difficult. You could probably squeeze a filed-down bushing inside the springs without them binding on it when flexed, but the bushing is only .01" thick so it's be really fragile until you got it installed inside the gun.

"Then it won't hurt to reshape the ears a bit to reduce the vertical face contact."
Just be sure you aren't messing with the timing of the system. It's easy to remove enough material that the hammer will drop with the slide further back than we want. Again, the system is so terrible as it is, that I question its actual functionality, but the idea behind what it's doing makes sense.

TCB
 
Just be sure you aren't messing with the timing of the system. It's easy to remove enough material that the hammer will drop with the slide further back than we want. Again, the system is so terrible as it is, that I question its actual functionality, but the idea behind what it's doing makes sense.

No, just take a bit off the front face of the ears so that the vertical face starts below the top of the frame. Otherwise, leave the height of the top and the angles the same.

As for bluing steel, a little Duracoat and an aluminum trigger would look good as new...literally. :p
 
So, chipped up like a cockroach applied it? Or, would you rather have it look good?!
I think the appearance of the original is as much a problem of the unfinished item as the finish itself.

For me, function is primary, appearance is secondary. Steel is heavier than aluminum and the additional weight might affect the function of the springs. The existing aluminum trigger is skeletonized, perhaps out of a need to reduce the weight, so steel may not be functional without new springs. I can fabricate an aluminum trigger easier that a steel one because I have the necessary aluminum bar stock on hand and it is easier to work. As for coloring, there are a number of options, up to and including anodizing.
 
That's a good point about trigger mass; I wonder if drop safety may have been a factor? Because if you drop the gun onto something that pushes the safety in, and the trigger hasn't already dumped all its momentum into the safety block (which is won't if it's too heavy to move quickly), it could still discharge once the safety lever bottoms out and the whole gun comes to a sudden final stop. I'd actually wondered about this the first time I heard of the gun layout, since the safety and trigger movements are opposed and the safety is so big.

The tail of the gun would prevent this in the vast majority of muzzle-up drops, but dropping the butt of the gun onto a rail or ledge could possibly cause the scenario. A lighter trigger would undoubtedly help, at least. Hopefully it's not so critical that a better trigger and beefed up transfer bar would be danger-prone, though :uhoh:. It'd also be possible to bake in a kinetic safety of some sort as well that would interfere with the safety block and prevent its movement when struck from the back.

TCB
 
Status
Not open for further replies.
Back
Top