
You are using an out of date browser. It may not display this or other websites correctly.
You should upgrade or use an alternative browser.
You should upgrade or use an alternative browser.
Lee Pro 1000 Solutions < No Bashing >
- Thread starter LiveLife
- Start date
- Status
-
Not open for further replies.
OP
OP
LiveLife
Member
The posts are awesome. Reading some of them made me realize I am under utilizing my little Pro 1000. 
Keep up the great work everyone!
Problem: Pro 1000 only has 3 holes and I have a 4 die set.
Solution: If you deprime/size and hand prime separately, you can now use the 3 holes for the rest of 4 die set.
Keep up the great work everyone!
Problem: Pro 1000 only has 3 holes and I have a 4 die set.
Solution: If you deprime/size and hand prime separately, you can now use the 3 holes for the rest of 4 die set.
Last edited:
evan price
Member
Problem: Cases from the case feeder sometimes do not go into the shell holder all the way and this causes jams when the case gets stuck between the shell holder and the carrier.
Solution: Adjust the length of the "Z"-bar so that it pushes the case all the way into the notch in the shell plate... The "Z"-bar has a spring-loaded arm on the left press post that tensions the "Z"-bar so don't be afraid to push that shell in there.
Solution, 2: Be sure you have the "Z"-bar in the right hole in the side of the case pusher. One of my case pushers has two holes, one at the rear and one more forward. You want the "Z"-bar in the one more forward.
PROBLEM: The case feeder & tubes flexes when you are really going to town on the press, and this can cause slipped cases at the case pusher, cases to jam at the case feeder rotary collar, etc.
Solution: I put an old wooden ruler in the middle of the case feeder tubes, and added some Duct Tape to make a bundle. Now it's pretty stiff and no more swinging around.
Problem: Case feeder "jumps" in the middle of the horn, and the case gets out of position/falls over
Solution: Take the carrier off the press and look at the horn with a straight edge. Often if a case falls over and is not noticed, it gets crushed under the top of the press. This will cause the horn to deform, twist, or get a divot mashed into it.
You can straighten the horn by careful application of a small crescent wrench to twist it back into shape. You can remove burrs and divots with a fine file, or I use one of the emory-boards with foam inside my wife gets from the nail salon. Use the case pusher by hand to feel for where it sticks and then make it smooth. A bit of lubricant on the sides of the horn where the pusher slides will make it better, but try not to lube the top of the horn where the case slides, if it is too slippery here the cases are more likely to fall over.
qrashandburn
Member
- Joined
- Mar 10, 2010
- Messages
- 3
It's the resizing die to be sure, the brass was brand new and so was the die. Also I isolated the problem to resizing by only running one at a time.By the way,
It is very often the expanding die that gets stuck, not the sizing die. Make sure the plug in your expanding die is very smooth and clean; polish it if it has a rough surface.
If you find that it is the sizing die, it might help to clean the die and tumble the brass (I know you always do this, but double check to make sure).
Last edited:
mdp75
Member
My wife and I can size and prime 1000 cases in about 1.5 hours on my two single stage presses. I then dump the primed cases in the tubes. move the expander powder charge to station one bullet seating to station 2 and lee FCD to station 3 and then its nothing but finished rounds 1000 rounds in 3 hours is not uncommon.
Hondo 60
Member
Bunch of great posts! Please keep it up.
Lee made a kit to convert the 3 hole turret press to a 4 holer. Why can they do the same with the Pro 1000?
I know I'd buy the kit. Just think of all the shell plates & turrets they sell!
Lee made a kit to convert the 3 hole turret press to a 4 holer. Why can they do the same with the Pro 1000?
I know I'd buy the kit. Just think of all the shell plates & turrets they sell!
OP
OP
LiveLife
Member
Problem: When depriming, spent primers don't always go into the hole of the base to be collected.
Solution: Cut a 5/8" x 1 7/8" piece out of cardboard/aluminum sheet and roll into a semi-circle channel. Place the piece into the primer channel of the ram curved side out. Slowly work the ram to make sure the bottom of the channel clears the base lip of the ram hole. Now, all the spent primers fall into the hole for collection.

Solution: Cut a 5/8" x 1 7/8" piece out of cardboard/aluminum sheet and roll into a semi-circle channel. Place the piece into the primer channel of the ram curved side out. Slowly work the ram to make sure the bottom of the channel clears the base lip of the ram hole. Now, all the spent primers fall into the hole for collection.
Attachments
bloominonion
Member
- Joined
- Feb 4, 2011
- Messages
- 132
I know this is a somewhat old post, but I specifically joined this forum after much lurking about just so I could add my .02 on the Lee Pro 1000 since I can't find these ideas anywhere else.
1) Disassemble the shellplate carrier and use a brass wire brush in a Dremel to polish the cartridge ejection port, where the shellplate contacts the carrier, as well as the bottom of the shellplate, and the rail the bullet feeder slides on. (Just be sure to go slow and gentle, continually checking for ANY heat buildup or you can start to screw up the surface and make it rougher.) You can take it a step further and use a cloth polishing wheel with some polish for a mirror like finish.
Then lube everything with powdered graphite, work it into the surfaces, and blow any excess graphite off the surfaces.
This will make everything move like it is riding on ball bearings.
2)If you have the bullet feeder attachment, add a small washer around the screw it rides on to increase the surface area to prevent binding. Lube the contact surfaces of slider and screw/washers with powdered graphite, working it into the plastic. Tighten screw down, then back off 1/2 to 1 full turn (basically till the assembly moves smoothly with no binding).
3) Attach bullet feeder assembly to the frame of the loader to allow switching of shellplates with dies already setup. (Do this step only if you are mechanically inclined, and you can order the plate that the feeder assembly bolts through from Lee for $5 to prevent messing up the one you have)
Major lesson learned so far is: Lube everything with powdered graphite as it won't become sticky, build up with dirt or grime.
Mike Kerr
Member
Welcome to the HighRoad Bloominonion. That was a great first post - very informative. I'll look forward to seeing more of your posts. I joined just after the Forum started in early 2003 but like you I lurk and read more than I post because I learn more that way.
Regards,
Regards,
bloominonion
Member
- Joined
- Feb 4, 2011
- Messages
- 132
Forgot to add one.
Problem: Bullet feeder assembly not consistently placing bullet/moving up too soon (or just generally not performing well)
Solution:
1) See my above post about washer and graphite lubrication.
2) Add a counterweight off the very tail end of the bullet feeder assembly. You can either use a hook with a weight tied to it, or drill a small hole through the edge of the feeder (the lowest part of the little incline) and put a nail through it, and hang weight off that. I used a 3" diameter zinc pulley.
Bullet feeder will become MUCH smoother with these modifications. It became a whole new thing for me.
Lost Sheep
Member
Primers dropping while installing the tray
Take a piece of universal custom tool stock. (That's a shade-tree mechanic technical term for "paper clip")
Straighten out one loop. (The rest of the paper clip should remain curled up for easier handling)
Bend 1/8" of the end of the straightened loop down, perpendicular to the plane of the rest of the un-straightened paper clip. This is now the "Primer Block". The loopy part is called the Handle" and the straight part between the Primer Block and the Handle is called the "Shaft".
Place the Handle of the tool flat on the cover of the primer flipper tray with the primer block sticking down into the primer exit ramp of the flipper tray so that the primers are blocked from exiting the flipper tray.
Now, you can insert the primer flipper tray into the primer feed ramp in a leisurely manner without losing any primers.
If the Primer Block is slightly longer than necessary, the shaft of the tool will be slightly raised up from the flipper tray cover and easy to grasp when you want to remove the tool.
If you want to interrupt loading, just insert the tool between two primers (off to the side, you probably don't want to stick the tool right into the primer cup).
Lost Sheep
There's an easier way to keep the primers from falling out too soon.Problem:
Dropped primers when installing tray to chute.
Solution:
Drill a 1/16" hole in the cover to the primer tray right at the exit point and use a bent paperclip to hold back the primers when installing the full tray to the chute.
Take a piece of universal custom tool stock. (That's a shade-tree mechanic technical term for "paper clip")
Straighten out one loop. (The rest of the paper clip should remain curled up for easier handling)
Bend 1/8" of the end of the straightened loop down, perpendicular to the plane of the rest of the un-straightened paper clip. This is now the "Primer Block". The loopy part is called the Handle" and the straight part between the Primer Block and the Handle is called the "Shaft".
Place the Handle of the tool flat on the cover of the primer flipper tray with the primer block sticking down into the primer exit ramp of the flipper tray so that the primers are blocked from exiting the flipper tray.
Now, you can insert the primer flipper tray into the primer feed ramp in a leisurely manner without losing any primers.
If the Primer Block is slightly longer than necessary, the shaft of the tool will be slightly raised up from the flipper tray cover and easy to grasp when you want to remove the tool.
If you want to interrupt loading, just insert the tool between two primers (off to the side, you probably don't want to stick the tool right into the primer cup).
Lost Sheep
That sounds smiler to mine.Take a piece of universal custom tool stock.
Lost Sheep
Bruce Lytle
Member
- Joined
- Feb 17, 2011
- Messages
- 4
Just found this thread, a lot of good information. I've already done some of the above in the week or so I've had it, about the only thing I haven't done it lube it all with graphite. I've got a 5# can of it that I've had for 15 years or so, finally something to use it on!
I'm waiting to reload more rounds till I get my micro-adjustable charge bar, bullet feeder and case collator. With all the time on my hands, I've been playing with some idea's.
For one thing, I notice that the turret goes up and down a bit when cases go into their dies. My thinking says this is not a good thing, as far as stuff jamming, bullet seating depths, case expansion, you know... So I've shimmed up under the lugs of the turret with feeler gauges (for now) to take the slack out. This way the turret is in the same position every time. I've ran a few cases through it and all seems to be working ok. I could be wrong, (about the movement being bad) but I've always thought "tight is right" when it comes to dies and fixtures.
OP
OP
LiveLife
Member
Bruce Lytle, welcome to THR.
For me, running a few hundred cycles through the Pro Auto Disk with W231/HP38 sufficiently coat and lubricate the moving surfaces. I use W231/HP38 in all new Pro Auto Disk setup as my "break in" powder.
One thing that will affect the final dimensions of case neck flare (expansion) and bullet seating (But this applies to all progressive presses), is when you have less than full shellplate (say 1 case vs 3 cases) applying even pressure on the shellplate, there will be some deflection (tilting) of the shellplate to very slightly vary the case neck flare/bullet seat depth. I always set the bullet seat depth with station 1 resizing a case and station 2 flaring the case neck as seating the bullet alone in station 3 produced different seating depth. Of course, each time you check the bullet seat depth, you need to use another unsized case in station 1 and unflared case in station 2 so as to apply pressure on the shellplate as reusing sized and flared cases would not apply the same pressure on the shellplate.
Another thing is that you'll notice some variations in bullet seat depth of your finished rounds ever so slightly (say around +/- 0.0005" or more). This is normal for cases that have been reloaded several times as case length will not be the same. Different length cases will affect case neck flare amount and bullet seat depth.
I would recommend you use the press without any shimming. If you are curious, make some test rounds (with same length cases) and see if the "play" makes any difference you can measure.
For me, running a few hundred cycles through the Pro Auto Disk with W231/HP38 sufficiently coat and lubricate the moving surfaces. I use W231/HP38 in all new Pro Auto Disk setup as my "break in" powder.
This play is not a problem as the final dimensions for case expansion (flare) and bullet seating depth are determined always with the shellplate carrier pushing upwards with the bottom of the turret lugs engaging the top lugs of the frame - so the amount of play has no effect. You having shimmed under the turret simply engaged the lugs sooner, but this may pose a problem explained below.For one thing, I notice that the turret goes up and down a bit when cases go into their dies. My thinking says this is not a good thing, as far as stuff jamming, bullet seating depths, case expansion, you know... So I've shimmed up under the lugs of the turret with feeler gauges (for now) to take the slack out. .
Actually, having some "play" between the turret and the frame has its benefits. Some reloaders experience shaving of case sides when alignment between the sizing die and shellplate is not straight. Pro 1000's play allows self-aligning of case/shell plate to sizing die/turret as the case enters the die opening.This way the turret is in the same position every time.
One thing that will affect the final dimensions of case neck flare (expansion) and bullet seating (But this applies to all progressive presses), is when you have less than full shellplate (say 1 case vs 3 cases) applying even pressure on the shellplate, there will be some deflection (tilting) of the shellplate to very slightly vary the case neck flare/bullet seat depth. I always set the bullet seat depth with station 1 resizing a case and station 2 flaring the case neck as seating the bullet alone in station 3 produced different seating depth. Of course, each time you check the bullet seat depth, you need to use another unsized case in station 1 and unflared case in station 2 so as to apply pressure on the shellplate as reusing sized and flared cases would not apply the same pressure on the shellplate.
Another thing is that you'll notice some variations in bullet seat depth of your finished rounds ever so slightly (say around +/- 0.0005" or more). This is normal for cases that have been reloaded several times as case length will not be the same. Different length cases will affect case neck flare amount and bullet seat depth.
I would recommend you use the press without any shimming. If you are curious, make some test rounds (with same length cases) and see if the "play" makes any difference you can measure.
Bruce Lytle
Member
- Joined
- Feb 17, 2011
- Messages
- 4
I understand what you are saying about the "alignment" clearance. I was working with it the other day, trying to get the OAL right for a load and found that the best I could do without the shims was +.003 -.0005 with 10 rounds. I am aware of the different pressures on the shellplate, and was using "used" cases like I was normally loading, just didn't put in any primers or powder using the same pressure, ensuring that I'm at full travel each stroke. With the shims I was getting +/- .0005. All of my cases measure .888", well a couple are .887. They've been fired once. I have some I've fired twice, they've gone to .890 - .891". All are R-P cases.
OP
OP
LiveLife
Member
Out of curiosity, what bullets were you using? Depending on the bullet types used (jacketed, plated, lead, moly coated lead), I have noticed difference of variations in OAL produced. Keep in mind that as such, some variations are inherent to progressive presses.
All in all, some very slight variations won't affect your shot group accuracy enough to matter. For match grade reloads, I try to improve the consistency as much as I can, but there's a point of diminishing return.
For pistol loads, powder charge consistency variation of less than 0.1 gr and clustering of bullets by same weight produced the most significant return on accuracy. I found other factors such as different head stamp cases, very slight OAL variations and primers produced less significant return.
You may experience erratic drops with the adjustable charge bar for lower pistol charges with certain powders. Although W231/HP38 drops very accurately for me in the Auto Disks, I have hard time making it drop consistently for charges below 5 grains. Some have reshaped the chamber of the adjustable charge bar with some success and can post their experience.
Bruce Lytle
Member
- Joined
- Feb 17, 2011
- Messages
- 4
Currently I'm using 185 gr Hornady XTP's, Loading them to 7.0 gr of bullseye, with a COL of 1.230". I'm waiting for a micro-adjust charge bar, as the auto disk's are impossible to get certain charges, even with 2. I figured the micro-adjust will do more than the double disk kit, simpler, and cost less.
Pete D.
Member
- Joined
- Sep 13, 2010
- Messages
- 2,658
Just saw this thread. I had been downstairs loading up .45 ACP cartridges..and...yep....I use a Pro 1000. I have two (.44 and .45)
The best buy in progressives (and I own two Dillons also).
The press has loaded two thousand rounds so far this year....that puts it at over 60K rounds since I bought it. I had to replace the plastic rachet gear twice.
Spent primers. The press is screwed to a wooden bench. Before I mounted it, I used a hole saw to cut a two inch diameter hole in the bench top. I installed the press over that hole. I could mount a can or a jar but, instead, I put duct tape over the hole on the bottom of the bench. When the base gets full, I hold a plastic container beneath the hole and remove the tape.
I use the micrometer powder bar for my loads - it is set for 4.0 grains of Bullseye and that is what it drops, year after year.
I use a case feeder but not a bullet feeder. Since I have to put a bullet into each case anyway, if a case is not sitting properly in the shellplate, it is a small matter to put it in with the flick of a finger.
Very few problems. Keep the primer tray full and there are even fewer.
Pete
OP
OP
LiveLife
Member
I will try to resume the thread's format.
Problem: auto disk's are impossible to get certain charges
Solution: I buy extra Auto Disks and drill them out for in-between drop charges. Whenever I am at gun shows, I look for them and usually pick up a 4 disk set for around $5. A new set is $11.
Problem: auto disk's are impossible to get certain charges
Solution: I buy extra Auto Disks and drill them out for in-between drop charges. Whenever I am at gun shows, I look for them and usually pick up a 4 disk set for around $5. A new set is $11.
Pete D.
Member
- Joined
- Sep 13, 2010
- Messages
- 2,658
prob
Solution: Use Lee's adjustable charge bar.
Pete
Problem: auto disk's are impossible to get certain charges
Solution: Use Lee's adjustable charge bar.
Pete
OP
OP
LiveLife
Member
Problem:
This is an update to post #32 to address the pesky problem of spent primers not going into the press base chute for collection. This time, for good.
Solution:
The cardboard stock worked well, for a while, but the edges swelled and I replaced it with a piece from an aluminum can. Since I really like the way Classic Turret captures spent primers in the plastic tube, I also shaped a small plastic funnel from the dollar store to collect the spent primers into a tube.
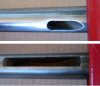
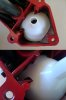
First, the easy part. Picture below shows an older Pro 1000 ram on top with a smaller spent primer drop cutout that has a sharper angle that worked about 90% of the time. The newer ram on the bottom shows a larger cutout that has less sharp deflect angle, but still works only about 95% of the time. To capture 100% of the spent primers, we need a cover to direct the spent primers into the press base chute.

The cover is made from 1.75"x0.75" piece of aluminum can. I used a regular metal scissors to make the cut and a plastic coat hanger to apply the roll. The cover is inserted into the ram hole and pressed into the slot. Leave 1/2 inch opening at the bottom for spent primers to exit. Operate the ram lever slowly to ensure the bottom part of the cover clears the base. Now, essentially 100% of your spent primers should make it into the chute. Spent primer fouling may build up inside the ram. If so, pull off the cover by lifting at the bottom and replace after cleaning.


If you already have a system of collecting spent primers that you are happy with, you can stop here. If you want to collect spent primers into a tube, then go to Part 2.
This is an update to post #32 to address the pesky problem of spent primers not going into the press base chute for collection. This time, for good.
Solution:
The cardboard stock worked well, for a while, but the edges swelled and I replaced it with a piece from an aluminum can. Since I really like the way Classic Turret captures spent primers in the plastic tube, I also shaped a small plastic funnel from the dollar store to collect the spent primers into a tube.
First, the easy part. Picture below shows an older Pro 1000 ram on top with a smaller spent primer drop cutout that has a sharper angle that worked about 90% of the time. The newer ram on the bottom shows a larger cutout that has less sharp deflect angle, but still works only about 95% of the time. To capture 100% of the spent primers, we need a cover to direct the spent primers into the press base chute.
The cover is made from 1.75"x0.75" piece of aluminum can. I used a regular metal scissors to make the cut and a plastic coat hanger to apply the roll. The cover is inserted into the ram hole and pressed into the slot. Leave 1/2 inch opening at the bottom for spent primers to exit. Operate the ram lever slowly to ensure the bottom part of the cover clears the base. Now, essentially 100% of your spent primers should make it into the chute. Spent primer fouling may build up inside the ram. If so, pull off the cover by lifting at the bottom and replace after cleaning.
If you already have a system of collecting spent primers that you are happy with, you can stop here. If you want to collect spent primers into a tube, then go to Part 2.
Attachments
OP
OP
LiveLife
Member
Collecting pesky spent primer Part 2.
For years, I simply cut a hole on the bench top to collect spent primers into a container/trash can. Although this worked and I even mounted a small square baking pan to slide under the bench, I didn't like a mound of spent primers going off the bench whenever I removed the press off the bench.
I shaped a small plastic funnel from the dollar store using metal scissors/utility knife and attached it to the same size tube as the Classic Turret (Funnel drain tube was cut to increase the hole the primers would fall through and match the size of the tube). Now spent primers are collected into a container through the tube for easy disposal/recycling.
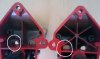
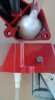
Left is an older Pro 1000 base with only one reinforcing rib in the middle. On the right is a newer Pro 1000 base with more extensive reinforcing ribs and the funnel cutouts needed to clear these reinforcement ribs. White circles show where the spent primers fall through.

Plastic funnel cut shape:

Plastic funnel with cutouts clearing the reinforcement ribs:

And with collection tube attached:

For years, I simply cut a hole on the bench top to collect spent primers into a container/trash can. Although this worked and I even mounted a small square baking pan to slide under the bench, I didn't like a mound of spent primers going off the bench whenever I removed the press off the bench.
I shaped a small plastic funnel from the dollar store using metal scissors/utility knife and attached it to the same size tube as the Classic Turret (Funnel drain tube was cut to increase the hole the primers would fall through and match the size of the tube). Now spent primers are collected into a container through the tube for easy disposal/recycling.
Left is an older Pro 1000 base with only one reinforcing rib in the middle. On the right is a newer Pro 1000 base with more extensive reinforcing ribs and the funnel cutouts needed to clear these reinforcement ribs. White circles show where the spent primers fall through.
Plastic funnel cut shape:
Plastic funnel with cutouts clearing the reinforcement ribs:
And with collection tube attached:
Attachments
Last edited:
evan price
Member
Tip 'o the hat to ya, BDS! That's nice.
codefour
Member
I know the initial thread title was "no bashing". But why does every LEE thread have to start with "no bashing"..??
RCBS, Hornady, and Dillon threads do NOT start with "no bashing"..
LEE makes some good products but some products just require too much work to make them work as the other offerings..
I am not bashing LEE, but everything they make besides simple reloading products, i.e. dies etc, require too many mods to work..
Yes, I will keep my few LEE die sets, but will avoid there other mod requiring products.
I did not write this as a LEE bashing, but there are other product lines that offer a lot more..
- Status
-
Not open for further replies.
Similar threads
- Locked
- Replies
- 46
- Views
- 11K
- Locked
- Replies
- 200
- Views
- 35K
- Replies
- 19
- Views
- 4K
- Replies
- 13
- Views
- 1K