Lee Pro 1000 Solutions < No Bashing >

Status
Not open for further replies.
3 to 4 hole conversion

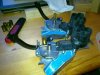
Thank you all for your responses. I bought the Lee 1000 sight unseen and was told it looked like it was brand new and it indeed does. When I received it, it was in a box and the head wasn't on it and I didn't realize there were only three holes in the head. Never the less, it was bought worth the money and I can use it as a dedicated press for 45 ACP using it with either 3 or 4 holes. I do prime all my cartridges using a RCBS universal hand primer and prefer priming in that manner. I also do have 2 SS presses and a 6 hole turret press and have exclusively used RCBS in the past. I do have a Lee crimping die for 45 ACP and find it easier using it to crimp with and would like to continue using it. My introduction to reloading was back in 1963 using a plastic hammer and a Lee die loading 243 and soon there after a Mec loader for shotgun shells and I was hooked.

I would still be most interested to hear how anyone who has done the 3 to 4 head conversion either liked or disliked it. I don't really want to reinvent the wheel, I just want to see if I can make it a little rounder.

John
 
Call--or e-mail--Lee for the specific parts list.

However, given my experience with having converted the older Turret (the design similar to the Pro 1000, and with which you would functionally end up), I would recommend you simply straightaway purchase one of the new Classic Cast 4-hole turrets.

They are superior designs in many ways, and then you would have the benefit of having access to both your Pro 1000 and a 4-hole Turret.

Jim H.
 
OK, since I did some more powder drop tests to verify powder drop weight consistency, I'll add to this thread from the "Working DIY Micro Auto Disk" thread (more in-depth discussion of modification process in the link) - http://www.thehighroad.org/showthread.php?t=741988

Problem: I need smaller powder charges than what the smallest Auto Disk hole (.30) will drop.

Solution: Modify the disk hole by drilling and using a screw.

Details of mod - I used a Phillips head brass screw (#10-32 x 1/2") and a drill bit to make the hole (Drilling a smaller pilot hole will help). As discussed in the DIY thread, I used a longer screw (1.5") chucked in a drill to reshape and polish the tip to reduce powder bridging but if you are using Bullseye/W231/HP-38, I found this is not necessary (reshaping was done for Titegroup which has rougher textured surface and caused powder bridging). Using the screw size indicated above, I got following consistent powder drops verified on my Ohaus 10-10:

Bullseye down to 1.5 gr
W231/HP-38 down to 2.0 gr
Titegroup down to 2.8 gr and 2.5 with tip modification


Brass screws used (make sure the head is smaller than the thickness of the disk or use a set screw to clear the bottom of hopper)

attachment.php


.30 disk hole drilled and tapped with brass screw

attachment.php


Screw adjustment shown at 3.0 gr W231/HP-38 setting

attachment.php


Smaller screw head than the thickness of the disk allows for clearance during cycling (can also use set screw with no head)

attachment.php


Before/after comparison pictures of longer (1.5") brass screw chucked in the drill to reshape/polish the tip

attachment.php


Comparison picture showing cone, dome shaped tips next to unmodified brass screw (modification of tip was to better meter Titegroup down to 2.5 gr and not necessary if using Bullseye/W231/HP-38)

attachment.php


Comparison picture showing screw tips inside the .30 Auto Disk hole

attachment.php
 
Last edited:
As always... great Job bds.... Looks sweet

Ill for sure do This next Time I need to adjust Just a Bit more

Thanks


Stav
 
Problem: Adjustable charge bar throws inconsistent charges, light (50% or so) charges, or completely empty charges.

Solution: Due to its design, the charge bar will not throw small charges, or even medium charges accurately - especially with flake powders. Simply build up the front area of the charge bar with epoxy and it will throw charges as consistent as the auto-disk. I just put painters tape on the bottom of the bar, put JB weld in the cavity, and painters taped the other side. Sandwiched the cavity with popsicle sticks and put it in the vise to cure. The tape came right off, and only minor trimming was necessary. Note that this will make the cc measurements incorrect, you will need to figure out the charge volume by trial and error.

chargebar.jpg

I didn't invent this fix, but it took some looking around to find it. It works very well. Also, make sure your hopper is on correctly - it can be reversed, which causes inconsistency. With the hopper empty, and the chain in the "down" position, look through the charging hole, it should line up with the cavity. If you do this with an unmodified adjustable charge bar, you will see the problem with the design.

I found this fix here: http://forums.loadmastervideos.com/forums/viewtopic.php?t=582
 
Will that mod work with the Classic Turret?
Im not sure I totally understand why that would work...maybe if I knew the problem with the design I would understand better. The charging hole's shape doesnt match the charge bar's?

I just got a lot of 380 cases so Im quite interested in throwing some smaller charges. Had to dip 80 rds worth of Zip by hand today because I couldnt get it to throw what I needed.


EDIT: I understand now, after reading site linked above.
 
Last edited:
I went to home depot and loaded up on some supplies..trying Maxxhavoc's mod. Wish me luck, Im not always the handiest of fellas! Will update.


Im trying the easiest option first, I think it has about a snowballs chance in hell of working properly. This was just felt with adhesive on the back, like you stick to the bottom of your dining room chairs to keep the floor from getting scratched. Pretty sure powder will stick all into it and it wont work very consistently...only took about 5 seconds though.

Some people have used epoxy putty, and I will use that if this doesnt work..which means I will probably be using the epoxy putty in a sec:)

Well, the premise of that definitely worked. Im going to use the epoxy though because I dont think the felt will hold up long term and there was a throw here and there that wasn't consistent. I have no doubt this mod will work though, I was throwing 2.9 gr 5 and 6 times in a row, with a powder that I couldnt even get to register on the scale yesterday... Thanks for the tip Maxxhavoc.
 

Attachments

  • download.jpg
    download.jpg
    31.9 KB · Views: 61
Last edited:
FYI, make your boundries fairly stable/firm as once epoxy/JB Weld hardens, it is very hard to work with. Some have used Bondo/body filler with some sucess as it is easier to shape/sand to reshape the chamber after it hardens.

I think the key is getting the finished slide surface as smooth and flat as possible for the polymer wiper at the bottom of the hopper to make good sliding seal with. If the finished surface is rough, you may experience premature wear of the wiper.
 
Before you sand, I would use masking tape over the other surfaces to protect from the sanding.

If you need to smooth/polish the adjustable chargebar surface, I found burnishing with plain copy paper works quite well. Fold a clean copy paper several times (to protect the chargebar from surface uneveness), lay on flat surface, grip the charge bar well and rub/slide quickly on the paper surface with slight pressure.

The friction from the paper will apply a smoothed surface to almost polished finish.


BTW, I also use folded copy paper to burnish/polish damaged primer feed attachment surface to allow primers to slide easier again (scroll down to last 2 pictures) - http://www.thehighroad.org/showthread.php?p=7877744#post7877744

attachment.php


Picture on the left shows damaged attachment surface and picture on the right shows new attachment surface next to repaired/burnished surface (if the attachment surface cannot be repaired by burnishing, I replace the attachment).

attachment.php
 
It would be nice if Lee wood just machine a new part, or aka fix the design flaw. And I dont think design flaw is to strong a statement here.

But you guys got me scared talking about sanding stuff and damaging wipers!
 
Last edited:
Problem:
I want to decap before tumbling.

Solution:
Turret with universal decapper only and case feeder with collator on a pro1000 are the fastest decapping press I've ever seen and used.


Problem:
When changing shellplate carriers, the case pusher keeps falling off.

Solution:
Put an empty case or dummy round in station 2 (priming/powder) and just hook the Z-bar around it.
 

Attachments

  • 8ytydybe.jpg
    8ytydybe.jpg
    138.9 KB · Views: 76
To make my adjustable charge bar work I went the JB weld method, using the plastic 15min epoxy, but still let it totally cure overnight. To get the overage off the top and bottom I used a razor blade to shave it down til it was virtually even, then used a combination of small files and fine sandpaper to finish it off. After testing several different powders dozens of times, and loading a few hundred rounds I am totally happy with the results. Only downside is having to spend a little extra time in trial and error getting the proper charge when I switch powders or calibers since the numbers on the charge bar are meaningless now but its totally worth it to be able to fine tune my loads.

7E8153E4-40D9-4647-8C6E-74252EA316DF.jpg

Now looking down into the hopper there is a cavity for powder even when the charge bar is adjusted all the way down to its smallest position, which was not there before the modification.

6791F8D1-86F2-4540-8C9B-66E5010A6EFD.jpg
 
Nice pictures dave333. Reminds me of another tip.

The powder hopper is not symmetrical. I helped one reloader out by demonstrating that to him. He was getting inconsistent drops because his hopper was on backwards. It can "kind of" work when it is on incorrectly, but the best way to see what is correct is by looking into the cavity like dave's picture above.
 
This isn't specific to the Pro 1000 or Loadmaster, but it is specific to the double disc kit for the powder measure. I found that when using the double disc I could remove some of the powder variation by using some electrical tape around the circumference of the disks, one or two complete passes. I hold the disk together to make sure they are as straight as possible, this eliminates the movement in the stacked discs and seemed to tighten up the spread when loading 24.5 grains of H335/WC844.
 
ljnowell, a bullseye match shooter who never used the Pro 1000 asked me to help him setup his Pro 1000 for the first time on this thread - http://www.thehighroad.org/showthread.php?t=761231

A big "Thank you" to all those who contributed to this support thread. Success of ljnowell demonstrating "never used" Pro 1000 before newbie to smoothly reloading 1000 rounds without issues could not have been achieved without the combined input from other Pro 1000 users.

Great job THR Pro 1000 owners! You deserve a pat on the back!


Following is the summary of steps/mods/QC measures that were taken to ensure smooth reliable operation of the press that could be used as a "pre-flight" checklist for Pro 1000 before each reloading session:

- Lube the metal-to-metal contact surfaces with oil/grease and wipe off excess

- QC: Brace a used primer tray against the top frame to fully seat shellplate carrier on the ram before tightening with allen wrench while ensuring primer attachement pin is inside one of the column grooves (may wrap zip ties to better "shake" primer tray to fill chute with primers)

- Install 3-hole turret without dies

- QC: Lube the center hex/action rod with a drop of oil on finger tip (and relube as necessary during reloading session) and check index timing (shell plate should click into station before carrier reaches bottom)

- QC: While watching the priming rod, move the case sensor until rod drop with a "click" - If not, check case sensor spring is not riding the bottom of priming rod and correct spring position

- Make a spent primer ram slot cover from aluminum can to better capture spent primers

- Install and adjust dies with Pro Auto Disk without hopper using clean/tumbled cases and a dummy round (no primer/no powder). Lower ram lever halfway to unlock auto index. Rotate shellplate clockwise to adjust length of dummy round to determine max/working OAL/COL

- Lube Pro Auto Disk hopper wiper with fine graphite powder/number 2 pencil lead.

- QC: Install disk/hopper and bead chain/spring with the shellplate carrier and Pro Auto Disk fully retracted to avoid inconsistent powder fill of disk hole

- Using CCI/Winchester/Magtech primers will feed better than slightly larger cup Fiocchi/Tula/Wolf primers or prepare to get resistance workout seating primers

- Make a cover (paper or clear plastic) to keep primer attachment free of falling debris/powder granules

- QC: Fill hopper with powder and unlock the hopper (turn counterclockwise) - Drop several charges until consistent using auto index unlock feature - lightly tap hopper 10 times with finger to settle bulky/flaky powders

- Run a case through the progressive steps to ensure proper operation of the press and finished dimensions. Don't hesitate to push up hard on the lever to seat primers

- QC: Run finger tip over the seated primer to ensure it is seated at least flat and preferably slightly below flush

- Install case feeder and ensure feeder body does not catch/rub top frame

- For 380/9mm cases, use a penny with .22LR case in the case collator to prevent flipped case

- QC: As resized case activates the case sensor, keep an eye on the column of primers to drop to push a primer into station #2. If the column of primer does not drop, tap on the attachment/primer tray or manually push the column down to push a primer into station #2

- QC: Measure dimensions of several rounds loaded in progressive mode for consistency with all stations loaded

- Refill primer attachment when top of column is just below the top

- Refill hopper with powder when 1/3 full

- Relube center hex/action rod with another drop of oil if shell plate index becomes less smooth

- At the end of the reloading session, turn off hopper (turn clockwise) and drop several charges until no powder drops (use auto index unlock feature) and dump powder back into container

- Wipe press clean with a paper towel
 
Problem: powder spills into primer feed ramp when the powder feed station is empty.
Solution: get the regular auto disk powder feeder instead of the pro model. In the standard model, the powder drop is actuated by the brass case instead of the up and down cycle of the tray.
For some reason, the standard auto disk powder feeder throws much more accurately and consistently than the auto disk pro model.
 
Problem: Primer attachment won't feed right and primers keep jamming, preventing the shellplate from rotating.

Solution: Continued from post #67 - http://www.thehighroad.org/showthread.php?p=7877744#post7877744

Repost from another thread - http://www.thehighroad.org/showthread.php?p=10116166#post10116166

Elkins45 said:
Lee Pro 1000 I didn't know what it was like to just expect a primer would appear in the correct spot and not be sideways or upside down.
Primer showing up sideways/upside down on Pro 1000 is preventable. It requires proper shell plate timing, clean primer attachment slide surface free of debris, attachment full of primers, properly installed attachment so pin rides the grooves on support rods to shake the primer tray, properly installed case sensor spring and preventing powder granules from falling onto the attachment so the priming rod can drop down fully - http://www.thehighroad.org/showthread.php?p=7877744#post7877744

jmorris said:
That covers just about everything for sideways/upside down, I guess the "correct spot" is controlled by the shell plate/case fit?
There's one more factor to Pro 1000 feeding primers reliably - primer cup diameter.

I have found CCI/Winchester/Magtech SP/LP primers to work best with Pro 1000 primer attachment due to the diameter of the primer cups.

Fiocchi/PMC SP and Tula/Wolf LP primers have slightly larger primer cup diameters and can be a challenge, especially with once-fired brass with tighter primer pockets.

With S&B/RWS 9mm once-fired cases, even using Winchester/Magtech primers is a challenge and using Fiocchi/PMC primers is a no-go. I now cull once-fired S&B/RWS cases and hand prime S&B cases separately. S&B cases that have been fired multiple times is less of an issue (probably from enlarged primer pockets).

When new reloaders to Pro 1000 have trouble with primers not feeding reliably, I substitute primers with CCI/Winchester/Magtech primers and presto, the primers start feeding reliably.
 
Problem: Spent primers build up underneath the press base

Solution: Find a small plastic bottle, such as vitamins or pharmacy medicines are sold in. Find a hole saw that is about the same size as the inside of the bottle. Drill a hole in the lid of the bottle so that you have a ring that threads onto the neck of the bottle. Unbolt your press from your work surface. Use the same hole saw to drill a hole down through the work top. Use super glue, screw, small nails, or whatever method you choose to secure the lid/ring to the underside of the table. Now you can screw the bottle on and off of the lid/ring under the table. Spent primers will collect in the bottle for disposal, so you don't have to unbolt the press to clean under there.


http://www.titanreloading.com/press-accessories/titan-primer-chute

I bought one and it is easy to install works prefect!
 
Springfield0612 said:
http://www.titanreloading.com/press-accessories/titan-primer-chute

I bought one and it is easy to install works prefect!
I am glad someone finally made a product that will collect pesky spent primers into a tube like the Classic Turret.

But I am not sure if the product will fit the bases with multiple ribs (looking at the picture on their website, looks like it won't). The dollar store funnel mod I did will fit both types of bases - http://www.thehighroad.org/showthread.php?p=7561860#post7561860

attachment.php

attachment.php

attachment.php


BTW, using the ram slot cover mod will direct 99.9% of spent primers into the collection hole at the base - http://www.thehighroad.org/showthread.php?p=7884861#post7884861

attachment.php
 
Last edited:
Lee Pro 1000 Ram slipping

Problem: Ram becomes decoupled from shell plate carrier on the down stroke after resizing. Even though they are carbide dies they require enough effort to resize to decouple the ram sometimes.

Solution: I reload . 38 Special and 9 mm. I find that if I clean my brass in an ultrasonic cleaner, then rinse them thoroughly with water, after the last rinse, I lather my hands with soap, and rub the pile of cases to coat all of them with soap. Then they go to the top of my furnace for drying. After they are dry, they have a thin film of soap which greatly eases resizing effort. The small amount of dry soap which gets in the case mouth has no effect on the powder charge.
 
Status
Not open for further replies.
Back
Top